Aller au contenu principal

Raptor X Axis Linear Rail Install

Ce dont vous avez besoin

  1. Raptor X Axis Linear Rail Install, Preparing / Disassembly 1a.: étape 1, image 1 de 3 Raptor X Axis Linear Rail Install, Preparing / Disassembly 1a.: étape 1, image 2 de 3 Raptor X Axis Linear Rail Install, Preparing / Disassembly 1a.: étape 1, image 3 de 3
    • After moving Z to 250mm above the bed and removing filament, Power Off, Power Cables UNPLUGGED!

    • Remove printhead, DB15 cable, and control box and set aside.

    • You will need access to the back of the machine as well as the front. Give yourself enough room to rotate the machine if not work all they way around. Another tip is to place a piece of cardboard on the build surface to use a place to work.

    • If you have access to compressed air, blow the machine off. Use this time to clean the machine and give yourself good lighting to look over all the components thoroughly.

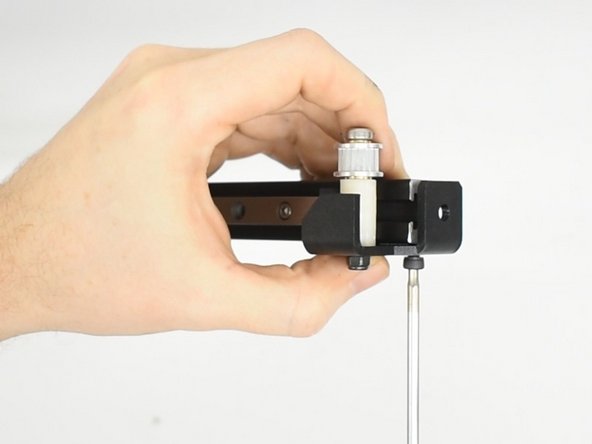
    • Using a 8mm open end wrench, loosen the bottom inner wheel eccentric locknut. Back it off a few turns.

    • Using a 7mm closed end wrench hold the nylock nut on the front of the X/Z bracket and loosen the eccentric wheel shaft with the M2.5 hex.

    • Fully remove both lower inner wheels. They will not be used.

    • 3 points is superior to 4 in this case.

  2. Raptor X Axis Linear Rail Install, Disassembly 1b.: étape 2, image 1 de 3 Raptor X Axis Linear Rail Install, Disassembly 1b.: étape 2, image 2 de 3 Raptor X Axis Linear Rail Install, Disassembly 1b.: étape 2, image 3 de 3
    • The X Axis assembly is attached to the X/Z trolleys with 4 M4 cap screws and T nuts.

    • Unplug the X End Stop then the X Motor (this can be done before or after X Axis removal depending on your access)

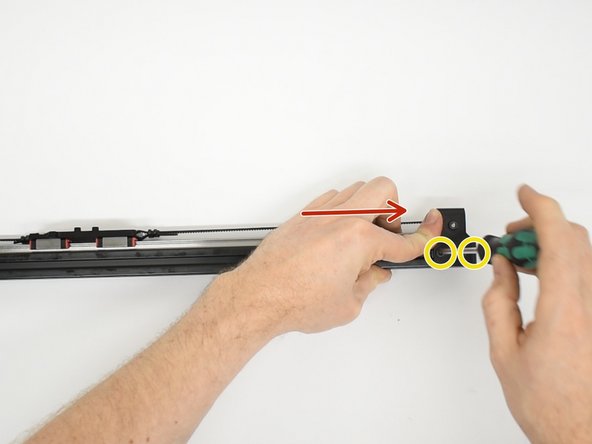
    • Remove the assembly by loosening the cap screws from the back of the machine. The T nuts just need to align parallel to the slot.

    • Hold on to the X Axis assembly with one hand. If not, it will fall onto the bed.

    • Be sure the X Motor is unplugged

  3. Raptor X Axis Linear Rail Install, Unboxing the Linear Rail: étape 3, image 1 de 3 Raptor X Axis Linear Rail Install, Unboxing the Linear Rail: étape 3, image 2 de 3 Raptor X Axis Linear Rail Install, Unboxing the Linear Rail: étape 3, image 3 de 3
    • Move to a clean surface, wash your hands, etc.

    • Use a knife to open the box and remove the foam bundle. There are rubber bands to keep it all together during unboxing. Remove the rubberbands and set aside. Please repurpose them.

    • Remove the top foam to reveal your Linear Rail Upgrade! You should have received everything needed to install the upgrade.

    • 1 Assembled Linear Rail Upgrade

    • 1 X Carriage Plate

    • 1 X Axis Idler Assembly

    • 8 of M3x4 SHCS (socket head cap screw)

    • 1 printed motor pulley spacer

  4. Raptor X Axis Linear Rail Install, Assembly 1a.: étape 4, image 1 de 3 Raptor X Axis Linear Rail Install, Assembly 1a.: étape 4, image 2 de 3 Raptor X Axis Linear Rail Install, Assembly 1a.: étape 4, image 3 de 3
    • If you haven't already, clean the X Motor, bracket and pulley

    • With M2 hex, loosen the motor pulley set screws and insert the printer spacer under the pulley.

    • With the pulley flange facing down and pinching the pulley spacer firmly, position one set screw to align with the machined flat on the motor pulley shaft and tighten that one first. Then, tighten the second set screw.

    • Install the X Axis Motor / bracket onto the new 2020 frame with the pulley facing up when the linear rail is facing forward. The end stop should be facing to the right.

    • Install the X Axis Idler Assembly by aligning the T nuts parallel to the slot and pushing it in until it stops. With an M3 hex, run the screws until they start to tighten but leave final tightening for later.

    • If you have difficulty, loosen the M4 cap screws a couple turns to give clearance for the T nuts to fit easier.

  5. Raptor X Axis Linear Rail Install, Assembly 1b. Install the X Carriage Plate: étape 5, image 1 de 2 Raptor X Axis Linear Rail Install, Assembly 1b. Install the X Carriage Plate: étape 5, image 2 de 2
    • Install the X Carriage Plate. Using an M2.5 hex, start all 8 cap screws a couple threads before tightening any then tighten in an X pattern

    • Make sure the carriage moves smoothly in both directions in full travel.

  6. Raptor X Axis Linear Rail Install, Assembly 1c. Install the X Belt: étape 6, image 1 de 3 Raptor X Axis Linear Rail Install, Assembly 1c. Install the X Belt: étape 6, image 2 de 3 Raptor X Axis Linear Rail Install, Assembly 1c. Install the X Belt: étape 6, image 3 de 3
    • You will need a minimum of 4 cable ties, a pair of needle nose pliers and a pair of flush cut pliers.

    • Formbot Raptor owners will only reuse the X Motor/ bracket. Vivedino Raptor 2 owners will reuse the X Motor/ Bracket and X belt.

    • Route one end of the belt through the front of the belt slot on the X Carriage Plate and fold over about ½”. Using a cable tie, secure that end in place, making sure the teeth on the belt mesh together to hold tight.

    • Run the belt around the opposite side pulley and back to the open slot repeating the process, this time pulling the belt tight with your hands or needle nose pliers before securing with a cable tie.

  7. Raptor X Axis Linear Rail Install, Assembly 1c. Install the X Belt cont.: étape 7, image 1 de 3 Raptor X Axis Linear Rail Install, Assembly 1c. Install the X Belt cont.: étape 7, image 2 de 3 Raptor X Axis Linear Rail Install, Assembly 1c. Install the X Belt cont.: étape 7, image 3 de 3
    • The belt should be slightly loose at this point.

    • Loosen the bolts to the X Idler assembly and while pushing it away from the frame, tighten the screws. This step can be repeated once on the machine to hold things more securely and final tension the belt.

    • Add a second cable tie to both sides next to the others.

    • Move the X Carriage Plate back and forth. It should be nice and smooth.

    • The belt should spring back when you push on it now. It can be final adjusted when the new X Axis assembly is installed on the machine.

  8. Raptor X Axis Linear Rail Install, Assembly 1d. Attaching the X Axis: étape 9, image 1 de 3 Raptor X Axis Linear Rail Install, Assembly 1d. Attaching the X Axis: étape 9, image 2 de 3 Raptor X Axis Linear Rail Install, Assembly 1d. Attaching the X Axis: étape 9, image 3 de 3
    • Plug the X Motor back in

    • Make sure the T nuts are still in place and parallel to the X Axis

    • Install the new X Axis Assembly

    • While holding in in place, tighten the right outside cap screw and make sure it clamps the assembly in place before letting go.

    • Repeat for other 3 screws

  9. Raptor X Axis Linear Rail Install, Assembly 1d. Attaching the X Axis cont.: étape 10, image 1 de 3 Raptor X Axis Linear Rail Install, Assembly 1d. Attaching the X Axis cont.: étape 10, image 2 de 3 Raptor X Axis Linear Rail Install, Assembly 1d. Attaching the X Axis cont.: étape 10, image 3 de 3
    • There are 4 cap screw/ t nuts securing the X Axis in place. Using an M3 hex key, you can tighten the 4 screws (inner and outer + left and right)

    • You can line the right side (idler) so it is flush with the X/Z bracket.

    • For Extruder assembly, refer back to HERE

Conclusion

Next, you will need to assemble and install your extruder/ hotend setup.

Tiny Machines 3D

Membre depuis le 11/16/19

2 970 Réputation

14 tutoriels rédigés

Équipe

Tiny Machines 3D Membre de l'équipe Tiny Machines 3D

Community

5 membres

40 tutoriels rédigés

0 commentaires

Ajouter un commentaire

Nombre de vues :

Dernières 24 heures : 0

7 derniers jours : 0

30 derniers jours : 1

Total : 412