Aller au contenu principal

Razer Blade Stealth 2017 Fan Replacement

Ce dont vous avez besoin

  1. Razer Blade Stealth 2017 Fan Replacement, Battery: étape 1, image 1 de 2 Razer Blade Stealth 2017 Fan Replacement, Battery: étape 1, image 2 de 2
    • Before you begin, be sure to turn off your laptop and discharge the battery down to 25%.

    • Use a Torx T5 screwdriver to remove the eight, 3mm screws on the bottom cover of the laptop.

    • Whenever you remove screws from the device, remember to save and label them.

  2. Razer Blade Stealth 2017 Fan Replacement: étape 2, image 1 de 1
    • Remove the bottom cover of the laptop by sliding it away from the hinge.

    • Do not force the cover up!

  3. Razer Blade Stealth 2017 Fan Replacement: étape 3, image 1 de 2 Razer Blade Stealth 2017 Fan Replacement: étape 3, image 2 de 2
    • Use your fingernail to pry up and disconnect the battery from the motherboard.

  4. Razer Blade Stealth 2017 Fan Replacement: étape 4, image 1 de 1
    • Use a Phillips #00 screwdriver to remove the six, 5mm screws securing the battery.

  5. Razer Blade Stealth 2017 Fan Replacement: étape 5, image 1 de 2 Razer Blade Stealth 2017 Fan Replacement: étape 5, image 2 de 2
    • Remove any tape attached to the battery.

    • Use the plastic spudger to pry out the battery.

  6. Razer Blade Stealth 2017 Fan Replacement, Fan: étape 6, image 1 de 2 Razer Blade Stealth 2017 Fan Replacement, Fan: étape 6, image 2 de 2
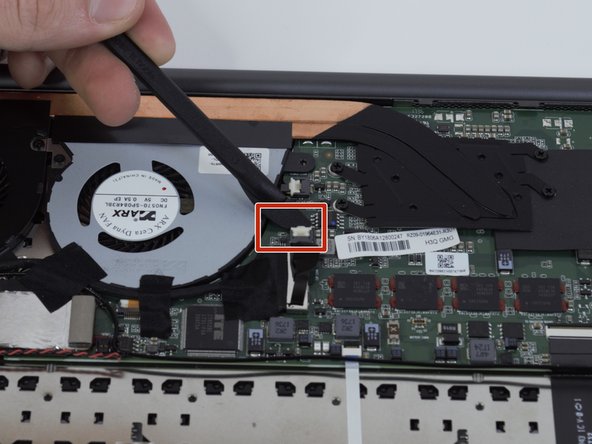
    • Use a plastic spudger to lift the white clasp on the fan connector.

  7. Razer Blade Stealth 2017 Fan Replacement: étape 7, image 1 de 1
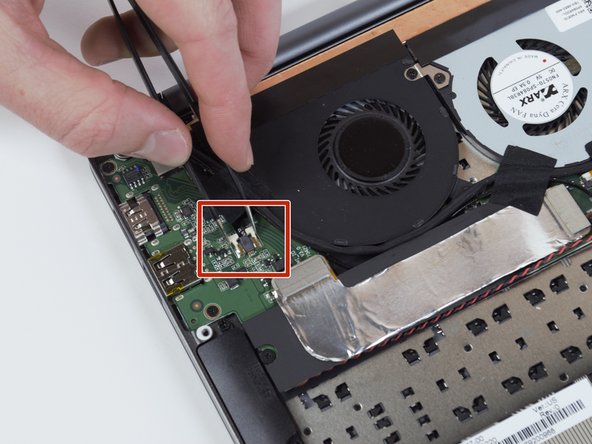
    • Use tweezers to pull the fan cable out of the opened connector terminal.

  8. Razer Blade Stealth 2017 Fan Replacement: étape 8, image 1 de 3 Razer Blade Stealth 2017 Fan Replacement: étape 8, image 2 de 3 Razer Blade Stealth 2017 Fan Replacement: étape 8, image 3 de 3
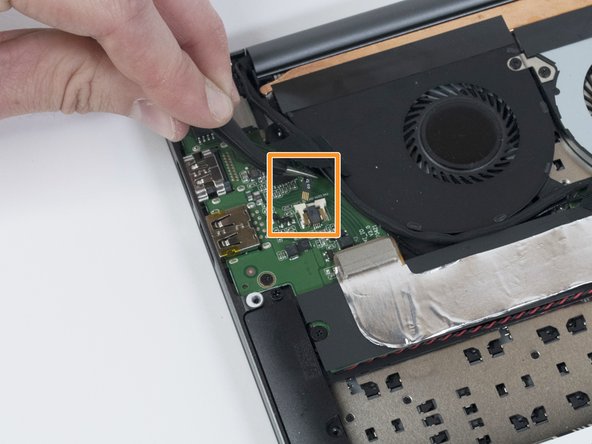
    • Use tweezers to squeeze the fan's white header.

    • Disconnect the fan connector by sliding it out toward the rear of the chassis.

  9. Razer Blade Stealth 2017 Fan Replacement: étape 9, image 1 de 3 Razer Blade Stealth 2017 Fan Replacement: étape 9, image 2 de 3 Razer Blade Stealth 2017 Fan Replacement: étape 9, image 3 de 3
    • Remove any tape attached to the fans.

    • Use a Phillips #00 screwdriver to remove the six, 3mm screws and the metal bracket around both fans.

  10. Razer Blade Stealth 2017 Fan Replacement: étape 10, image 1 de 2 Razer Blade Stealth 2017 Fan Replacement: étape 10, image 2 de 2
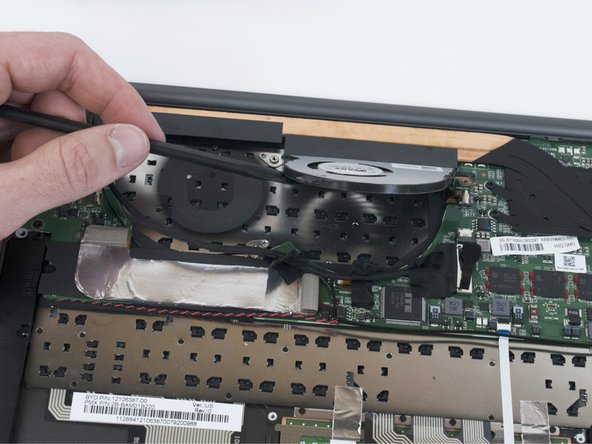
    • Use a plastic spudger to slide the fans out of the case.

Conclusion

To reassemble your device, follow these instructions in reverse order.

2 autres ont terminé cette réparation.

Helene Willits

Membre depuis le 10/10/19

762 Réputation

6 tutoriels rédigés

Équipe

Cal Poly, Team S11-G3, Regan Fall 2019 Membre de l'équipe Cal Poly, Team S11-G3, Regan Fall 2019

CPSU-REGAN-F19S11G3

4 membres

7 tutoriels rédigés

Un commentaire

What is the part number for the black fan? I'm trying to buy a replacement but I can't find any :(

Sang Jae Kouwenberg - Réponse

Ajouter un commentaire

Nombre de vues :

Dernières 24 heures : 4

7 derniers jours : 13

30 derniers jours : 43

Total : 2,170