Introduction
Remplacez le disque dur de votre iMac intel 21,5".
Ce tutoriel inclut également les étapes pour remplacer votre disque dur par un SSD. Elle décrivent comment installer la sonde de température du SSD pour que les ventilateurs de l'iMac tournent à la bonne vitesse.
"Avant de commencer à travailler sur votre iMac," débranchez-le et appuyez sur le bouton de marche pendant 10 secondes pour décharger les condensateurs de l'alimentation.
Faites très attention à ne toucher ni les pattes des condensateurs ni les points de soudure visibles au dos de l'alimentation.
Ce dont vous avez besoin
-
-
Collez une ventouse sur chacun des deux angles supérieurs de la vitre.
-
Si la ventouse n'adhère pas à la vitre, essayez de les nettoyer, l'une et l'autre, à l'aide d'un solvant doux.
-
-
-
Retirez les deux vis Torx T10 8 mm par lesquelles l'écran est fixé au boîtier extérieur.
-
-
-
-
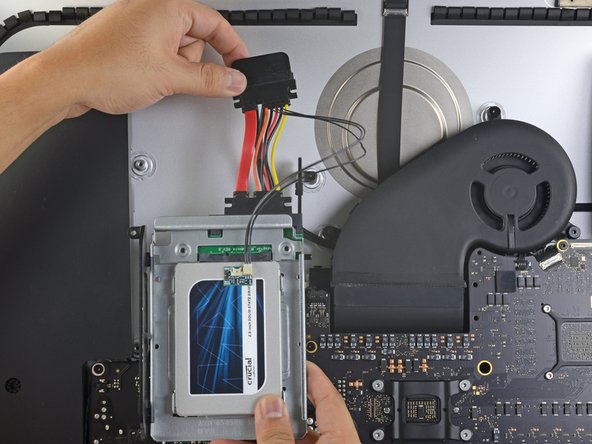
Déconnectez le capteur thermique en débranchant son connecteur sur le côté du disque dur.
-
-
-
Retirez les deux vis torx T8 qui maintiennent le support supérieur sur le disque dur.
-
Retirez le support supérieur du disque dur.
-
-
-
Alignez les connecteurs de SSD avec les prises du boîtier métallique.
-
Appuyez le disque contre les prises du boîtier jusqu'à ce que le SSD soit bien encastré.
-
-
-
Décollez le film de protection blanc qui recouvre l'adhésif derrière la petite sonde de température,
-
Collez le circuit de la sonde de température à la surface métallique du SSD, à côté du connecteur SATA.
-
Repliez les câbles de la sonde de température, qui dépassent, de façon qu'ils ne vous gênent pas quand vous montez le boîtier.
-
-
-
Trouvez le connecteur labellisé HD TMP ou HDD TEMP sur la carte mère.
-
Si la sonde de température précédente est encore connectée à la carte mère, débranchez-la et ôtez-la. Vous n'en avez plus besoin.
-
Connectez le câble à double fil rouge-noir de la sonde de température au connecteur labellisé HD TMP ou HDD TEMP.
-
Disposez le fil qui dépasse de façon qu'il n'interfère avec aucun composant.
-
Pour remonter votre appareil, suivez les instructions dans l'ordre inverse.
Pour remonter votre appareil, suivez les instructions dans l'ordre inverse.
Annulation : je n'ai pas terminé ce tutoriel.
375 autres ont terminé cette réparation.
Merci à ces traducteurs :
100%
Ces traducteurs nous aident réparer le monde ! Vous voulez contribuer ?
Commencez à traduire ›
66 commentaires
Make sure the hard drive is of the same producer and it has a temp sensor connector. It's the only way to ensure that the heat sensor connector will fit into the hard drive's socket. If you don't plug in the temp sensor iMac's HDD Fan will rotate at its maximum speed, ie. over 6000 rpms - the noise is extraordinary!!!
I replaced my internal HDD on my 215" iMac, but the iMac can't get access to the new hard disk's (Seagate Barracuda Green) temperature sensor. The HDD fan in the iMac steps up the RPM, and over about 15min reaches 6000RPM (VERY loud) and stays there until machine is shutdown or put to sleep.
I found a fix for this: http://hddfancontrol.com/HDDFanControl/H... - this tiny piece of shareware software allows the iMac to see the temperature of the drive via S.M.A.R.T., and therefore the fans react according to the correct temperature again!
One thing Andrew left out here, which I discovered on my own, is that even if you have the temperature sensor connected to the correct pins, you ALSO have to make sure that it is 'oriented' properly.
On the sensor connector (the little head that plugs into the hard drive) I saw a little white dot on one side, which it turns out, indicates that's the 'top'. So on my iMac, you have to make sure when you connect the temp sensor connector with the white dot showing.
Otherwise, I got the 6000 rpm fans.
Success. For any interested people, it's about an hour - going slowly. Now that I've done it, I assume I could do it again in 15 minutes if I had to.
Just have the right tools handy, the T 8 and T 10 bits in particular. Getting off the display screen is easy. The screws are harder than you'd think because of the magnets, but they're not that bad. I recommend having tweezers to help pull them and place them later on.
Overall, the thing that worried me most was the fan issue. And, so far... it's not an issue. I had a seagate 500 gb, and I replaced it with a seagate barracuda 3 tb hhd. Everything fit right into it, just as it did into the original. No optical sensor needed. No new sensor needed, period. No software needed. Nothing. Just put in the new hd, and it works. I'm very pleased, and very proud of myself. Good luck to anyone considering doing this upgrade. You can do it, really.
It's a pretty straightforward procedure. Took less than an hour. I replaced the 500GB Seagate Barracuda with a Seagate Barracuda 2TB, model ST2000DM001. So far, after about 30 minutes of use, it's working great, and I haven't had the fan problem, but we'll see what happens.
Kevin's advice about the tweezers for extracting and inserting the screws that attach the display to the case was right on (although I used a small pliers instead).
Before you begin the replacement procedure, I highly recommend putting the new drive into a hard drive dock, and restoring to it from a Time Machine backup. Try booting off the new drive once to make sure it works. Then, when you swap the new drive for the existing internal drive, it'll be ready to go with no further effort needed.


