Il est possible que cette traduction ne reflète pas les dernières mises à jour du tutoriel source. Aidez à mettre à jour la traduction ou bien consultez le tutoriel source.
Introduction
La version de ce guide n'est plus à jour. cliquez ici pour la version actualisée du guide.
Ce dont vous avez besoin
Vidéo d'introduction
-
-
Éteignez votre iPhone avant de commencer le démontage.
-
Sur le boîtier arrière de votre iPhone 4, il y a ou bien deux vis cruciformes #000 ou bien des vis Apple 5 points Pentalobe (deuxième image). Vérifiez de quelles vis il s'agit et assurez-vous d'avoir le tournevis qu'il vous faut pour les enlever.
-
Enlevez les deux vis de 3,6 mm (Pentalobe ou cruciforme #000) près du connecteur de dock.
-
-
-
Faites glisser la vitre arrière vers le bord supérieur de l'iPhone.
If the back doesn't slide in properly upon reassembly, you didn't insert the motherboard properly. Remove it and try it again, DO NOT try to force it down!
-
-
-
Attrapez la vitre arrière et retirez-la de l'iPhone. Vous pouvez également utiliser une petite ventouse.
using suction cup with too much force breaks rear panel
Remove the single 2.5 mm Phillips screw securing the battery connector to the logic board- for me this Phillips screw won't budge from its place have tried all the phillips combinations 000, 00, 0, 1 and the straight /slotted 1.5 mm but nothing. can some help me please purchased a replacement battery for my iPhone 4 but not able to do it just because of this screw.
If the screw head is not buggered, press the tip of a hot soldering iron to the screw for a second or two. Don't get it too hot, or you'll damage something.
splaye -
don't use hot soldering iron . the female outlet the battery plugs into is very fragile . for no extra money you can buy a battery that has magnetic tools specifically to pick this screw out . if worse comes to worse be certain the screw will come no looser then use tweezers and pick it out . the #1 fear with this technique is DO NOT DROP THE SCREW . I have done this and crawling on my hands and knees till I find it was depressing
-
-
-
Enlevez l'unique vis cruciforme de 2,5 mm qui fixe le connecteur de batterie à la carte mère.
I was going through the take apart and after reassembly, it seems to just sit there an power cycle. It's as though the battery is no longer working. Any thoughts as to what I may have done wrong?
you potentially messed up the ribbon cable from the battery to the adapter. I have done it before. Its not fun...
barri80 -
Stuck on step 4 can't unscrew the battery screw. stopped trying as all i seem to be doing is damaging the screw any tips as to how to approach this?
I ended up drilling the head of one of my screws off. It was already damaged. Then I think I used needle pliers to spin it out once the plate came off and there was more room to grab the shank.
I didn't need to remove the battery !! why would you take the battery away, the motor can be removed easily with the battery in place, and the whole process would take less than 2 minutes if you exclude the battery steps
I was VERY careful but the interior philips screw holding the battery in place but it stripped immediately. I see others have had this problem. What do I do now?!
I've tried three different #000 drivers but they don't fit this screw. Stuck now. Also blows my confidence about proceeding because even if I do get this off.... I see some even smaller Phillips head screw further along in the process
If the screw is not damaged by previous attempts, the screw driver should fit perfectly. You can also tap the screw with a small mass to unlock.
revher -
Despite the battery replacement it’s really simple, in my iPhone 4 there was a totally different connector for the battery (I’ll post a few photos). Wider, only one screw but at the top, with a small contact clip screwed together with the battery connector, and which flies off once you remove the battery connector. By the way the battery provided from ifixit did not fit into neither any of the screw holes nor in the socket. The socket is in a different position compared to that in the pictures here and the battery connector can’t reach at the same time the socket and it’s seat. Sadly I have to give up… 🥲
-
-
-
Utilisez un outil en plastique pour soulever délicatement le connecteur de la batterie de son emplacement sur la carte mère.
-
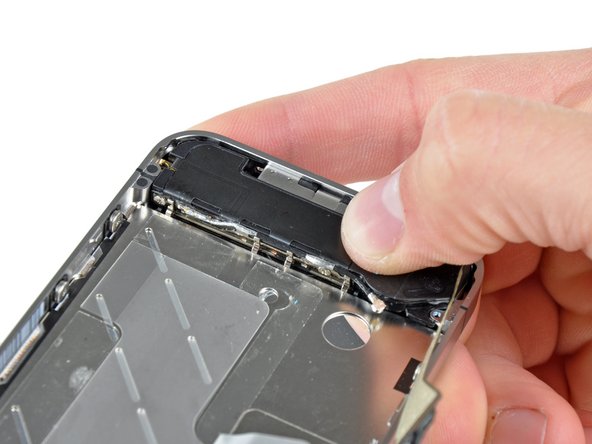
Retirez le cache métallique sur le connecteur de l'antenne.
There is a small black L-shaped bracket of some sort that tits between the battery connector and the motherboard socket, with a loop on one corner that sits betwen the riserand the battery connector. Remove this now, and do not forget to re install it on assembly.
In Step 5 be EXTRA careful with the battery connector as the socket can come off extremely easy. This can mess up the replacement a little bit and cost you extra. Otherwise, this guide is excellent.
Good luck, fixers!
I fix(ed) it!
When removing this L shaped piece, it should be shown ON CAMERA where it came from and the exact position it was in while in the phone, I had to take 2 screws (not 1 like said in the video) out to get to this piece and once that second screw came up I didn't get a chance to see where this piece came from because it popped right out. I was extremely nervous but I believe I got it back in properly.
Putting the antennae cover back in place is impossible without a good photo. I used this link to refer to:
-
-
-
En vous servant de la languette en plastique transparente, soulevez délicatement la batterie et retirez-la de l'iPhone.
-
S’il reste de l’alcool dans le téléphone, essuyez-le soigneusement ou laissez-le sécher à l’air libre avant d’installer votre nouvelle batterie.
-
Avant de rebrancher le connecteur de la batterie, assurez-vous que le clip de contact (en rouge) est correctement positionné à côté du connecteur de la batterie.
use the iPod opening tool to pry gently under the battery from the outer edge of the phone and work towards the plastic tab. the tab is not actually attached to the battery itself, but a plastic sheet between the battery and inner frame. the adhesive on the battery tends to be under the edge of the battery nearest the center of the phone.
This i think is the most diffucult part.
Because they use so much glue on it. I have to did this with so much force.
Glad that i didn't kill the circuit board when i took this out.
My battery was so firmly glued in, it took a long time to slowly pry it loose. Patience is the key to this process. I could see easily damaging the circuit board by using too much force. The plastic tab did not help at all.
The ribbon cable attaching the new battery to the battery connector clip is longer than the original. I clicked the clip into the socket first and then was very careful to fold the excess while putting the battery back in so the ribbon cable didn't kink. One kink in this could sever the battery leads.
My ribbon cable was also longer than the original. How did you get it to not kink while placing the batter back into the phone? That seems to be my only hang up at the moment
Piece of cake! The hardest part was being sure the outer pentalobe screws were actually turning and I wasn't stripping them. Battery was glued firmly in, so I loosened it from the outside instead of using the plastic pull-tab. I pre-bent the battery connector neck before putting it back in and had no problems with it fitting in. Getting the battery connector aligned with the antenna piece underneath was a bit fiddly. Got the case back on, put in the new screws, and powered the phone on without problem. Had 40% charge, all seems well. Yippee!
Do NOT use a spudger or similar type of prising tool to try lift up the battery. Instead, just warm up the whole area with a hot air gun or hair drier to soften the glue.
The reason why I say don't use an implement to try lift the battery is because far too many times I've seen punctured & bent batteries come in to this workshop that have to be thrown out for safety reasons. It only takes a grain of sand, or a burr on the spudger and you're risking a potential cell rupture and potential fire.
Just use a bit of heat ( not a lot! ) to soften up the glue and it'll come away with the plastic pull tab.
These instructions don't mention putting the 2.5mm screw back in. I found this very challenging because it is so short, so very difficult to line it up to get it back in the hole, and very easy to drop it inside the phone. Take care.
Apparently it's not necessary to remove the battery, but try at least (I'm curious).
The battery was stuck (too much glue) and the plastic tab didn't help, and I ripped it...
So I use the plastic opening tool on the other side to remove really gently the battery, it was really really stucked with the glue... Now I'll know when I'll need to change it.
I put a little piece of tape to repair the plastic tab for the next time.
For the other part of the guide, it was a piece of cake and I'm a bad bad handyman :)
Thanks for the guide!
You are right. This is the reason why their is simpler guide: iPhone 4 Battery disconnection to be used when there is no necessity for removing the battery. Disconnection is sufficient for many fixes except replacement of the battery!
revher -
you have to remove the battery for digitizer replacement, however i would suggest removing it at the very last stage, i.e. step 24. cause it is easier to remove without the logic board being there
Adhesive was holding battery VERY firmly, so during this step I used a hair blow dryer on low setting to carefully heat up the device. Then used the plastic tool to gently but firmly pry up one place on each edge. At first it felt like barely anything was happening, but within a few tries the adhesive gave away easily and the battery came right out.
Before inserting the battery I put the contact clip into position. It has a hooked shape on one side which fits between the socket and the folded battery cable. If you try to position it AFTER the battery is installed the whole process is much more difficult. I used a tweezers to hold it in place while inserting the battery.
When inserting the battery I started by guiding the folded cable into position against the side of the contact clip, then proceeded to lay the battery in position. This made it very easy to have all parts in their original positions -- no need to fiddle with the battery cable or contact clip afterwards.
When pressing the battery connector into the socket, the first time I pressed from bottom to top. That didn't work because there is a little tab at the top of the connector which must fit into a tiny notch or else the connector won't lay flat properly. Pressing the connector from top to bottom worked easily.
Needle-nosed tweezers were very helpful when lining up the screws. After everything was reassembled I tried powering up the device, but the battery had insufficient charge. I plugged it in and immediately the screen displayed a battery with a thin red line (illustrating no charge). After 25 minutes the device sprang to life and indicated a 10% charge. At 70 minutes the battery indicated 30% charge, and at that rate should be fully charged in under 4 hours. It's fixed!!
Why they didn't say this, I have no idea: HEAT UP THE BACK OF THE PHONE! This helps the adhesive give so much easier, worth the extra 2 minutes to make sure you don't tear anything.
super easy, battery had plenty of glue for what ever reason, I put the screw in 1st then set the battery and was easy to set the new battery. Charge was at 94% strange seeing it next to my Iphone 6 but glad I did it as now I can use it for music and save the battery on the main phone. Thanks for a easy instruction guide.
Strictly speaking re-assembly is NOT the exact reverse of dismantling. In particular do not put the battery in and then try to plug in the connector, Rather, start by plugging in the connector (having straightened the ribbon-wire attaching it to the battery) and only then re=position the battery on its (gluey) base. Also I used a wooden cocktail stick to position the antenna connector correctly (pushing the stick through the hole in the antenna piece and into the threaded base where the screw will eventually go) and then I held it all in place (temporarily) with a tiny blob of Bluetac until I managed to successfully withdraw the cocktail stick and fit the proper screw.
Stuey 25/2/2018
.Heating a towel and wrapping the phone for 3 min did the trick of removal of the battery.
I used the plastic opening tool to nudge the battery a bit and then shoved in the guitar pick. By sliding the guitar pick over the length of the battery, the battery got unstuck very easily.
When attaching the battery connector make sure that it snaps in place. My replacement battery connector did not snap in place and I forced it on, that caused the connector to detach from the ribbon cable. I had to solder the connector back onto the cable which requires a very steady hand and SMD soldering tools. So, if it does not snap in place with a clicking sound, the connector is probably of bad quality and your battery will probably not work. I placed my old battery back (where the connector nicely snapped in place) and am waiting for a replacement of the dodgy replacement battery.
-
-
-
A l'aide d'un éjecteur de carte SIM ou d'un trombone, enlevez la carte SIM et son tiroir.
-
Retirez la carte SIM et son tiroir.
-
-
-
Retirez les deux vis suivantes:
-
Une vis cruciforme de 1,2 mm
-
Une vis cruciforme de 1,6 mm
-
Retirez le cache en acier fin du connecteur de dock de l'iPhone.
I had trouble with my SIM card at this point. It wouldn't go all the way in - only about 1mm short but enough to keep the phone from being able to read it. It seems that the red screw in this step is the culprit. I loosened it up a bit and the SIM card tray was able to fit flush.
-
-
-
A l'aide d'un outil en plastique, faites délicatement levier sur les deux extrémités courtes de la nappe du connecteur de dock pour l'enlever de la carte mère.
Make sure not to pry too much under the flex cable because you will likely damage the gold / silver shining adhesive tape that is located beneath it.
The guide is missing a comment on this and one would not expect the tape there. Check out the photos of step 10 to get an idea of how the tape looks like.
I assume this to be some kind of head-conductive component.
It won't be much of a problem if you damage parts of it though.
But if you peel off / coil up too much of it, it could get too big and the flex cable could get damaged when it's pressed against it.
-
-
-
Décollez soigneusement la nappe du dock de la carte mère et de l'emplacement du haut-parleur inférieur.
This is held down by adhesive, don't try to just yank it off. Peel it slowly. If you damage this cable, you are slightly screwed.
Peel back NOT off. It needs to just pull aside. If it comes off, throw the phone.
-
-
-
-
A l'aide d'un outil en plastique, faites levier sur le connecteur inférieur de l'antenne pour l'enlever de son emplacement sur la carte mère.
NOTE: When replacing the logic board, be sure this antenna remains exposed and doesn't become trapped under the board.
what are you talking about here???
Yeah, would like to know the value of the little blue inductor ... my iPhone 4 doesn't have it any more and I have the worst signal.
I wasn't sure how to carefully detach the antennae. Can anyone offer some insight on how to reattach the antennae? Is it supposed to be soldered to the board? Or is it a pin attachment?
see that tiny little blue thing just to the left of the antenna connector but before the screw? make sure you DON'T knock that out of place otherwise your iphone becomes a heavy ipod touch (yes. this idiot made that mistake while struggling to get the antenna connector back in - which for the record just clips back in). this would have been a handy tip for me while i was reading the instructions, which apart from that little trinket of information, were very easy to follow.
-dan
-
-
-
Retirez la vis cruciforme de 1,9 mm qui attache le bas de la carte mère à l'intérieur du boîtier.
Be careful, I almost damaged this specific screw by using a Phillips #00 screwdriver. It's screwed in tighter than most others. You will need a Phillips #000 or else your #00 has to be a really sharp one.
The cross on top of the screw on my phone is all messed up - not from me stripping it, it just looks like a manufacturing error. The screwdriver won't even fit into the screw, and I can't get it out (I have no idea how they got it in in the first place). Any suggestions?
same here, screw stripped any suggestions?
Couple of ways to get rounded-out-head screws;
1) use a tiny drop of super glue on the top place your screwdriver on the drop/screw, then sprinkle a bit of bicarb-soda on to the wet super glue, it'll harden very rapidly and form a fillet; wait a minute and you should be able to then unscrew the screw.
Be VERY CAREFUL when doing this, because you don't want to have superglue wicking between the screw and the circuit board.
Perhaps practice on some other things first.
I've removed several like this before; frequently I find the culprits for rounded out slots are ham-fisted people trying to do their own repairs in the past.
Get a set of these precision screw extractors. I own a small electronics repair shop and I wouldn't be without them. If you buy them remember that the ends are reversible in case you dull one end. Precision Screw Extractor Set
-
-
-
Retirez les cinq vis suivantes qui attachent l'antenne Wi-Fi à la carte mère:
-
Une vis cruciforme de 2,3 mm
-
Deux vis cruciformes de 1,6 mm
-
Une vis cruciforme de 1,4 mm
-
Une vis cruciforme de 4,8 mm
Be careful about the very small spring contact that is under the shield and around the 4.8 mm screw - it can spring out when the shield is removed. It must be reinserted prior to installing the shield, with the thick part up and the spring in contact with the gold pad to the right of the screw hole in the case.
INCREDIBLE! Steve this probably happens to people all the time. The "very small spring contact that is under the shield and around the 4.8 mm screw" I will elaborate on. It's not so much around the 4.8mm screw as it actually part of the assembly where the 4.8 mm screw is tightened. I added an arrow to this picture to visually illustrate:
http://imageshack.us/photo/my-images/9/i...
I had no wifi at all until this was present. I had overlooked the piece and spent hours trying to figure out where it went. BIG THANK YOU to Steve for his comment. After fixing, my wifi was perfect.
Jimmy -
Thanks for your notice! It really helps me.
There is a washer under the plate that is held together by the 1.4mm Philips. This might come loose. Be careful not to lose it.
Confirming this. It's not in the description and it came out when I disconnected the screw. At first I was unsure where it came from, but when I reassembled the phone, the yellow screw didn't make contact, so I realized the washer had to go under the contact plate.
marcx77 -
If a nut under the YELLOW screw is rotating, hold the nut with tweezers.
On my phone the "washer" that the 1.4mm screw goes into I think is actually the mounting post that had come detached. I realize afterwards there was therefore no point removing this screw, but I did remove (and put it back afterwards) by holding onto the loose post/washer with tweezers to prevent it turning.
Print this image out (step 13) - trust me, you'll need it later!
The "washer" that a few of the commenters have mentioned isn't a washer nor a broken post. It is a circular nut that helps the WiFi antenna get a good connection to the logic board. It is part of a sandwich: 1.4mm screw head WiFi antenna logic board ++ circular nut. I held it in place with tweezers and then screwed the 1.4mm screw in. Don't lose this nut!
When I came to reassemble at this step, I noticed the 1.4mm screw no longer had anything to screw to. The nut or washer or whatever it is that you mention has gone. My screen does not work any more. Is this connected and/or is there anything I can do to peplace what is lost?
This screw is supposed to tie into a very small nut that sits under a small u-shaped tab in the EMI shield that is fixed to the PCB. Maybe that nut has moved or got lost. I recommend you to lift that small tab to find it because if loose it could create a short-circuit.
But that screw/nut is absolutely not essential to the LCD. It should work without it.
I used an elastic band pulled taught over the blade of a flat headed screwdriver to hold the nut (beneath the yellow screw) in place. Alternatively I was thinking of carving the eraser on the end of a pencil into a wedge shape to do the same job when tightening the screw on reassembly. Just needs something to grip it in place to stop it spinning.
A note about screw management: ALWAYS remove screws from left to right if you are just putting them in order of removal on a magnetic trey, it helps with re-assembly. If you can, I recommend getting a magnetic white board and writing the size of the screws on it and categorizing by that, it makes it way easier and you won't ever have to worry about putting the wrong size screw in anywhere ever again.
the nut of the yellow screw falls be careful ...to re install it again
-
-
-
Utilisez un outil en plastique pour soulever légèrement le bord supérieur de l'antenne Wi-Fi de la carte mère.
-
Enlevez les clips de maintien du Wi-Fi du cadre intérieur avec la pointe d'une spatule.
-
Retirez l'antenne Wi-Fi de l'iPhone. Veillez à ne perdre ni les clips en métal sur le haut du cache, où est l'emplacement de la vis de 4,8 mm, ni la vis de 4,8 mm elle-même. C'est la raison principale pour une performance anormale du Wi-Fi après le remontage.
watch for the connector cover here - it tends to be quite "springy" and may fly towards you when you attempt to release the clips
So as I'm prying the plate off a tiny little nut falls out. I've repaired 4 iPhone 4s now and this is the first time this has happened. Anyone know where exactly it goes? I'd upload a pic, but this forum doesn't support images I see. I'm pretty sure it goes to the long bolt at top center, but where in the stack it goes I'm not certain.
It's probably the nut for the yellow screw of step 13. It sometimes comes off the motherboard, with no adverse effects. Just put it back, under the small u-shaped metal shielding
Yes, that belongs to the yellow screw and is (badly) glued to the motherboard. You'll need very thin pliers to place and fix the nut while reassembling.
mcbohdo -
-
-
-
A l'aide d'un outil en plastique, soulevez délicatement le connecteur de la caméra arrière de son emplacement sur la carte mère;
-
Retirez la caméra arrière.
the rear camera has an extra long tab which runs under the digitizer cable - be careful not to bend this while removing the camera.
Just to clarify, the little tab on the side of the camera does not go under the motherboard, it goes under the cables. This misunderstanding is common for those new to mobile repair. Always make sure you take notes on the small things like this!
-
-
-
Retirez le petit autocollant blanc et rond (autocollant de garantie et d'indicateur d'eau) qui couvre la vis près de la languette de la batterie.
-
Retirez la vis cruciforme de 2,4 mm cachée sous l'autocollant.
There was no screw underneath the warranty sticker or even a place for a screw. Disappointed.
I removed by accident the other white sticker on the logic board. What happens now? Will the phone work?
It won't hurt anything.
Joshua -
Danger! Since the last screw I took out before is the 4.8 mm (step 13) it can happen that one messes up the order and uses this one instead of the 2.4 mm! This will break the new Display again. I'd add a distinct warnig here to use the right (short) one.
Now I'll a order a new display...
I agree with Ed Williams: no screw under the sticker on my phone.
-
-
-
A l'aide d'un outil en plastique, faites levier pour déloger les connecteurs suivants de leurs emplacements sur la carte mère:
-
La nappe du tactile (faites levier d'en bas)
-
La nappe de l'écran LCD (faites levier d'en bas)
-
La nappe de la prise jack/ du bouton de volume (faites levier d'en haut)
-
La nappe du microphone supérieur/bouton de veille (faites levier d'en haut)
-
La nappe de la caméra avant (faites levier d'en haut)
Windex didn't work well for me for degreasing the connections. It made the connections worse in fact. Now my digitizer AND my screen don't work.
It seems that you misunderstood the notes throughout the guide. You should only clean metal to metal contact points, such as the contact area between the EMI fingers and the metal case on the speaker enclosure. Applying Windex in connectors or sockets of any type will almost certainly destroy components in your phone.
When re-plugging the yellow connector (the leftmost of the 3 connectors that you disconnected from the top) put the cables behind and not before the metal part with a hole where the EMI Shield 2 clips in. Otherwise you will not be able do step 13.
Be carefull of a very small component soldered near the yellow connector. It can pop off and make your front camera irresponsive.
When reassembling, the various connectors have a leading plastic lip that allows you to align and then slowly snap in place. i pushed on the pads on top of the connectors with the flat tool provided in the kit. Also, the first time, i did not press the LCD cable very well, so the phone was working, but no display showing. once i snapped this in place the second time, it worked like a charm.
After reassembly, when I changed to the front camera, the display got stuck in shutter mode. The website bellow suggests I lost a microscopic jumper that enables the front camera. I am guessing this happened when I disconnected the 3 connectors. The dang jumper is so small I never even noticed that I lost it. Oh well at least the rear camera still works... After replacing screen camera app now stuck on shutter?
I ran into a not workin front camera after a screen replacement on Iphone4. I found out that I had broken the tiny jumper on the main board when I pried off the headphone plug. That jumper is next to the right upper corner of the headphone/volume button plug (yellow marked in step 17 of relacement guide), you can see it in the picture as two silvery dots. If your prying tool sits on that jumper when levelling the plug off, it is history. I took a ampoule of conducting silver liquid, but instead of shaking it I took some of the sediment out with a thin wire and aplied a tiny blob over the two remaining soldering pads left. And alas, it worked ! Front camera is ok again. Thanks to those who found out about that jumper.
On reassembly, be really careful when reattaching the digitizer cable - the cable breaks very easily, rendering your nice new display useless. In my case, I must not have threaded the cable through properly, so it was just a bit too short to reach the connector. I gave it a gentle tug... and snap!
I was much more careful the second time through :(
did you have to buy a whole new display?
same thing just happened to me:((((
mstutz12 -
What is the correct length of flex (ribbon) cable for the Digitizer cable and the LCD cable? I've threaded the cables correctly through the mid frame, however, I keep encountering the same issue. Once I've tried seating the cables into the sockets, the Digitizer cable is too short by approximately 5mm. I've tried several different makes of the front panel display (front screen replacement) but have encountered the same problem with each and the supplier, stating each have been 'defective units'. It just feels a stretch to believe I've been unlucky in purchasing 4 that have all been defective. I can't check these against the original (Apple) screen, as it was too damaged and the removal process of these iPhone 4 screens is a nightmare. Any help is appreciated
Feeding those ribbon cables through the frame is one of the trickier parts of this repair. Check Step 30 of the Display Assembly Replacement Guide for detailed instructions. If you check the comments, you'll find a lot of others have struggled with this—but it can be done! :)
My setup was nothing like this. The headphone jack, top microphone, and front camera connections were not in these locations. Rather, they were on the logic board below the main camera connection. Furthermore, the logic board was held in place by a Phillips head screw that was hidden under a small black piece of tape. This screw also held the small gold connector tab. Additionally, the bottom of the logic board was held in place by a Phillips head screw.
Sounds to me like you have an iPhone 4S. This guide is for the iPhone 4. ;)
-
-
-
A l'aide d'un petit tournevis plat, retirez la vis d'entretoise de 4,8 mm près de la prise casque.
-
Sans ce dispositif, les nappes autour de la carte mère peuvent être endommagées.
The smallest screw below the Digitizer connector is held by a tiny nut which is fixed below the EMI shield. Beware because this thing can get loose easily.
Is this it? http://i.imgur.com/AQlJS8g.jpg
crimney -
I believe that's the one he's referring to...
Joshua -
The screw anchor/stud came loose on me as well... How did you repair it? If you left it broke did it effect anything?
iyacyas -
Image of rectangular rubber piece
Thank you Rajan for this picture. The rubber piece fell out and i was frantically trying to find its spot.
Yes! Thanks for this pic! I found this little piece in the body of the phone after I removed the logic board and was stumped! Real lifesaver!
Joshua -
I have found that the easiest way to remove these standoffs is to loosen them with a 2.0 or 2.3 mm standard (flat) blade driver bit. Then, once it is loose, you can either loosen it the rest of the way, or for better control, insert your pentalobe driver into the center of it and loosen it the rest of the way. If your pentalobe driver won't turn it, then it is not loose enough, or the end of one of the small screws has broken off in it (actually fairly common).
Best of luck to you! Just ask if you need more info!
Joshua -
there are several versions of what appears to be the iphone 4S. It has more screws and a hidden 4.8mm flathead at the top close to where the exposed one was in this step. I rendered my iphone useless not knowing this. If you have this version, stop, put everything back and bring it to a professional, or you will find about 6 or 8 extra pieces that are not covered in these instructions and a broken phone as well.
Wesley, this is the guide for the iPhone 4, not the 4S. The two are distinctly different.
There's no multiple-variants of either model to best of my knowledge (having repaired hundreds of both the 4 and 4S)
Didn’t see the comments about the rubber strip until too late - severed the digitizer ribbon cable on the edge of the board! Screen worked fine, but no touch control - had to buy a new screen and do it all again…! :(
-
-
-
Retirez soigneusement la carte mère de l'iPhone tout en faisant attention de ne pas accrocher les nappes.
AliExpress is the place for you.
Missing rubber guard can causing touchscreen sensitivity & accuracy problem.
Do not forget the rubber piece. When replacing my home button, I noticed this rubber piece fall out of the phone, and couldn't figure out where it went. I left it out, and my touchscreen had all sorts of problem. I thought I had damaged the digitizer ribbon. I even bought a new screen and had similar problems after putting that in. I finally put a makeshift piece of rubber that I cut up into the spot where this rubber piece had gone, and currently haven't had problems for over a week. This rubber piece must suppress interference problems of some kind.
Great point! I had the logic board put back in and then found this little thing hanging out. I found a "tip" on a different site that showed it going between the rear-facing camera and the logic board! Thanks!
Joshua -
Can we get a better photo of where rubber piece goes? Mine fell off, and I have no idea where to put it back on to.
It goes on the edge of the logic board where the Digitizer and LCD Panel ribbon cables bend over the Logic Board before they plug into it. The rubber piece protects the ribbon cables from chafing like a bumper and from interferance.
fasthans -
You can see it on the upper left of the Logic Board, just to the right of the camera in the photo for Step 18. It is easier to see if you click on the view huge link to blow up the photo.
fasthans -
Ear piece metal connectors: You can see them on step 22. If those are not bent up enough (laying flat) you won't have contact with the logic board... and no more audio from the ear piece. This is what happened to me. I had to unmount it again to bend them and hop the ear piece worked again!
This was a very tricky part. Just make sure that you don't put pressure on the login board to get it into place, take your time and ease it in. There will be a bit of spring in it when you push down which is a combination of the folded LCD and Digitizer Ribbon Cables and the two copper contacts underneath.
This was absolutely the hardest part - had to do it over many times. The digitizer ribbon cable kept insisting on folding up under the logic board. Tip: do not let the cable fold up, even it that's how it naturally wants to go, it will be too short.
hi, the small gold prong (step 19) in my phone is fragile what should i do? what function from that small gold prong? thank you
-
-
-
Retirez la vis cruciforme unique de 2,4 mm qui attache le boîtier du haut-parleur au cadre intérieur.
Note: During assembly, do not put another screw on the left side just yet. Otherwise you would not be able to install the motherboard in the next step.
Well thats where I messed up
-
-
-
Retirez le boîtier du haut-parleur de l'iPhone.
the EMI fingers are VERY fragile...
Agreed. I broke mine off the first time I removed it.
Me too, are they that important, can i put it back together without them?
romaine -
'and then there were THREE' yup i broke off one as well. hint on re-assembly; put in the speaker box, and working from left to right, apply a fair amt of downward pressure and use a tiny flat-blade screwdriver to push the tip of the emi fingers toward the speaker box, go left to right so you can put in the screw on the right side when done.
I broke 2 of the 4 off (both on the left side) and haven't noticed any difference in the functioning of the phone.
I broke off the right-most one (closest to the microphone) and after reassembly my signal strength was poor and dropped easily. I replaced the antenna/speaker unit with one from a 4s (the cable was a touch longer; but, solved with some bending) and made sure to really clean the contacts (and not break any)... long story short, intact fingers and cleaning has resulted in better signal strength than prior to the repair! go figure!
I agree they are very fragile! I broke off 1 EMF finger by pressing it down - wish i had read comments 1st! Phone still seems to work Ok, but gave me a scare.
Where are the emi fingers in the picture??
The four small metal prongs on the edge of the black speaker housing, and up against the LCD panel's edge
Nicholas -
-
-
-
Enlevez les deux vis suivantes qui attachent le vibreur au cadre intérieur:
-
Une vis cruciforme de 6 mm
-
Une vis cruciforme de 1,4 mm
-
Retirez le vibreur de l'iPhone.
There is a square, metal bar that fits into a slot on the right side of the vibrator. The 1.4mm screw threads into this bar. It fell out when I first flipped it over the phone to remove the screen. Look out for that.
On reassembly I broke the 1.4mm screw. The head fell off and the thread stood within. It worked fine attached just by the other one, but caution when fastening these 1.4mm screws.
-
-
-
Enlevez la vis cruciforme de 1,5 mm qui maintient la vitre avant près de la prise jack.
When I removed the screw from here I also found a small rubber piece. It is about 8mm long and 2mm wide, and it has a channel down the centre of it. I couldn't figure out where it came from but the phone seems to be perfectly fine without it. I thought it could possibly be some sort of anti-vibration damper for the vibrator although I am not sure. I couldn't see it in any of the pictures.
Referring to the exact screw that is circled in red, I cannot seem to get this particular screw to thread properly during the reassemble process. I have found that I had to add another 15-20 min to my assembly/dis-assembly due to the fact I have to remove the earphone jack and the antenna that is in this corner, too. Any suggestions on how to get this screw to thread w/o doing the extra steps? Need of help, Please
The small rubber piece The Talent mentioned is actually mentioned on Step 18, the last bullet (pin) point there.
-
-
-
Enlevez les trois vis cruciformes à tête large de 1,5 mm le long du côté où se trouve le bouton de volume.
If your objective is to remove the front panel only, you do not need to remove any of the "large-headed" 1.5 mm Phillips screws, but only loosen them slightly. Putting these screws back can be quite a hassle, and there's really no need for it. When replacing the front panel, take care of the position of the washers (they should be in between the case and screw head.
i tried using the 'only loosen' method on half, and found out because of the washers, they interfered during reassembly. it was very easy to replace them by setting the phone down on its side (propped up so as not to tip) and use a tweezer to put in the washer then screws, it was simple.
I used tweezers. Worked great. Til i applied too much pressure and one of the washers went whizzing away into oblivion.
crimney -
I also used very fine tweezers (from a swiss army knife) to hold the washer and screw from the side as I positioned the screw over the hole, and then placed carefully the screwdriver tip onto the screw before releasing. worked fine. I found this the hardest part of the whole reassemble process.
-
-
-
Enlevez la vis cruciforme de 1,5 mm près de la nappe du connecteur de dock.
My screw here turned out to be rusted, so was REALLY tough to remove, I pretty much stripped it whilst getting it out with a 1.0 flathead. Not sure if this area is prone to getting wet, but be warned. I noticed an orange tinge to the screw before I started but thought it was a reflection from the ribbon.
This screw was also extremely rusty on my unit - so much so that it never came loose. I tried every angle and position but it just kept stripping out the Phillips head. Needless to say, I didn't actually get the home button replaced, because I could never get the screen off. But by doing all the steps up until this, I was able to get everything loose enough to check the home button connections, clean stuff up, wiggle things around a little, and get said button working properly again.
But yeah, apparently this area IS prone to water/rust. I know my iPhone's gotten wet-ish before, so I guess it made it in here enough to rust out the screw. As Dave said, ye be warned.
outof2n -
-
-
-
Enlevez les trois vis cruciformes à tête large de 1,5 mm le long du côté de l'iPhone où se trouve la carte SIM.
-
Enlevez la vis cruciforme à petite tête de 1,5 mm près de la caméra arrière (qui a déjà été retirée).
I just loosened them and it worked fine!
Yep, absolutely. And you will save a great amount of time. :)
Titelive -
No matter how hard I try, I cannot get these screws out! I had the same problem on the other side (step 24) as well. My screen has previously been replaced by a 'trained professional' but they have stripped all of the large flat-headed screws, making it impossible for me to get them out!
In need of serious help/advice/techniques for getting these God-forsaken screws out!!!!
Did you find a solution? Same problem
gelmi -
Use a thin rubber-band between the screw and the screwdriver to compensate for the lack of grip for the screwdriver
Joe Is -
i couldn't get all the large headed screws out, two where stuck. So i gently removed all the other screws in the following steps, and pulled the front cover gently out by moving gently and breaking some parts of the front screen (which i throw away anyway) After that the remaining screws became looser, and were able to screw up and down.
anobody please tell me which one screwdriver i should use to loose the flat-headed screws?
The tools are listed at the top of the guide, all of the Phillips screws in the guide are the same #000 size listed there.
-
-
-
Insérez délicatement le bord d'un plastic opening tool (outil en plastique pour tout ouvrir) entre le joint en caoutchouc autour de la vitre avant et le cadre intérieur en acier.
-
Faites délicatement levier pour soulever l'écran hors du cadre intérieur en acier.
Great guide. When you are prying the glass screen off be extremely careful not to lift the top of the too high. If you do lift it too high then the glass at the bottom of the phone will easily crack.
Since my screen was shattered, let's face it which is the main reason to replace the screen, it completely came apart around the button. Use of a hair dryer would have been a useful tip, however I don't blow dry my hair and so don't have one. A warm towel just doesn't cut it.
I just need it to work for a few more months until the iPhone 6 comes out.
The square piece your are referring to is the rubber piece that fits on the logic board. It seats on the logic board between the orange circled screw and the green circled screw in step 13. To date, I had one fall off during my third IPhone 4 screen repair. Needles to say, I had to part the entire phone out due to one stripped screw in the corner that was holding on the bracket to the screen. Luckily the screen and LCD was already missing and all that was left was the backlight.
My screen wouldn't budge, nothing I tried couldn't get the plastic spudger started, even having the whole phone heated to loosen the adhesive. The way I worked it through was to *gently* push a small (2-3 cm) blade around the power button into the edge between the screen bezel and the steel frame. The hard steel blade started a small crevice, then I could work my way around with the plastic tool as described.
Hope that helps if your screen is as stuck as mine.
-
-
-
Soulevez lentement et délicatement le bord supérieur de l'écran hors du cadre intérieur en acier.
-
Continuez de soulever l'écran en tournant jusqu'à ce que l'adhésif sous la partie du bouton home se décolle lentement.
-
Il est peut-être plus facile d'insérer une spatule (spudger) en haut et de la passer délicatement autour des bords.
-
Dégagez délicatement le bord inférieur de l'écran du cadre intérieur en acier.
Be very, very careful when removing a broken screen. My experience was that while most of the broken screen came off, there were many smaller pieces which were stuck to the area around the home button as well as the camera lens. I took my time and used narrow-headed tweezers to remove countless shards of glass. Likewise, I found what I think was an adhesive membrane which I think was supposed to come off with the front screen but remained stuck to the frame. After some head-scratching on my part, I removed the adhesive membrane (tape) and hoped I wasn't removing something important. Thankfully, once reassembled, the phone worked fine!
I have used clear tape placing it on the screen so that the shards of glass will stay in one piece. This worked out for me hopefully someone will try it.
Removing the screen in the step was a little tricky… The home button got stuck in the display hole and the ribbon cable broke. Another 20$ down the drain…
-
-
-
Passez les nappes du tactile et du LCD à travers le cadre intérieur en acier et retirez l'écran.
-
Quand l'écran a été installé correctement, les nappes du LCD et du tactile devraient être l'une à côté de l'autre et de la même longueur comme on peut le voir sur la deuxième photo.
-
Lors du remontage, ne touchez pas la partie métallique à la base de la nappe du LCD, car ceci peut causer des problèmes avec le LCD. Si vous l'avez touchée par hasard, nettoyez-la délicatement avec une lingette à l'alcool avant de continuer.
If you do have to replace the Camera Ring, I find it much easier to put some double sided 3m on the Display where the ring would go, then put the ring ON the camera, not the display. Also if you need to replace the camera ring, your prob gonna have to replace the ear screen, its easier in the long run just to replace it. Please do not glue either piece on.
This is the only part that was a little tricky for me. When I was reinstalling the LCD panel it took me a few tries to get the connectors and cables through the holes correctly, and not pinched by the frame. Take it slow and be gentle.
This part was very tricky because you need to make sure you have enough slack from the LCD and Digitizer cables. Take your time to make sure that the cables are fully through, even the slightest pinch will be enough for this to not reach and you have to redo it again (a massive pain if you've already started the reassembly. - A good way to test this is to before you reassemble try placing the logic board on top where the LCD and Digitizer cables will fit into, if they reach fine then you are good, if not then adjust the cables again until you know they are through completely, this saves you having to disassemble again if its not correct. - Good Luck and Take your time!
Had to back track to this step as the feed through got folded a bit and I couldn't clamp down one of the digitizer cables..... all in all a fantastic tutorial.
Thanks!
I had the same problem and the issue is that ribbon cable gets squared off towards the bottom and has to be fed into the slot more carefully.
Great guide and great parts offering. Thing 4's ancient iPhone 4 is back in business until I hand him down my 5 when I get the next iPhone this fall.
For some reason when I put the phone back together the screen is dark on the upper left corner. The touch sensitivity works perfectly and the button replacement went well.
I received a dodgy digitiser - even when i took the screen off again the cables were not the right length.
I thought I had the same problem, but I removed the screen again and found that the thinner cable had folded under itself. At every motion of re-installing the screen, I had to hold those dang cables taught to keep them from folding under again! Ugh. The thin one had a fold in it, but it still worked.
CHECK AND DOUBLE CHECK THE RIBBON CABLES BEFORE YOU PUSH IT DOWN! It really is very easy to mess the whole thing up here...I did! Even when you think you've got both cable through, check from the side, there's a little square bit that catches. If you damage the ribbon at all it's time to buy a new screen and learn from your mistakes.
Im at the steap where you have to put the lcd screen and the frame together but at the beginning of this steap removing it! 2 small pieces felt off and I can't find where they belong any one
be careful how you re install them cables one of them might stuck on the board ..
-


Pour remonter votre appareil, suivez les étapes dans l'ordre inverse.
Pour remonter votre appareil, suivez les étapes dans l'ordre inverse.
Annulation : je n'ai pas terminé ce tutoriel.
951 autres ont terminé cette réparation.
Merci à ces traducteurs :
92%


Ces traducteurs nous aident réparer le monde ! Vous voulez contribuer ?
Commencez à traduire ›
Pièces jointes

26 commentaires
To replace broken glass you must purchase the glass/digitizer/lCD/frame together because the glass is sealed to the LCD. Do not fall for the cheap glass and digitizer replacements with no LCD.
I was able to replace the LCD panel and digitizer as separate units, but they were separate to start with. That being said, it's definitely more challenging. it's pretty easy to get the two attached to each other, just takes 2 drops (1/10th of one ml) of clear oil. i used a 1/2cc syringe to spread a thin line down the center. came out absolutely perfect. without the oil it's horrible. No contrast and just moiré galore.
The added difficulty comes from getting the two parts to behave while assembling, since they aren't glued, they slip and slide around, and air can get in on the edges and no more dark black.
i tried first with water; terrible results, it interfered with the capacitive touch; ouch. So, i got some practice today re-assembling the phone. the guide was priceless—this is one of the most complex teardowns of ever. i used 12 compartments of an 18-comartment bin.
The pictures were a great help. I did it! Success!!!
Great guide! I recommend adding some of the notes in this guide to the guide itself. One regarding the connector that goes under the EMI shield at the top of phone connecting the long screw at the top in the center to the gold dot on the logic board (I found this one in the notes OK). It is the connector for the WIFI and Bluetooth antenna as it turns out (the guide is incorrect as the antenna connector by the speakers is for the 3G/IPhone radio not the WIFI). The other, the rubber guard that fits over the edge of the logic board where the Digitizer and LCD ribbon cables bend over the logic board (I missed this step in the notes, but am not going to disassemble to fix, hope it's not too important, lol). A couple of more panels with photos illustrating the two steps would do it.
I could not have attempted this without this guide let alone be successful, great job! Thank you!
Flawless front display install...the iPhone runs like a champ once again. However I have one minor concern. Although the front display is sitting flush with the midframe if I push down on the top of the front display while the unit is on I'm getting some frosting towards the top. Are there shims to tighten up the tolerance of the front display so it doesn't do this?
After installing the new display, the home-button is a little deeper immeresd in the display than before. As if the new display did not fit completeley inside the steel frame. When I look at the iphoen from the side - its also obvious that the glass above the steel frame is thicker than the glass on the back of the phone. could the new display (purchased from ifixit) be thicker than the old? I really tried hard to push the new display all the way into the steel frame and alle the screws attaching the display to the frame fitted in nicely.
Btw - the phone works fine and there is no visible gap between the new display and the steel frame.
Great instructions and pictures. I would add that the 2 cables that slide through from the screen/digitizer should be tested for connection and actually connected BEFORE tightening down all corner and side screws to ensure you have pulled them through far enough.
Also, they rip/tear, so be careful.
Im cheap tip #288
use 1oz "solo" cups to put your screws, clips, etc in. The First cup shoud contain the first two screws from the bottom, then stack an empty cup on top, next would be the screw from the battery connector. was rinse repeat. you get the idea. when reassembly time comes around, you would be suprised on how fast things go back together. no second guessing.
//I hate repairing the Iphone 4
Can a 4S screen be used to replace a 4? I think I ordered the wrong screen. When I installed it the screen is just blank, sometimes grainer or snowy, but no picture or anything.
The instructions are great and clear. Had to go slowly trying to re-seat the logic board (It acted like it was, but it really wasn't). I was really not expecting this to work at all, and it sorta didn't, but it mostly did! The phone woke right up - but the home button doesn't work. No worries, if I can do it once, I can do it twice. Thanks for all the help.
Just replaced the front display and rear glass on my Iphone4. I had one problem, but I think it was due to a manufacturing defect or an error during the assembly process at the factory. The headphone jack/volume control ribbon cable was covering most of the slot where the thin metal cover retaining clip resides. I didn't notice it during the disassembly process, but when I started to reassemble the thin metal cover, I noticed the ribbon was covering most of the slot and had an indention on it where the retaining clip had deformed it a little. The ribbon was covering all but an 1/8 inch of the slot where the retaining clip should fit. I had to file all but 1/8 inch of the clip off for it to clear the ribbon.
I finished the reassembly process and ops checked the iPhone4. IT ALL WORKED AS ADVERTISED! WiFi, Bluetooth, email, texts, phone; the works.
Thanks to Ifixit, I was able to accomplish a task I never thought I could successfully undertake.
Thanks for your online tutorial and excellent repair guides.
CP
Wilmington, NC
This worked like a charm, but I learned a few things that I would like to pass on. This takes more than an hour if you have large hands or your screwdriver isnt magnetic enough to pick up the very small screws. Also, there are numerous sizes of screws, so when you disassemble, lay them out in order they were taken apart. The guide ends and then you just need to look at it in reverse to reassemble, but take care in remembering how to replace some of the parts - ie the shields. Also, make sure you have all the required tools. Another thing to remember is that the you need to make sure you pull the cables all the way through when you put the new screen on, otherwise you will have to remove the motherboard again and start over. THanks iFixit!
I attempted to replace a broken front screen and failed miserably and I will pass on what I learned from it. I can identify several reasons as follows: 1) I was not fully prepared mentally to undertake such a tedious task. I should have anticipated more time and started when I was alert and fully motivated. Instead, I started at the end of the evening when I was fatigued from the day.2) The lighting was an issue. This seems basic but yet I overlooked in my anxiety to get started. And, 3) The screw drivers I was using were poor quality. I seemed to strip about 50% of the screws. Since then. I purchased better tools and have not had this problem.
I ordered a screen from China for $25 that included magnetized screwdrivers (a must). Whole job took about 2 hours because of the small screws. Works great currently! Thanks for posting the instructions.
These step-by-step instructions were incredible and I really appreciated the photos that went with them. Like another reviewer, it did take me several hours to complete but it was worth it as I have a phone that works again. Thank you SO MUCH for making these instructions available!!
My phone had this cheap job done on it before so none of the insructions matched
I had this cheap job done on my phone so none of the instructions matched!
using something like the 18-compartment tray will GREATLY help with this one; there are over a dozen groups of parts. For re-assembly having a digital calipers to measure the 2.4 vs the 2.6mm screws also helps greatly.
awr - Réponse
My method for hardware management during delicate phone surgery is to take and print out on 8.5"x11' paper, one or more pictures of the open phone in various stages of disassembly, and then tape the screws to the appropriate spots on the pictures. Also write numbers on the pictures next the screws to indicate the order in which you removed them.
lens42 -
I use a plastic egg tray, I drop all the screws and small parts (like the camera) for each step into the same egg indentation. You can see that the screws are different lengths, so I don't put one screw into it's own spot. I used 5 egg indentations to replace my screen.
Mangled Jargon -
I did a successful surgery on my iPhone, be warned this is not for the faint of heart!
I've done iPod screen replacements, battery replacements, this is by far much more difficult and intricate.
Great write up! Thanks a million.
Jaysen Strange - Réponse
I've changed some iPod screens as well and that has been the least pleasant experience so far. Glue and the main connector that has to be unwrapped and connected from the rear where you have no feel or control where it belongs.
iPhone repair is complex, but doable and has very few "traps".
mcbohdo -
Couldn't even get both screws out of the bottom of the case. One was easy and other refuses to budge. Screws so small I can't see if it is turning or screw driver is properly seated. Sad I too have done screen replacements on other phones. Don't know any secrets to get the screw out
ckracht - Réponse
I also have a problem with seeing what is happening with some of those tiny little screws and parts. For other projects that I do, I use an Opti-Visor. It slips over your head and provides 10x magnification. ( You can find them on Amazon).
Yeah, it adds cost to the project and you would have to wait for delivery, but it sure makes a world of difference in seeing what you are working with / on.
jhow -
On an early iPhone 4 I found that the #000 Phillips bit included in the 54 Bit Driver Kit didn't actually fit the screws. However the JIS #000 also in the kit did fit quite well. This is due to the JIS bits "thinner" design to prevent camming out of the slot. Otherwise everything went well. Looking forward to replacing the battery in my other phone that has the pentalobe screws. Glad I got the 54 Bit kit!
etler - Réponse
Use a vacuum duster and a sharp tool to pry out the dust, this can increase the volume insanely!
Dpairs - Réponse
What does the park that is gold and next to the 4.8mm screw for the antenna? Looks like I am missing that part and almost positive that is why I can't pick up or connect to any wifi signals. I have the screw and the antenna from another phone that is working and tried it on the broken phone and still doesn't work. Only thing different is that gold metal piece to the left of that 4.8 mm screw. Can I buy that part? how do I attach it?
Jay Pennington - Réponse
great instructions did it the first time
Mr J - Réponse
For organisation of the parts and for a much easier process of rebuilding i use a big magnetic flat surface with a grid drawn on it. Then I use a dry erase marker to make any notes I need and to number the parts in order as i disassemble . Believe me it saves a lot of time and hassle especially if you drop one of those tiny screws good luck finding it but when your working over the magnet and drop a screw its going to be right where it fell. At first I tried the piece of paper to keep organised but all it takes is one small slip and you move the paper too quick and your left with a jumbled bunch of screws and parts and a painstaking task of putting it all back correctly, aka a big waist of time and effort.
case-yg - Réponse
I found it very useful to use a magnet sheet when doing these repairs. I use electrical tape or a sharpie to make a grid, and place each micro screw in a separate box on the grid.
I work directly over the magnet sheet, so that if something drops I have a better chance at not losing it.
If you do lose a screw, go over the work area with a fridge magnet. It will pick it up if it hasn’t popped too far away.
Megan Telliano - Réponse