Introduction
Si votre écran iPhone 11 est fissuré, si la vitre tactile ne répond pas ou si rien ne s'affiche quand l'appareil est allumé, consultez ce tutoriel pour le remettre en état de marche avec un nouvel écran. La communauté iFixit partage avec vous ses conseils pour changer son écran iPhone 11 facilement à travers ce tutoriel étape par étape. Des explications et instructions précises afin d'effectuer votre changement écran iPhone 11 avec le plus de fluidité possible. Car, malgré ce que vous avez pu entendre auparavant, tout le monde a vraiment le pouvoir de changer son écran iPhone 11 seul ! La patience est primordiale ainsi que les conseils et astuces que vous trouvez dans ce tutoriel. Un changement écran iPhone 11 permet non seulement de prolonger la durée d'utilisation de votre mobile, mais également de limiter la production de déchets électroniques. Car malheureusement, les cycles de recyclage doivent encore être améliorés et la réparation iPhone reste la meilleure alternative plutôt que d'envoyer un appareil entier au recyclage. Changer son écran iPhone 11, c'est donc la promesse d'un monde meilleur aussi bien pour les générations futures que pour votre compte en banque !
Attention, si l'arrière de votre nouvel écran LCD comprend déjà une fine plaque de protection en métal, suivez plutôt ce tutoriel plus court pour une réparation plus facile. Mais si la plaque manque, continuez à lire ce tutoriel qui vous montrera comment remplacer votre écran et conserver votre ancienne plaque de protection de l'écran LCD.
Le module haut-parleur interne + capteurs fixés au dos de l'écran est couplé individuellement en usine avec votre iPhone. Vous devez donc suivre les instructions ci-dessous pour le transférer depuis votre ancien écran iPhone 11 sur le nouveau. Cette pièce comprend l'illuminateur infrarouge qui fait partie intégrante de Face ID. S'il est endommagé ou remplacé, Face ID ne fonctionnera plus. Faites très attention à n'endommager aucun de ces capteurs durant le changement écran iPhone 11. Sinon, seul un technicien "agréé" par Apple pourra restaurer la fonctionnalité Face ID. Si vous avez d'aide pour changer l'écran iPhone 11 et réintégrer les capteurs Face ID, n'hésitez pas à poser vos questions à notre communauté.
Remarque : la fonctionnalité True Tone ne fonctionnera plus après un remplacement d'écran iPhone 11, même si vous utilisez un écran d'origine Apple.
Ce dont vous avez besoin
Vidéo d'introduction
-
-
Éteignez votre iPhone avant de commencer à le démonter.
-
Dévissez les deux vis Pentalobe de 6,7 mm de long en bas de l'écran de l'iPhone.
-
-
-
Mesurez 3 mm à partir de la pointe et tracez une ligne sur le médiator avec un marqueur permanent.
-
-
-
Si votre écran iPhone est fissuré, n'oubliez pas de le sécuriser de manière à éviter d'aggraver la fissure ou de vous blesser durant la réparation.
-
Posez des bandes de ruban adhésif d'emballage sur l'écran iPhone en les faisant se chevaucher jusqu'à ce que la surface soit complètement recouverte.
-
Si vous avez du mal à retirer la vitre cassée avec une ventouse au cours des prochaines étapes, utilisez un morceau de bande adhésive solide (par exemple du ruban adhésif isolant) plié en deux pour fabriquer une poignée et soulever l'écran.
How to detect my Iphone what screen it is, OLED or LCD?
It’s OLED. You can find the specs here, https://support.apple.com/en-us/HT201296
When you find your phone, at the bottom of the description click on, See the tech specs…
mcr4u2 -
The included suction cups were stiff and worthless. They would not lift the screen. Also, I tried every type of tape on the screen to help the suction cups stick without success. Heavy duty suction cups were for my bathroom also failed. However, I had an old GoPro mount with some preapplied double sided 3M VSB tape and stuck that on the screen near the bottom. Magic! This method had the added bonus of being able to use a GoPro attachment as a handle to lift the screen, and propped up the screen like a kickstand in step 12.
Very cool! Thanks
Antonio -
My screen was pretty stuck… would not budge. Heated, super glued the suction cup, tried gorilla tape. Ended up doing the GoPro mount with 3M VSB tape method mentioned. Worked great. That 3M tape is the bomb.
If you have flat feeler gauges (for adjusting engine valve tappet clearance, ignition points … old school) the .003 thick goes right in. Work your way up until you can get the pick or supplied pry tool in.
where can I buy 3M VSB plis!!
3M VHB tape is at auto stores and other big box stores, or online.
nicO -
I used the tweezers that came with the replacement screen and jammed one of them into the glass and that eventually worked. Heating with a blow dryer is also important. The suction cup was helpful in loosening the adhesive for sure, but just not enough to get the display to come out.
-
-
-
Recouvrez l'écran de bandes de ruban adhésif, qui se chevauchent, jusqu'à ce que toute la surface soit couverte.
-
Si la ventouse n'adhère pas au cours des étapes suivantes, pliez un morceau de ruban adhésif épais (du ruban adhésif toilé p.e.) pour former une poignée et soulevez l'écran de cette façon.
-
-
-
Tirez la poignée bleue vers l'arrière pour déverrouiller les bras de l'Anti-Clamp.
-
Faites glisser les bras sur le bord gauche ou droit de votre iPhone.
-
Positionnez les ventouses en bas de l'iPhone : une sur le dessus, l'autre en dessous.
-
Pressez les ventouses l'une contre l'autre pour appliquer la succion sur la zone souhaitée.
-
-
-
Tirez la poignée vers l'avant pour bloquer les bras.
-
Tournez la poignée dans le sens horaire de 360 degrés, ou bien jusqu'à voir les ventouses commencer à s'étirer.
-
Assurez-vous que les deux ventouses restent alignées. Si elles commencent à se désaligner, détendez les ventouses et réalignez-les.
-
-
-
Chauffez un iOpener et faites-le passer à travers les bras de l'Anti-Clamp.
-
Pliez l'iOpener de façon qu'il repose sur le bord inférieur de l'iPhone.
-
Attendez une minute que l'adhésif se ramollisse et qu'un espace s'ouvre.
-
Insérez un médiator dans l'espace entre l'écran et le joint en plastique, et non dans l'écran.
-
Passez les trois étapes suivantes.
-
-
-
Servez-vous d'un sèche-cheveux ou d'un pistolet à air chaud, ou bien préparez un iOpener et posez-le sur le bord inférieur de l'iPhone pendant environ une minute.
-
-
-
Tirez fermement et constamment sur la ventouse pour ouvrir un léger espace entre le panneau de l'écran et la coque arrière.
-
Insérez un médiator dans l'espace entre l'écran et le joint en plastique, et non dans l'écran.
This turned out to be the most difficult part for me. My old ifixit suction cup didn't suck hard enough to generate enough force to pry the display from the case. I ended up applying heat at least a dozen times, and I had to pull up on the suction cup forcefully over and over and over while repositioning it several times. I finally had success inserting my pick into the tiny gap after 30 or so rapid tugs on the suction cup.
I have the same question
-
-
-
Faites glisser le médiator le long du coin inférieur gauche et du bord gauche de l'iPhone, en tranchant l'adhésif qui maintient l'écran en place.
-
-
-
Réinsérez votre médiator dans le bord inférieur de l'iPhone et faites-le glisser le long du bord droit pour continuer à couper l'adhésif.
Instructions are confusing as the last step says not to insert at certain points, while this says to slide all the way up the right side - is it that sliding is ok but inserting isn't (whatever that might mean) or just not more than 3mm?
Just slide slightly and the display will rise without problems on all iPhone models, sometimes if I have long nails I even insert a fingernail and lift the display.
Tonynox -
-
-
-
Tirez sur la bosse de la ventouse pour détacher l'outil du panneau frontal.
-
-
-
-
Ouvrez l'iPhone en soulevant le côté gauche de l'écran comme on ouvre la couverture arrière d'un livre.
-
Calez l'écran contre un objet stable.
-
-
-
Pour accéder aux vis de l'étape suivante, faites pivoter le bord inférieur de l'écran.
-
-
-
Servez-vous d'un tournevis Y000 pour dévisser les trois vis de 1,1 mm de long qui fixent le cache du connecteur de la batterie.
During reassembly, I had to connect my phone to the charger before it would power up.
Die Schrauben sind wahnsinnig kurz, tatsächlich winzig klein. Nach dem Herausdrehen könnte es im ersten Moment so aussehen, als habe man die Schrauben ausgebohrt anstatt herauszudrehen, sie sind jedoch sehr schnell gelöst und liegen dann entweder im Gehäuse oder sind neben dem Gehäuse herausgefallen. In jedem Fall sollten sie nie auf den Boden fallen, da sie dann kaum mehr auffindbar wären.
-
-
-
Prenez une spatule (spudger) ou un ongle propre pour soulever le connecteur de la batterie de sa prise sur la carte mère.
-
Repliez légèrement le connecteur par rapport à la carte mère pour l'empêcher de faire accidentellement contact avec la prise.
-
-
-
À l'aide d'un tournevis Y000, dévissez les cinq vis de 1,1 mm qui maintiennent le cache de la carte mère en place.
Die Schrauben sind wahnsinnig kurz, tatsächlich winzig klein. Nach dem Herausdrehen könnte es im ersten Moment so aussehen, als habe man die Schrauben ausgebohrt anstatt herauszudrehen, sie sind jedoch sehr schnell gelöst und liegen dann entweder im Gehäuse oder sind neben dem Gehäuse herausgefallen. In jedem Fall sollten sie nie auf den Boden fallen, da sie dann kaum mehr auffindbar wären.
-
-
-
Servez-vous d'une spatule ou d'un ongle pour débrancher le connecteur de la nappe du panneau LCD.
-
Déconnectez le connecteur de la vitre tactile, qui se trouve juste à côté.
Be mindful when reconnecting LCD panel connector and digitizer connector. It’s looks very similar. These 2 ribbon connectors a slightly different.
Pay attention.
내 아이폰이 디스플레이 분리 단계를 거친 후, 전원이 들어오지 않습니다. 층전기를 꽂아도 배터리에 미세한 전기 반응이 느껴지지 않고, 탭틱 엔진도 작동하지 않게 되었습니다. cpu 온도는 여전히 뜨껍습니다. 내 마더보드가 디스플레이 분리 후 갑자기 고장난건가요?
Hast Du das Problem gelöst?
커넥터 핀을 빼거나 다시 넣기 위해 구부러졌을 수 있습니다. 핀이 구부러진 경우 돋보기 등으로 살펴보고, 그렇다면 적절한 매장에 가져가세요.
Hampter -
-
-
-
Prenez la pointe d'une spatule ou un ongle pour débrancher la nappe des capteurs du panneau frontal.
-
-
-
Retirez l'ensemble écran.
After this step its probably a good idea to test the new screen (you dont have to plug in the front camera assembly)
Not a technician, so correct me if I'm wrong: I think that it's at this step of reassembly (before you reattach the screen) that you apply waterproof glue, if you have it.
-
-
-
Retirez les quatre vis qui fixent le module haut-parleur/capteurs :
-
Trois vis cruciformes de 1,6 mm
-
Une vis Y000 de 1,3 mm
Correct me if I am wrong but you no longer need to do this as of IOS 15.2 as apple doesnt disable Face ID on 3rd party repairs
-
-
-
Utilisez la pointe d'une spatule (spudger) pour soulever le bord supérieur du haut-parleur.
-
Faites pivoter le module haut-parleur vers le bas, en l'éloignant du bord supérieur de l'écran.
-
-
-
Utilisez un sèche-cheveux, un pistolet à air chaud, ou bien préparez un iOpener et posez-le sur le bord supérieur de l'écran pendant 1 à 2 minutes, pour ramollir la colle qui retient les capteurs.
-
-
-
Glissez délicatement le bord de votre médiateur sous la nappe qui se trouve en dessous du microphone.
-
Faites-le légèrement pivoter pour détacher le microphone, tout en faisant attention à ni forcer ni endommager la nappe.
-
Si besoin, utilisez la pointe de la spatule pour finir de détacher le microphone de son encoche dans le panneau frontal.
This step was a little bit confusing. I thought that the entire ribbon assm should be removed once the speaker was detached. The entire assm doesn’t actually come off until Step 30.
Be careful in the next few steps, as you can easily damage some parts. Make sure that you operate gently, and that you don't pull, twist or apply too much pressure on the components.
-
-
-
Utilisez une pincette pour soulever le petit cache et le détacher du capteur de luminosité ambiante.
As you remove it, familiarise with its position. It will be hard to put it back into place. If you pay close attention to how it comes out, it will be easier to put it back
-
-
-
Utilisez une pincette pour faire jouer le capteur de luminosité et le désolidariser de son encoche dans l'écran.
-
-
-
Retirez le module haut-parleur interne et capteurs frontaux.
-
Capteur de proximité
-
Illuminateur infrarouge
-
Le module doit être positionné de telle sorte qu'aucun de ces composants n'est obstrué par de l'adhésif.
-
-
-
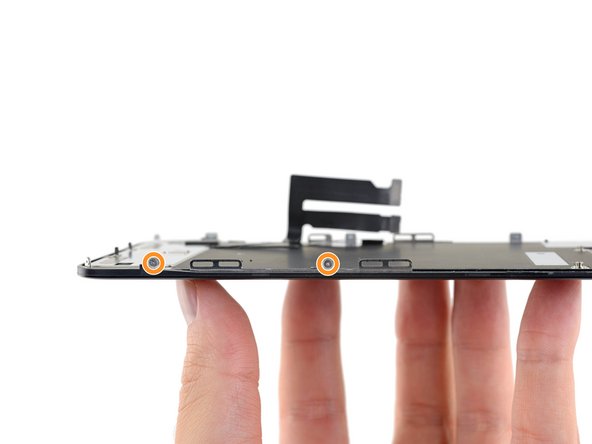
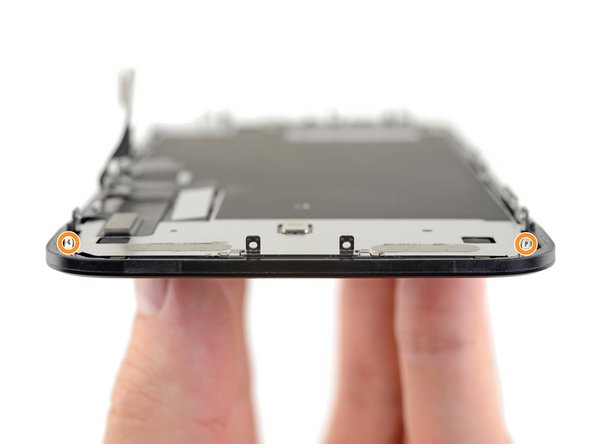
Prenez un tournevis Y000 pour dévisser les vis de 1,1 mm qui fixent la plaque de protection de l'écran LCD.
-
Ces vis se trouvent sur le côté le plus proche des nappes de l'écran.
-
Deux autres vis sont du côté opposé.
L’appui sur les vis est réellement important, au risque de foirer celles-ci. N’hésitez donc pas à appuyer, en faisant contre-poids du côté opposé bien évidemment.
This is the bit that was difficult. The tri'point screwdriver y0000 barely fits this tricky size. It could have been the cheap screwdriver that came with the screen replacement kit. Stripped 2 screws, drilled out with an appropriate size drill bit ' frame still intact. I had more success using a size 0.7mm flathead screwdriver.
-
-
-
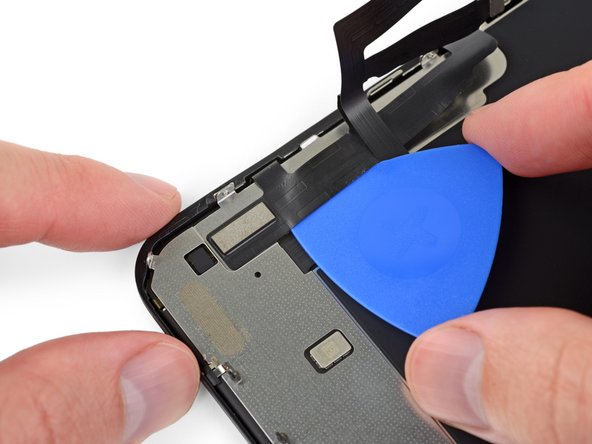
Faites chauffer le dos de l'écran avec un iOpener (ou un sèche-cheveux / pistolet à air chaud), afin de ramollir l'adhésif qui fixe les nappes de l'écran à la plaque de protection de l'écran LCD.
-
-
-
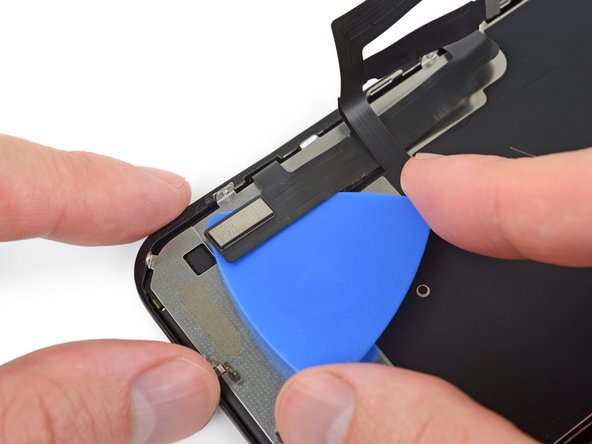
Insérez un médiator entre les nappes de l'écran et la plaque de protection.
-
Faites-le glisser vers le bas de l'écran pour commencer à détacher les nappes.
-
Arrêtez-vous quand vous arrivez au bout de la première nappe.
-
-
-
Réinsérez votre médiator, mais cette fois entre les deux nappes.
-
Faites-le glisser vers le bas de l'écran pour décoller les nappes l'une de l'autre.
-
-
-
Décollez la nappe de la vitre tactile entièrement de la plaque de protection et repliez-la de côté.
IPhone XS copy phone ka folder
-
-
-
Insérez un médiator sous la partie supérieure de la plaque de protection de l'écran LCD et faites-le pivoter pour la séparer de l'écran.
-
-
-
Soulevez encore plus la plaque de protection, jusqu'à ce que vous aperceviez le reste de la nappe de l'écran accrochée au dos.
-
Faites glisser une spatule entre la plaque et la nappe de l'écran et séparez-les complètement.
-
-
-
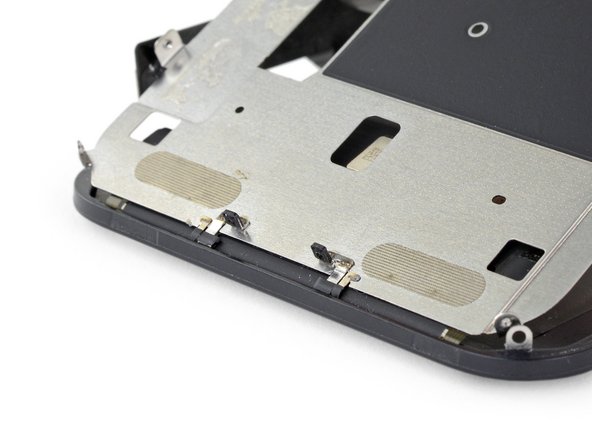
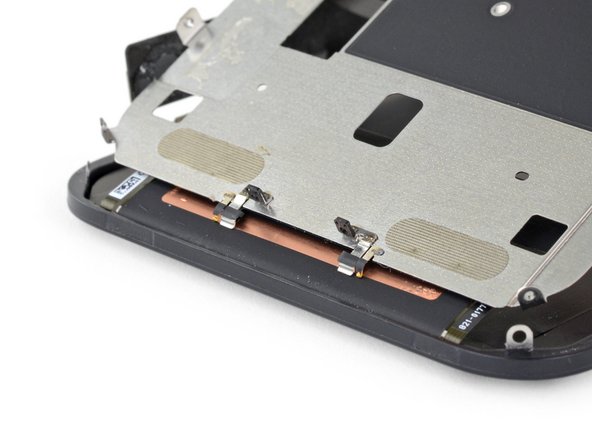
Au moment de soulever la plaque de protection de l'écran LCD, notez les deux dispositifs métalliques qui dépassent du bord inférieur.
hello whaty if one of the golden contact pins ( i guess it is) to be exact right one has freyed up a bit and looks messy. could it cause harm or it is not very important?
On reassembly leave the adhesive cover on the digitizer cable so that it doesn’t get caught on the LCD shield while working the other cable in place and positioning the shield on the frame. When you are ready to stick the digitizer cable to the shield remove the protective plastic.
-
-
-
Il ne reste plus que l'écran LCD et la vitre tactile.
-


Avant de finaliser votre changement écran iPhone 11, veuillez comparer votre nouvelle pièce de rechange à la pièce d'origine. Il est possible que vous deviez transférer des éléments restants ou bien retirer des adhésifs sur votre nouvel écran avant de l'installer définitivement dans votre téléphone.
Pour remonter votre appareil, suivez les étapes ci-dessus dans l'ordre inverse.
Déposez vos déchets électroniques dans un centre de recyclage certifié.
Votre réparation iPhone ne s'est pas déroulée comme prévu ? Allez voir notre documentation iPhone très fournie, ou par exemple la page Mon iPhone 11 ne s'allume plus. Vous pouvez également de mander de l'aide dans la page spécifique de l'iPhone 11 sur notre Forum.
Pour toutes questions concernant le changement d'écran iPhone 11, la communauté iFixit se tient prête à vous éclairer. Des milliers de passionnés et des membres de l'équipe qui sont là pour vous apporter leur soutien. Changer son écran iPhone 11 devient limpide grâce à iFixit, alors pensez à partager votre expérience, pour peut-être aider d'autres personnes comme vous lors de leur réparation iPhone !
Annulation : je n'ai pas terminé ce tutoriel.
172 autres ont terminé cette réparation.
Merci à ces traducteurs :
100%


Ces traducteurs nous aident réparer le monde ! Vous voulez contribuer ?
Commencez à traduire ›


23 commentaires
I am a repair technician from California, and I use your company’s tools and I gotta say that I love them. Very sleek, and the powerful magnetic bits help me get the job done. I did 5 repairs yesterday and each one finished was a good feeling of satisfaction. In the future, if you guys decide to make some sort of in-depth manual for the newer iPhones, that would be great because diagrams are not only a great way for me to sharpen my own skills, but will help make training new techs a breeze.
Cheers all the way from Fresno!
Hi, I replaced the display independently, not in the Apple service, to my disappointment I found a message in the device that warned me that the part is not original, consequently the FaceID was disabled. Can you tell me about ear? Thank you
Getting a message saying not genuine is known issue. there is no workaround yet. as far as face ID not working, you need to check for tear on the flex as you probably damaged it during transfer. If it’s broken, there is no way to fix.
The Important Display Message can be removed, check here: https://www.youtube.com/watch?v=bLo0_p7O...
Ricky LV -
Great repair guide. My only issues:
1. There are no instructions for removing the metal panel from the back of the old screen (nor how to reinstall it).
2. There are no instructions for removing the old, black adhesive from around the edge of the old case (nor the much needed instructions for reinstalling the new adhesive without damaging it or compromising the purpose of replacing this adhesive). This info is also missing from the adhesive replacement page for the iPhone 11.
I was able to patiently work my way through both of these issues and complete the repair on an iPhone 11. Covering these issues as additional steps of the repair guide would be very helpful for future iFixers.
Anyone have the phone randomly reboot after screen replacement? All aspects work on the phone after replacement. It just randomly goes black and then restarts
Maybe just a bad battery connection or a stained/bent connector
I am a repair tech at a repair shop we do more but thats what we are called and i love you’re tools, they are just perfect for everything and all i can say really is, be super careful with the screen and the prox flex, they can be eaisly ripped and really ruin you’re day because to restore the face id with a new prox requires micro sodering but other then that just be careful
I find the OEM screen looks more yellowish, is it me only?
OEM screens tend to have the colors a little bit off, could also be caused by disabled true tone.
Overall a very useful repair guide, there´s just one issue I came across:
Different display manufactors.
Been looking around, due to some issues and so far I´ve seen some different manufactors for the iPhone 11 (and the XR):
Toshiba (the print on the display starts with C11 or F7C, as seen on the last picture)
LG (DTP or C3F)
Sharp (DKH)
someone else stumbled across this?
Apple doesnt offer new displays, however afaik the original apple product manufacturer foxconn refurbishes original screens. Or you could just get a refurbished screen from somewhere else…
For iphone 11, on the flex if there is a square code QRC is DTP and a rectangle is C11
Didier -
Awesome guide, thank you very much! By the way, after the replacement the true tone function will most likely be disabled, which can as far as i know only be fixed by copying the firmware from the old screen over to the new one with a programmer (for example Qianli iCopy Plus). Also, the phone will notify you that the screen is not genuine after every restart and it will always show a notification in the settings. The only way to get around that is to swap the chip on the display cable with a hot air station and solder paste (not worth the hustle in my opinion, i dont mind the one notification in settings). https://www.youtube.com/watch?v=agq2HPK-...
Cheers!
Hi, since replacing my screen my ear speaker has been very muffed/static. Is there any way I can fix this? Thanks
I’d suggest checking the mesh under the earpiece for dirt and stuff that could be blocking the sound and maybe trying to refit it, maybe it’s not properly seated. Could also be fixed by just reseating the earpiece flex…
completed the guide. thx. my iphone claimed the screen is not original. anyway, seems to work correct
Hello I was wondering if anyone could help me. I recently replaced the screen of an iphone 11. The phone was good for the first couple of days but now the customer is having some issues. His display is something randomly scrolling up, mainly while watching videos and sometimes the screens just starts to act crazy and press random things. I’ve been doing some research and I found that something i could do is reset the phone to factory settings. However i’m unsure if this is like a software or a hardware issue. Any advice is helpful, thanks!
From my experience this sound like a ghost touch issue. Usually caused by a loose/broken/dirty connection or an overly tight screw somewhere. It's unlikely, but if you installed a screen protector afterwards, it may have a fingerprint or dirt between the protector and the phone screen. Same thing happened when we did my sisters phone at our store, a connection was loose and a screw was a little bit tight. Maybe a more experienced tech could offer more in-depth insight.
Teejay R -
Hello, I followed the guide and repairs. My phone will not come on. Unless sitting on the charger and then I only get the Apple logo for a few seconds and it does this repeatedly. Any guess on where I went wrong? Thanks
Hi all, Im still trying to get a better understanding of the different types of "screen repair" that can be done.
From what I understand, it is possible to perform a replacement of ONLY the "front glass/screen" with 3rd party, non-OEM screens that you can purcahse online) OR you can replace BOTH the screen and digitizer.
ALot of 3rd party sellers sell a "screen replacement" but I am not sure exactly what I need to look for.
My front screen is cracked but the damage that is visible is purely physical (II don't see /experience any altered pixels, flashing colors etc, just dealing with a iphone with a cracked front screen). BUT in addition to the physical damage, the right side of my iphone 11 (specifically a small area that covers the "&" sign and letter "i" on my keyboard are non-responsive.
Now, is the item Im commenting on going to fix my touch issue? If not, which Ifixit replacement part(s) will resolve this? if at all.
thanks
The ribbon cables used on this screen are incredibly weak, when compared to the apple ones. Did this whole thing and had the phone fully working. Made sure the cables were in the right spot and started pressing the screen in just for the display cable to split in half from a couple pounds of pressure. Absolutely livid. Waste of money and time. You can really tear these cables apart with the tiniest fold.
the right screws wouldn’t come off
Yusef San Inocencio - Réponse
ok one came of but my right wont come of either!!!!
Aisa Jawara -
Hello guys, I still haven't found away to power off the iphone without using the screen. Cheers!
danielaguirre93 - Réponse
You can try this.
Quickly Press and release the volume up button.
then Quickly Press and release the volume down button.
then press and hold the power button and wait until it turns off.
worked for me :D
Benóný Egilson - Réponse
Where does one get replacement seals? Is this the same as the display assembly adhesive?
Brian Baker - Réponse
not of the screwdrivers i have seem to be able to turn the screws
Aisa Jawara - Réponse