Ce tutoriel a des changements plus récents. Passer à la dernière version non vérifiée.
Introduction
Utilisez ce tutoriel pour remplacer l'écran LCD de votre iPad.
Ce dont vous avez besoin
-
-
Si la vitre de votre écran est fissurée, utilisez de la bande adhésive pour éviter de l'endommager davantage ou de vous blesser lors de la réparation.
-
Appliquez des bandes de ruban adhésif transparent sur l'écran de votre iPad jusqu'à ce qu'il soit entièrement recouvert.
-
Faites de votre mieux pour essayer de suivre le reste du tutoriel comme dans la description. Cependant, une fois que la vitre est cassée, elle continuera sûrement à casser pendant que vous travaillez, et vous aurez peut-être besoin d'un outil pour soulever en métal pour retirer la vitre.
-
-
-
Insérez un outil métallique entre le bord supérieur de l'écran et du panneau arrière
-
Faites pivoter l'outil pour libérer les clips le long du bord supérieur de l'écran.
-
Insérez un second outil métallique entre le bord supérieur de l'écran et du panneau arrière pour empêcher les clips de revenir en place.
-
-
-
Avec un spudger, longez le bord droit de l'iPad.
-
Le panneau avant est maintenu par des clips métalliques sur les côtés supérieurs, inférieurs et gauches. Le côté droit est maintenu par des clips en plastique qui se glissent dans des cavités sur la plaque arrière.
-
Une fois que les clips sont libérés, soulevez le côté gauche du panneau avant et glissez-le vers la gauche pour enlever la plaque arrière en aluminium.
Its seems easier to undo the clips on the left and bottom by levering them with an iPad tool and pusing the clips in from the edge with another tool when i can visually see them. One the right side, bottom and most of the left side is done there isnt much need to do the top as it will slide off if moved about a centimeter
-
-
-
Dans les étapes suivantes, vous déconnecterez les trois nappes reliant l'écran à la carte mère. Les nappes correspondent aux composants suivants :
-
Vitre tactile
-
Capteur de luminosité ambiante
-
Câble de données de l'écran
It would be easier to detach the Display Data Cable at its connector on the far right in the picture, since there doesnt seem to be much play to undo the suggested one.
-
-
-
Utilisez le bout d'un outil d'ouverture en plastique pour faire ouvrir les clapets de retenue maintenant les nappes de la vitre tactile dans leur prise sur la carte mère.
-
Tirez les nappes de la vitre tactile tout droit hors de leur prise.
Adding this comment in its proper place:
After flipping up the metal retainer, pull it sideways.
Do not pull it up vertically.
-
-
-
-
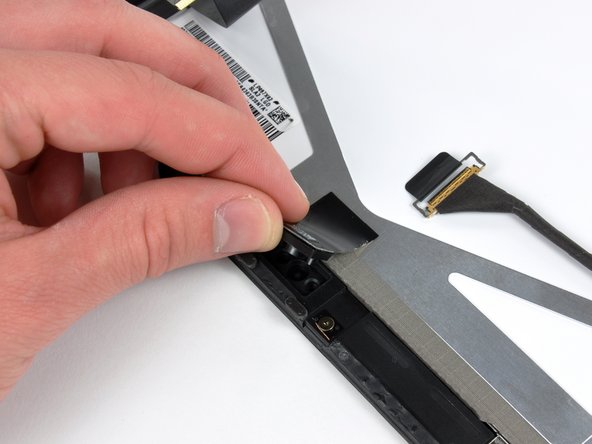
Débranchez le câble de données de l'écran de la carte principale en ouvrant le clapet de retenue métallique par sa languette en plastique noir.
-
Retirez le connecteur du câble de sa prise.
IMHO, unhooking data display cable from the other end is preferable to the above location, since the cable itself is sealed or taped onto the assembly.
-
-
-
Utilisez le bord d'un outil d'ouverture en plastique pour retirer soigneusement la carte du capteur de luminosité ambiante de l'adhésif la fixant au cadre de l'écran.
-
Une fois que vous avez acquis suffisamment de marge, éloignez le capteur de luminosité ambiante de l'écran LCD.
Step 7 after flipping up the metal retainer, pull it sideways.
Do not pull it up vertically.
I added your comment in the proper place at Step 7
-
-
-
Tout en appuyant sur la nappe de la vitre tactile, retirez soigneusement le morceau de ruban adhésif fixant la nappe de la vitre tactile au cadre de l'écran.
-
-
-
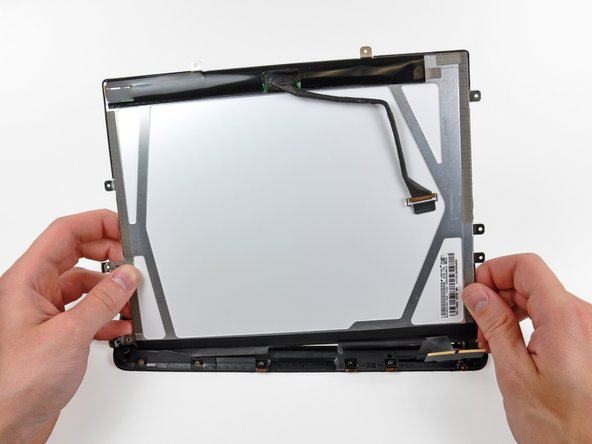
Soulevez l'écran LCD par son extrémité libre et retirez-le du cadre de l'écran.
-
Décollez soigneusement l'adhésif fixant le côté long de l'écran LCD au cadre de l'écran, puis retirez l'écran LCD.
-
-
-
Si elle est encore collée au panneau frontal, retirez la bande de ruban adhésif EMI près de la prise de capteur de luminosité ambiante.
-


Pour réassembler votre appareil, suivez ces instructions dans l'ordre inverse.
Pour réassembler votre appareil, suivez ces instructions dans l'ordre inverse.
Annulation : je n'ai pas terminé ce tutoriel.
78 autres ont terminé cette réparation.
Merci à ces traducteurs :
100%

Ces traducteurs nous aident réparer le monde ! Vous voulez contribuer ?
Commencez à traduire ›

4 commentaires
So what if ive snapped off one of the retaining flaps? Ive seen in the past when ive snapped them off before i could just plug it in, slap on some kapton tape and it was fine. This time i cant get the bottom of the digitizer to work on new glass. I put on the old glass and the bottom works just fine. the bottom flap is the one that broke, but why would the old glass work just fine, but the new glass does nothing on the bottom half?
Just replaced my lcd using this guide. Not easy, but doable. Took about an hour and a half. broke about half of the clips that hold the assembly in, but moved the remaining ones around so that it is secure. I recommend buying replacement clips if you aren't comfortable with that. Also, this guide says to use a Torx T5 screwdriver. Other sites say T4. It is most definitely T5. I bought the wrong one first and had to get a new one. Home Depot has an 8 in 1 Torx tool for 6 bucks that is great. Thank you iFixit for saving me hundreds that I would have spent on a new iPad!
Don't worry about buying more replacment clips -- if you still have them on the left edge, not having the clips on the top and bottom isn't noticeable.
Styg -
When reassembling at the last step (inserting the screen assembly into the back cover), do NOT simply do the reverse of what you did to take it out. Instead, insert the right edge first (with the plastic tabs). The metal tabs on the left edge (and top and bottom edges if you have any left) are flexible, so it is very easy to snap the left edge of the screen into the back cover AFTER the right edge is in place. If you put the left edge in first, you'll have a much tougher time trying to get the plastic tabs on the right edge into back cover.
1) Are you recommending to cover the display with clear packing tape even if it is intact (not cracked)?
2) If so,will the tape take the display’s oleophobic coating with it when removed?
Mitch Stary - Réponse
Hola necesito comprar
Alsone Michel - Réponse