Il est possible que cette traduction ne reflète pas les dernières mises à jour du tutoriel source. Aidez à mettre à jour la traduction ou bien consultez le tutoriel source.
Introduction
Peut-être que votre écran LCD est rayé ou endommagé et doit être remplacé. Ce guide vous explique comment retirer votre écran LCD en toute sécurité sans endommager les composants sensibles de l'appareil.
Ce dont vous avez besoin
-
-
Faites pivoter l'écran en position verticale supérieure.
-
Retirez les 8 vis noires (1,0 mm) du support de l'écran à l'aide d'un tournevis cruciforme.
-
-
-
-
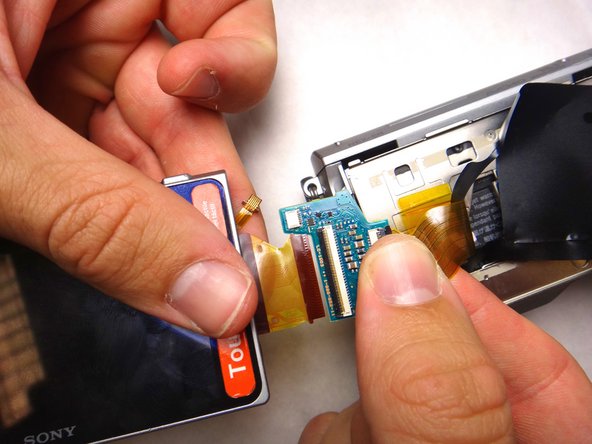
Utilisez un spudger ou un outil d'ouverture en plastique pour faire basculer la languette de verrouillage noire vers le haut. Faites glisser le câble tout droit hors de sa prise et retirez l'écran.
The black bar can be clipped up and down again to release and attach the bus again. Not knowing this is how i demaged the bus next to the thumb... so the cam is trash now :( Good luck to everyone else though
you can buy the little Board from sony and install it again.if you want to send it to trash give it to me instead.i will fix it.
-
-
-
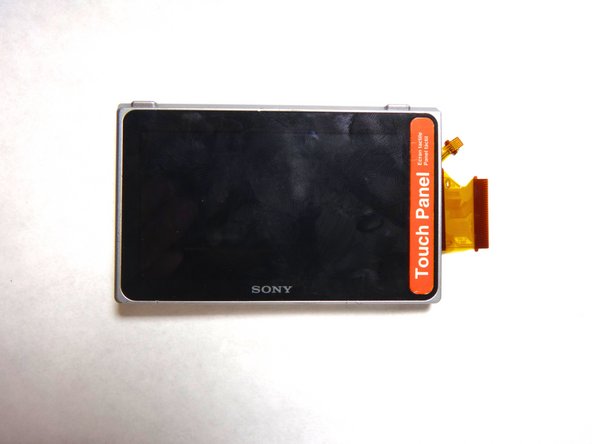
Certains écrans LCD de remplacement ne sont pas livrés avec le cadre en plastique. Le cadre d'origine est facilement séparé et réutilisé. Poussez le LDC hors du cadre par l'arrière. Cela demande de la force. Veillez à ne pas casser le cadre.
-
Après la séparation, retirez le matériau collant entre eux et remplacez-le par du ruban adhésif double face.
-
Lors du remontage, collez des bandes de ruban adhésif sur les bords intérieurs du cadre en plastique, puis coupez-les pour les adapter avec un couteau Exacto.
-
Le petit câble flexible doit être plié autour du bord intérieur du cadre en plastique, puis replié à nouveau pour rencontrer le connecteur. Suivez les plis du câble d'origine.
Hi,
I did exactly like this for a Sony Nex 5N, but the screen doesn't have backlight anymore. I thought that maybe was the display I ordered...but I ordered another one...and I have the same issue. I even bought the flat cable between the flip panel and the camera's body...the problem persist. Any clues?
Thank you.
I must mention that the image is present on the display, but there is no backlight. Of course that I tried to increase the brightness from settings...but there is no result.
To put the screen back into the frame (as my set didn’t include that part) I’ve used “3M 300LSE” adhesive tape which is absolutely awesome stuff. I highly recommend having some sheets in stock at all times. I originally bought it to help offer extra grip for problematic 3D prints, but it keeps being a lifesaver for all kinds of projects.
My new screen works but there’s no touch screen now and it will not reverse when I flip the screen. Any suggestions?
-


Pour remonter votre appareil, suivez ces instructions dans l'ordre inverse.
Pour remonter votre appareil, suivez ces instructions dans l'ordre inverse.
Annulation : je n'ai pas terminé ce tutoriel.
11 autres ont terminé cette réparation.
Merci à ces traducteurs :
92%
[deleted] nous aide à réparer le monde ! Vous voulez contribuer ?
Commencez à traduire ›
Équipe

Cal Poly, Team 8-9, Regan Spring 2014 Membre de l'équipe Cal Poly, Team 8-9, Regan Spring 2014
CPSU-REGAN-S14S8G9
4 membres
14 tutoriels rédigés
13 commentaires
Success! This guide was very helpful. Here is a bit more info:
The LCD screen I ordered did not have the plastic frame. The original frame is easily separated. Push the LDC out of the frame from behind. This takes some force. Be careful not to break the frame. After separation, I removed the sticky material between them and replaced it with double sided tape. I first stuck strips of the tape to the inside edges of the plastic frame and then trimmed them to fit with a Exacto knife. The small flexible cable must be folded around the inside edge of the plastic frame and then folded again to meet the connector. Follow the folds of the original cable.
On reassembly I used a very tiny bit of double sided tape on each of the side rails, near the screw holes to hold them in place while putting on the outer most screen backing shown in step 6. When replacing this part pay special attention to the two small tabs at the bottom which must slide into slots at the bottom of the screen assembly.
Where can I buy the screen other than bidding on ebay
I purchased my NEX-5 replacement screen from e-Bay 'buy it now' from seller: szdigital2013. It came from China and cost a mere £10.29 inc.post.
Michael Sept.2017
I see it amazon but is too damned expensive 60 ,79
double sided tape did not work for me. The screen keeps popping out - what kind of glue would you suggest?
I bought some red coloured/backed double sided from e-Bay seller: atomic7 for £2.99. incl. postage. It works fine if you put it on the underside edges of the LCD. It is fiddly and you need tweezers to apply, but it does work and keeps the LCD screen well in place.
question is the resolution as good as the original ? Does the one from ebay have the sony name on the screen? Is the 5r going to work with my 5t ?
Thank you, Emily. I had to discount the instrucion: "turn the LCD screen fully upwards" (or words to that effect) since my NEX-5 doesn't allow for this - it opens in two stages. Stage 1 = 73 deg. from vertical, (so you look down at the screen) Stage 2 = only allows the LCD to pivot downwards to about 48 deg. from the Vertical, (so you look up at the screen). In turn this means fairly difficult access to those tiny screws inside. It didn't function first time so I parted the ribbon connector again and applied some Maplin Contact Cleaner - then it did work (I rebuild Laptops). Applying the two-sided sticky tape was also very fiddly - needing three hands really, but eventually all was well. These are all Very Small Points. in the main, though, I wouldn't have known where to start without your extremely detailed pictures. So thanks again! Michael at Studio1.
I have the same problem as Anne, does it go back into the outer frame before you insert the screen. There seems to be a slot for it
I had the same problem I just left it out I saved it but I still don't know where the magnet goes and the screen for selfie doesn't turn right side up it look upside down ...I don't mind because I've never taken selfie's with it i think the magnet is the responsible but I could be mistaken
Oscar -
the cable around the screen what that do for the screen
What the cable around the screen on a Sony nex 5 what that cable is
What kind of LCD screen do i buy?
tnuhhuynh - Réponse