Il est possible que cette traduction ne reflète pas les dernières mises à jour du tutoriel source. Aidez à mettre à jour la traduction ou bien consultez le tutoriel source.
Ce dont vous avez besoin
-
-
-
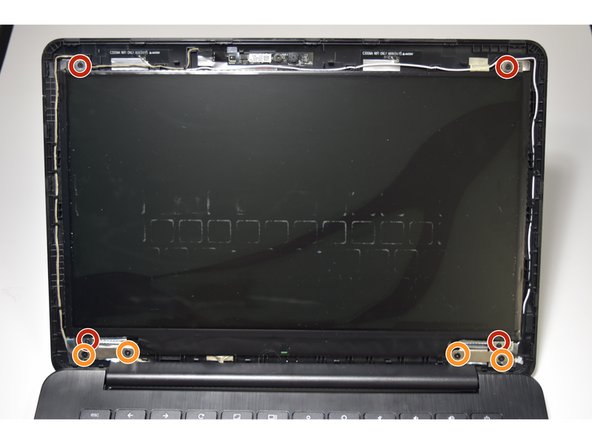
Coin de la pointe d'un outil d'ouverture en plastique entre l'enveloppe extérieure et la doublure intérieure de l'écran.
-
Utilisez l'outil pour faire levier tout autour du boîtier, y compris le côté inférieur près de la charnière, jusqu'à ce que le boîtier soit complètement séparé.
-


Pour remonter votre appareil, suivez ces instructions dans l’ordre inverse.
Pour remonter votre appareil, suivez ces instructions dans l’ordre inverse.
Annulation : je n'ai pas terminé ce tutoriel.
9 autres ont terminé cette réparation.
Merci à ces traducteurs :
81%
[deleted] nous aide à réparer le monde ! Vous voulez contribuer ?
Commencez à traduire ›
Équipe

University of Tampa, Team 1-1, Whiteside Fall 2015 Membre de l'équipe University of Tampa, Team 1-1, Whiteside Fall 2015
UT-WHITESIDE-F15S1G1
3 membres
8 tutoriels rédigés
3 commentaires
I’m having some real trouble getting the inner screen liner back on. I can’t seem to get it to hook under the plastic around the hinge mechanism. If you have completed this repair and could offer any advice on this aspect of it I would greatly appreciate it. Thanks!
I found the answer on YouTube (https://www.youtube.com/watch?v=fWYr8CfZ...). Turns out there is a much easier method to replace the screen the doesn’t require unscrewing the bottom of the Chromebook at all. You just remove the hinge cover and screen liner, swap out the screen then replace the screen liner and hinge cover.
I used this guide to fix the cable running to the screen. Turns out Asus had installed the cable over the hinge and not under as with the antennae.