Introduction
Ce tutoriel vous aide à retirer et remplacer l'écran de votre smartphone Huawei P10.
Si vous voulez protéger vos yeux des éclats de verre et avoir meilleure prise pour ouvrir le téléphone, posez des bandes de ruban adhésif sur l'écran.
Au moment du remontage, remettez de l'adhésif là où c'est nécessaire.
Ce dont vous avez besoin
-
-
Éteignez votre téléphone avant de commencer à manipuler votre téléphone.
-
Retirer les deux vis Pentalobe P2 en bas du téléphone.
-
Ôtez le tiroir de la carte SIM.
-
-
-
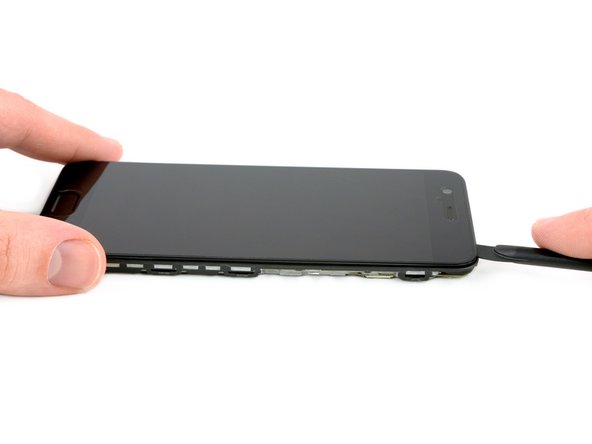
Insérez un outil d'ouverture en plastique entre l'écran et la coque en commençant en bas de votre téléphone.
-
Faites délicatement levier pour écarter l'écran et ses composants de la coque.
-
Après avoir dégagé la partie inférieure, servez-vous de l'outil d'ouverture pour ouvrir les clips sur les deux côtés.
Hi! I cannot find a way to insert the plastic opening tool. Any suggestions on how I can create a gap to start. Everything seems quit rigid.
Also, where will I find your reply.
vbr/lars.skoldebring@gmail.com
Hi Lars, you might want to use a suction handle to lift the display and create a small gap to insert the plastic tool. If you don’t have a suction handle you can “build” a handle with tape that you stick onto the display in a shape similar to this —> __∏__ (also you may want to edit your post and remove your email address ;) )
Hi,
I’m stuck at this step for about two hours… There’s nothing I can do to open the case. Tried all kinds of opening tools and a suction handle. There is no gap at all between the display and the body. How can anything be inserted into a gap that practically does not exist? Please help.
Sorry to hear that. You could try and lift the display by using a suction cup and pull to create a small gap for a tool to get in.
-
-
-
Faites pivoter l'écran vers l'arrière.
-
Déconnectez la nappe des boutons de volume et de marche avec une spatule.
Thanks JaL, of course it is.
-
-
-
Dévissez les deux vis cruciformes #00.
-
Retirez les deux plaques métalliques à l'aide d'une pincette.
-
-
-
-
Enlevez les 4 vis cruciformes #00.
-
Utilisez une pincette pour enlever la plaque métallique.
-
-
-
Utilisez une spatule (spudger) pour déconnecter la nappe principale.
-
Utilisez une pincette pour déconnecter le câble d'antenne et retirez-le de sa fixation en le laissant cependant sur la carte de gestion de la recharge.
Warum soll das Antennenkabel gelöst werden? M.E. schafft dieser Schritt nur ein Risiko das Antennenkabel/den Stecker zu beschädigen.
-
-
-
Utilisez une spatule pour déconnecter les nappes de la prise jack et du haut-parleur.
Ist das entfernen der Kopfhörerbuchse nötig? M.E. nicht - es besteht vielleicht ein geringes Risiko, diese beim Display entfernen zu beschädigen, aber vermutlich wird man diese eher lösen als beschädigen.
-
-
-
Utilisez une spatule pour soulever la carte.
-
Retirez la carte de gestion de la recharge.
I didn’t remove the charging board (I didn’t look precisely enough and thought I had to remove the head phone socket which I put back again as it can stay in place) and it didn’t interfer.
Please also include that their might be a small piece of tape over the microphone on the new PCB.
My mic was not working "on ear" but it was working when on speaker.
Found that small piece of tape by comparing the 2 boards, removed the tape and problem solved. -
-
-
Faites levier avec une spatule pour soulever soigneusement le haut-parleur. Il est fixé par de l'adhésif, donc il pourrait rester collé. Vous pouvez vous servir d'un iOpener pour le faire ramollir.
-
Ôtez le haut-parleur.
Welchen Klebstoff sollte man hier verwenden?
Hallo Funk Phenomenon,
um den Lautsprecher wieder anzubringen kannst du vorgeschnittene Klebestreifen bestellen. Solltest du hierfür keinen Anbieter finden, kannst du Streifen aus doppelseitigem Klebeband heraus schneiden.
-
-
-
Retirez le câble d'antenne si vous ne l'avez pas encore fait.
-
Ôtez la nappe d'interconnexion à l'aide d'une pincette.
-
Servez-vous d'un iOpener pour faire ramollir l'adhésif sous l'écran. Faites particulièrement attention aux parties supérieure et inférieure de l'écran.
-
-
-
Insérez la pointe d'un médiator entre l'écran et le châssis, en bas du téléphone, à côté du bouton home.
-
Faites glisser le médiator le long du bord inférieur pour couper l'adhésif.
-
Faites glisser le médiator autour du coin inférieur droit et laissez-le là.
-
Insérez un autre médiator sous l'écran, dans le coin inférieur gauche.
-
-
-
Écartez délicatement l'ensemble écran et le châssis.
-
Retirez l'ensemble écran.
Make sure that the flexible pcba is stuck to the screen!!
I noticed that my home button was not working after I connected the new screen. Turns out there were two pieces of double sided tape on the screen. I needed to remove the non-sticking layer and stick the flexible pcba to the screen for the home button to work.
Der Lautsprechergrill muss, sofern das neue Display keinen enthält, entfernt werden.
Ich habe da jetzt ein unschönes Loch - fiel mir beim Testaufbau nicht auf :-( (und bedeutet jetzt eine Stunde arbeit es ggf. zu fixen)
You need to transfer the speaker grill if the new display doesn’t have one.
-


Pour remonter votre appareil, suivez ces instructions en sens inverse.
Pour remonter votre appareil, suivez ces instructions en sens inverse.
Annulation : je n'ai pas terminé ce tutoriel.
23 autres ont terminé cette réparation.
Merci à ces traducteurs :
100%

Claire Miesch nous aide à réparer le monde ! Vous voulez contribuer ?
Commencez à traduire ›


4 commentaires
Any advice which adhesive to use? I’ve seen a russian replacement video, it looked like the guy was using some kind of silicone.
Little late but maybe this?
I used B-7000 glue. It enables you to release the screen when a second replacement is needed.
Assuming I purchase a screen off of ebay, and replace it using this method, will the touch id still work?
Das Honor 9 hat an der Unterkante keine Schrauben.
Wie ist das Honor 9 zu öffnen?
Michael Tuschek - Réponse
Vielleicht beantwortet diese Anleitung deine Frage ;)
Tobias Isakeit -
Hi, my P10 does not have screws, just two tiny holes. Do I push in here to unfasten? Einar, Norway
Einar Ryvarden - Réponse
Hi Einar Ryvarden,
in case you bought a used or refurbished phone, someone might have forgotten to put them back in. Since you have holes at the bottom edge next to the charging port this is likely. You can try to start with step 2 and see if you can lift the phone assembly (don’t forget to remove the SIM tray first). As far as I know there is no version of the regular Huawei P10 with no screws. However you there are none in the P10 lite and in the P10 plus, maybe one of the opening procedures for those phones might help you.
Dominik Schnabelrauch -