Il est possible que cette traduction ne reflète pas les dernières mises à jour du tutoriel source. Aidez à mettre à jour la traduction ou bien consultez le tutoriel source.
Introduction
D'autres bonnes vidéos :
https://youtu.be/fidHKn-J-0M?list=PLHnuY...
Même si celui-ci n'est pas en anglais, il est facile à suivre et le plus détaillé :
Ce dont vous avez besoin
Vidéo d'introduction
-
-
Retirez le capot arrière.
-
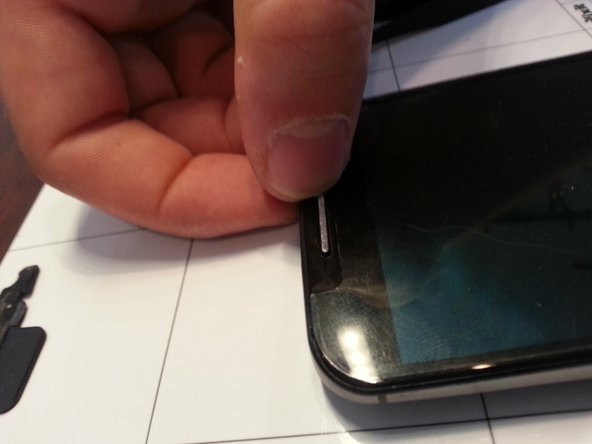
Poussez l'extracteur de carte SIM ou un objet métallique émoussé (pas pointu !) dans le trou qui se trouve à l'intérieur de la fente pour carte SIM. Il y a un trou spécifique qui semble conçu pour vous permettre de retirer le capot arrière avec une petite tige métallique.
-
Le dos en cuir semble très fragile. Il s'est plié et plié facilement, alors décollez-le avec une extrême prudence et allez-y lentement.
Tool comes with phone, so no need to get it.
Also, the adhesive is very sturdy. Try heating up the backplate with a blowdryer/heatgun for better results.
Also be sure to buy some replacement adhesive in advance or you will not be able to put the back cover again once you are done with your repair. You can find it online, it's very cheap.
Remova a tampa traseira.
Shove o removedor do cartão do sim ou o objeto de metal romo (não afiado!) No furo que está dentro do entalhe do cartão do sim. Há um buraco específico que parece projetado para permitir que você empurre a tampa traseira com uma pequena haste de metal.
A parte traseira de couro parece muito frágil. Dobrou-se e dobrou-se facilmente para descascar com extrema cautela e ir devagar.
Pode não ser óbvio a partir das imagens, mas o preto "treliça" no interior da tampa é o adesivo. Deve ser solto (cuidadosamente!) Para que a parte traseira saia.
-
-
-
Notez que cela n'est peut-être pas évident sur les photos, mais le "treillis" noir sur la photo et à l'intérieur de la couverture est l'adhésif. Toute cette partie doit être détachée (avec précaution !) pour que le dos se détache. J'ai utilisé une pince à épiler pour soulever les parties centrales.
-
-
-
-
Dévissez les 18 vis torx noires et retirez l'ensemble avant du boîtier central.
I was able to use a T4 screwdriver on these 18 screws. T3 Torx screwdrivers are a bit of a challenge to find in brick and mortar stores but luckily I was able to find the "Husky 8-in-1 Star Precision Screwdriver Set" at Home Depot for just under $10.
-
-
-
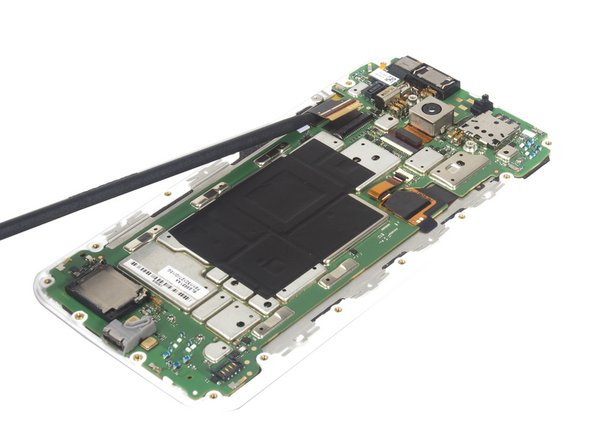
Relâchez le connecteur LCD.
In the first picture, the tool is lifting the connector. The second one shows the cable is being released under the connector. Do not try to pull it up or it will break the connector.
-
-
-
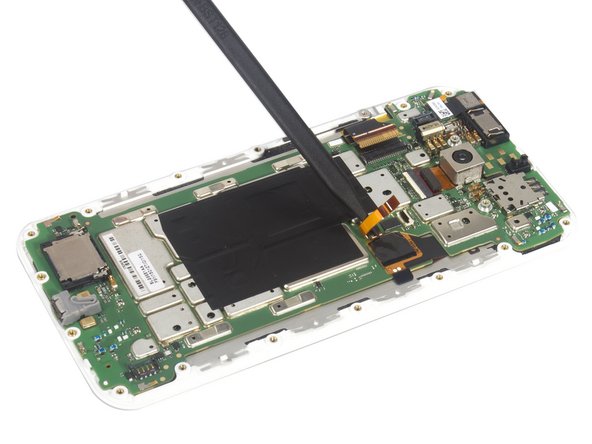
Relâchez le connecteur du numériseur tactile.
Not only this little cable has to be disconnected but the whole black squared flat cable that comes from the display underneath. I almost split the cable trying to figure out how to disassembly it. I slid a little plastic piece under the black flat cable to unglue it.
-
-
-
L'écran nouvellement acheté n'aura probablement pas de grilles de haut-parleur, vous devez donc les retirer de l'écran cassé et les mettre sur le nouvel écran
-
Sur les haut-parleurs supérieur et inférieur, retirez la mousse de haut-parleur légèrement collée. Décollez délicatement. Cette mousse ne sera pas réutilisée donc c'est ok si elle se déchire.
-
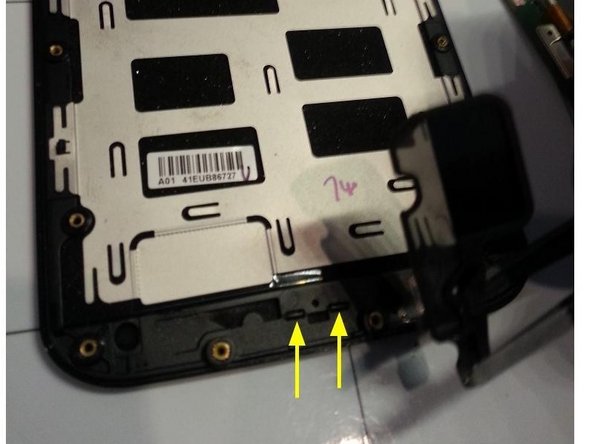
Localisez les deux languettes qui maintiennent la grille du haut-parleur en place. Mis en évidence sur la photo par des flèches jaunes.
-
Poussez la grille du haut-parleur en forçant l'une de ces deux languettes hors du cadre en appuyant sur la languette avec une pince à épiler. Il faut un peu de force et ça sortira.
-
La photo ne montre que le retrait de la grille du haut-parleur inférieur, mais la grille du haut-parleur supérieur est retirée de la même manière.
-
-
-
Après avoir retiré les deux grilles de haut-parleur, elles peuvent être placées dans le nouvel écran. Attendez que le téléphone soit entièrement remonté pour mettre les anciennes grilles dans le nouvel écran.
-
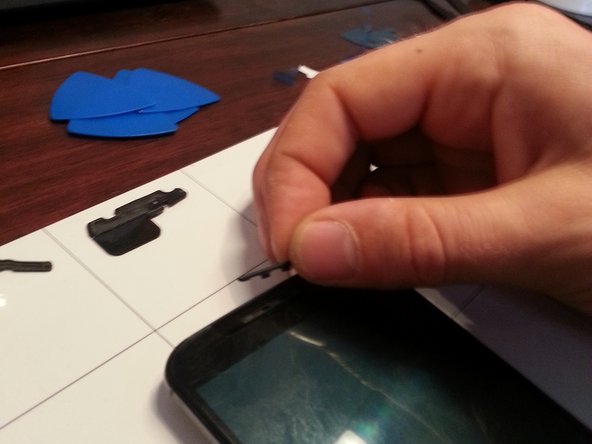
Alignez les deux languettes de la grille avec les deux fentes du nouvel écran
-
Poussez délicatement la grille dans les deux fentes. Commencez par pousser avec votre pouce et votre ongle sur une languette et n'enfoncez qu'une seule des deux languettes à la fois. Une forte pression de poussée est nécessaire, veillez donc à ne pas endommager le nouvel écran.
-
Si vous ne parvenez pas à enfoncer les grilles avec vos pouces, essayez de placer les grilles en place, puis poussez l'écran face vers le bas contre une surface plane.
-
Une fois que l'une des languettes est dans la fente, la deuxième languette peut être poussée dans la fente avec une certaine pression supplémentaire. Les deux grilles de haut-parleur peuvent être remplacées de cette manière.
-
Quelques personnes ont signalé avoir cassé leur écran nouvellement installé en faisant apparaître la grille du haut-parleur. Il est également acceptable de ne même pas installer la grille de haut-parleur cosmétique.
I wasn't able to push the speaker grills by thumb pressure, so instead just pushed the screen face down onto a flat surface. The speaker grills then snapped in place easily.
I just broke a brand-new screen by trying to get the speaker grills in. Pushed it down onto a flat surface ... the screen then broke in the bottom. I still haven't managed to get the speaker grills in. Be very, very careful if you try this.
ibreakit -
I also cracked the new screen trying this. Didn't seem to take much force to break it. Never did get the speaker grills in. I would advise don't even try.
You can use sandpaper to rub off some metal from the edges of the two heads. Pops in easily and you can use a little bit of glue to keep it firmly in place.
-


Pour remonter votre appareil, suivez ces instructions dans l'ordre inverse.
Pour remonter votre appareil, suivez ces instructions dans l'ordre inverse.
Annulation : je n'ai pas terminé ce tutoriel.
42 autres ont terminé cette réparation.
Merci à ces traducteurs :
94%
[deleted] nous aide à réparer le monde ! Vous voulez contribuer ?
Commencez à traduire ›
18 commentaires
Asking what little bit I don't hear about removing the top and bottom speaker pieces and if someone can give me a little more detailed information as to how to remove them so that I can reuse them in the new LCD and digitizer assembly that I got. For whatever reason it didn't occur to me when I ordered it to make sure that it came with new speaker pieces but thankfully because of a discount code and free shipping I can't complain much for getting the assembly combo for $85 with the exception of it not coming with new speakers or I know the bottom one of the speaker and the top one isn't but hopefully you get what I'm saying. So any more info I would appreciate it
What would cause the new screen to just shut off intermittently and power the phone down. I also experience a good amount of heat towards the lower portion of the screen assembly when powered on or plugged into a charger. I have changed the power/volume button flex cable assembly, both pieces and that didn't solve my issue with screen powering off.
I'm experiencing a similar issue. I've been scratching my head after replacing a screen on a customer's device for several days now. When I power up the device, everything appears to work except for the AT&T network (not sure if has been disconnected or not). Though, once the phone goes to sleep on it's own, or it's left alone for too long, things start to act funky. I wake the phone up after falling asleep for the first time since boot, the home screen appears, but there is no sense of touch/the digitizer isn't functioning anymore. Once the screen falls back asleep due to no interaction, it will not wake back up by pressing the power button and the LCD remains completely black. When I put the original screen back into the phone, however, the phone works as it should. The only way to reset the device is to unplug the battery, which results in app optimization after every trial (time consuming). There is also a bit of heat coming from the middle of the phone. I'm running out of ideas. Please help!
I am having exactly the same issue. I replaced the screen (which came with a frame) without incident. Phone powered up fine, touch worked normally, all apps and connectivity normal. After the screen goes black and I power it back on, the touch won't work. After it goes black again, the phone shuts down completely, I have to turn it on by unplugging the power cord and then holding the power and volume up buttons. Apps must initialize again, takes a few minutes. I suspect that there may be something defective with these screens? I got the following part: 2-O-1932-TK1887 Motorola Moto X 2 Screen Assembly with Frame - White (Add Toolkit) from Strive Mobile. Anyone else?
Screen work incorrectly after screen replacement was having the same issue this fixed the problem!
I'm currently having the same issue with my replacement. I went ahead and ordered a second assembly to make sure the replacement part wasn't the issue, with no success. I'm still experiencing the screen cutting off randomly and heat coming from the board.
Steve B -
Be careful! The replacement LCD screen linked above is not the one used in the video or the step by step guide!!!
The piece linked there is the screen alone, without the support frame, and it is very difficult -if not impossible- to scrap the support frame from your broken screen.
You will want to purchase a screen Assembly instead, which will include the support frame, such as this one (from the same website): http://www.witrigs.com/oem-lcd-screen-as...
Great guide nonetheless.
hello! i have broken my moto x 2nd gen LCD last week, but the touch works all fine. I wanted to know if it is possible to replace the LCD without the digitizer.
Does anyone know where I can pick up the speaker grill for this phone?
I'm having a problem with my cell phone, everytime I turn it on, it shows me a couple of vertical lines that start to show up, then it becomes a big thing on it, with a lot of coloured points, like the sky at night, like a galaxy (not the cell phone, a real galaxy).
I don't know what to do, I never dropped it off.
What if I try to remove and replace the LCD flat cable?
I broke the digitizer on my Moto 2nd gen X1095 few weeks ago. The top glass is intact, but I can see it is broken in the second layer through the glass.The screen won't light up at all. I've already got a replacement phone (Moto X Pure) but out of pure stubbornness and curiosity want to fix my old one. I've replaced the screen+digitizer combo according to this guide. But the new screen won't light up. The phone buzzes and I could even answer a phone call by imitating call answer swipe motion on the screen. In the process of disconnecting the old LCD screen from the motherboard, I've manager to break the latching black plastic piece that is suppose to hold the ribbon in place and bend one of the teeth on the far end of the connector. But it does not seem to affect how deep the ribbon cable goes into the connector and I've placed sticky tape over the connector instead of the latch. Could that be the reason the screen won't light up? Any ideas why else it could be happening?
Did you solve your problem of the LCD screen not lighting up?
From where will i get the screen replacement from?
Want to change my phone screen desperately… Please Help Me…
Thank You…
If your screen comes with the speaker grills, DO NOT remove them to reuse the original ones. The risk of cracking the screen, especially on the outside edge is not worth it. Just live with the color grill you get.
Good guide, thanks for sharing. As a side note, I used my heat blower in the low setting (50 C) to soften the original adhesives in some removal procedures and after that I clean the adhesives all with a fine brush and isopropyl alchohol. After well dried I heat them again in 50c setting with eventual higher temp bursts prior gluing to assure an even bond. Thanks!