Introduction
L'alimentation interne est essentielle pour que votre appareil s'allume. Suivez notre page de dépannage pour identifier si l’alimentation interne est cassée ou s’il s’agit du cordon d’alimentation externe. Le cordon d'alimentation sera un remplacement beaucoup plus facile si c'est le cas.
Ce dont vous avez besoin
-
-
Retournez l'appareil pour révéler la section en caoutchouc de la plaque arrière. À l'aide d'un spudger en métal, insérez délicatement l'extrémité émoussée dans l'espace situé entre la plaque arrière en aluminium et le caoutchouc, en séparant les deux pièces.
-
-
-
Retirez les dix vis de 3 mm avec un tournevis cruciforme n ° 00.
The two screws in the top center of this picture should not be removed at this time. They are locating pins on the hard drive.
Correct - the four screws top centre with glue over then do not need to come out. They are only locating posts for the HDD.
Tony Meredith - 2018-06-26
CONFIRMED. Thank you very much for the screws which should not be removed. You guys are right.
-
-
-
-
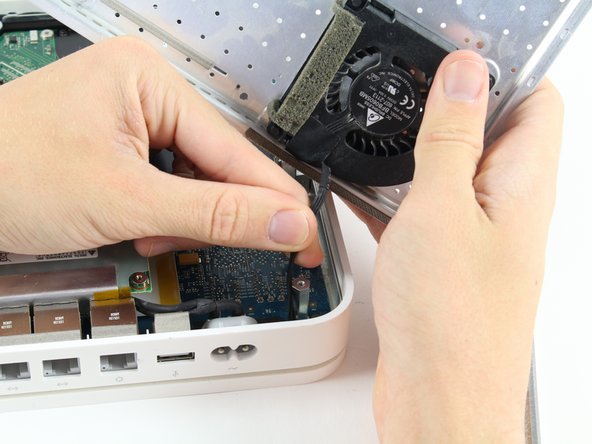
Le ventilateur apposé sur la plaque arrière est connecté à la carte logique. Un petit fil doit être détaché pour retirer complètement la plaque arrière.
-
Tirez la base du fil près de la carte logique et le connecteur se détachera.
Be careful you do not rip the locating connector off the circuit board like I did.
-
-
-
Retirez le connecteur externe de son logement en le soulevant puis en le tirant.
-
Soulevez le bloc d’alimentation interne de l’appareil.
-
-
-
Déconnectez le dernier câble d'alimentation de la carte logique.
very easy to find a replacement one on ALIEXPRESS. I bought one, it was not new but a refurbished but it works.
https://fr.aliexpress.com/item/400119317...
very to change it
-


Pour remonter votre appareil, suivez ces instructions dans l’ordre inverse.
Pour remonter votre appareil, suivez ces instructions dans l’ordre inverse.
Annulation : je n'ai pas terminé ce tutoriel.
15 autres ont terminé cette réparation.
Merci à ces traducteurs :
100%
Ces traducteurs nous aident réparer le monde ! Vous voulez contribuer ?
Commencez à traduire ›
Équipe

Cal Poly, Team 4-2, Livingston Fall 2016 Membre de l'équipe Cal Poly, Team 4-2, Livingston Fall 2016
CPSU-LIVINGSTON-F16S4G2
4 membres
17 tutoriels rédigés
4 commentaires
My time capsule stopped working. I tried everything but it was completely dead so I bought a new power supply on eBay but now the amber light is solid and won't turn green. I've tested the hard drive and it's fine. I've got another new power supply today and still a solid amber light. Any ideas please?
After the Apple Reseller said the device was not covered by service anymore and data rescue would cost 70 bucks I decided to go for it myself. Went very well. Except the grey rubber backplate was ripping apart on removal. Must be because of the device getting so hot. Will fix it with some self-adhesive rubber mat from the crafts store.
Thanks for the guide!
Hello is HOT I took the rubber mat off and rise it with rubber foot for better circulation of air, it helps alot.
After the new power supply the TC does not connect to hard drive. Have a green light.
The epoxy cementing the rubber pad to the aluminum base is a lot stronger than the rubber itself. The rubber is likely to tear as you remove it; I had to use a putty knife to clear the screws. It's worth hanging onto the branding near the Ethernet ports, for future identification (model number, serial number, Ethernet ID, AirPort ID); you can fashion a replacement pad out of neoprene rubber.
adlerpe - Réponse
Mine completely ripped I have no back cover now its in multiple pieces…. mine was giving off way to much heat and hard drive errors so I decided to replace hard drive and fan wish me luck BUT if yours is overheating do not expect to get back off without ripping the rubber to
William - Réponse
Using a fan to heat the plate up was helpful
Michael Zimmermann - Réponse
I wish I read Michael Zimmermann’s suggestion before I tore the first half into about 15 pieces! On the second half I used a hair dryer to heat the rubber. With enough heat and a very slow steady pull on the rubber it came of as a single piece :-)
mfred2 - Réponse
Do I need to put back on the rubber? will it overheat if I don’t?
Strider - Réponse
It is almost impossible to keep the bottom rubber covering intact in one piece. The rubber is covering the whole base section and it won’t be a problem without it I guess. This is not an epoxy because it is still gummy and sticky. This is like the adhesive used on the double side tapes. Goo Gone worked well to remove those residues.
Kenn Sakurai - Réponse
The rubber cap like bottom can be replaced with easy to cut in shape cork sheet will do. Just rip off the thin strip where the serial number for the ID and other info that might be needed later. Have it glued or put on a clear tape and put it on the side of the white plastic sidewall will do.
Kenn Sakurai - Réponse
With age, the rubber becomes brittle. It is best to heat it up with a hair dryer before trying to gently peel it off.
SirDeck - Réponse
Mine was probably about 10 years old at this point. I used a clothes iron (flatiron) set on medium heat ("permanent press"), and a piece of "parchment paper" from the kitchen between iron and rubber. After 30 seconds or so, the glue was softened enough that I could lift off the rubber, a little at a time using a putty knife. It all came off in one piece, with essentially all the glue still attached to the rubber. My thanks to the person (forgot the name, it was on one of the "drive replacement" articles for one of the other model Time Capsules) who suggested the iron.
Paul Koning - Réponse