Introduction
Ce guide montre comment remplacer l'assemblage électrique d'un Dremel 4000.
Ce dont vous avez besoin
-
-
Commencez par retirer le couvercle du boîtier en le dévissant.
-
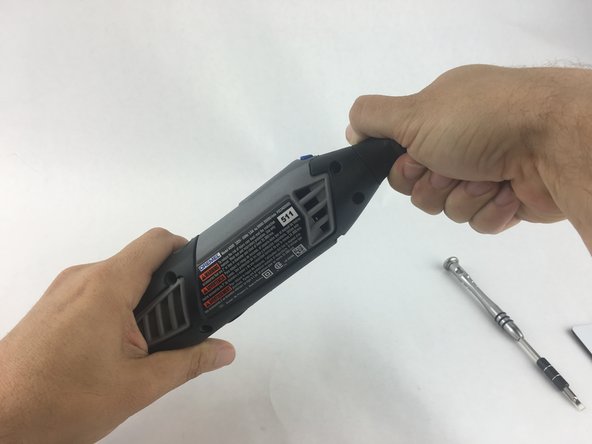
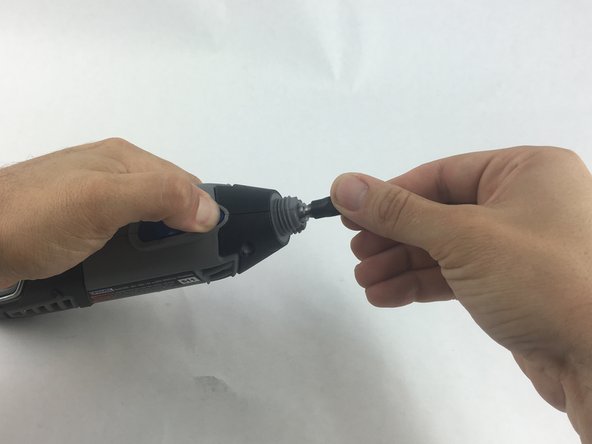
Ensuite, dévissez l'écrou de la pince de serrage maintenant exposé tout en maintenant enfoncé le bouton de verrouillage de l'arbre.
-
-
-
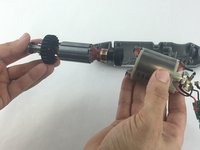
Avec vos mains, retirez soigneusement le cintre du boîtier.
Mine seems to have solid caps without the slot. How are this type removed?
This is getting worse. Maybe skipping the Collet Nut part threw me off - as there is no hanger. This description is PATHETIC!!!
I love how these pictures show you NOTHING related to what this guy is talking about
-
-
-
Retirez les capuchons des brosses (un de chaque côté) à l'aide d'un tournevis à tête plate.
I have found that the brushes are the most likely failure point on the Dremel tool. I haven’t purchased a new one in many years but they used to come with a spare set.
In general commutator brushes are made of a soft high carbon compound, usually found with new springs attached. The brushes can be carefully reshaped using files, sandpaper and a razor knife to fit the recesses of the tool.
Use the original to get necessary dimensions, a dial caliper is very helpful here to duplicate channels and recesses as well as determining how long the brushes should be. Should you need to shorten the brush a new concave can be established using a pencil or dowel wrapped in sandpaper being sure to match the concave to the channels so it matches the armature. It is preferable the curve be wider than the armature so edges don’t catch, it will naturally wear into a perfect curve. Blow off before installing.
Once the tool is reassembled turn on and off several times then run for a while varying the speed.
-
-
-
-
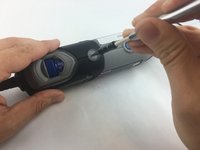
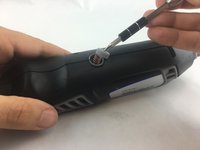
Pour dégager l'accès à l'ensemble électrique, retirez le capuchon du cadran à vitesse variable et le levier d'alimentation bleu, et mettez-les de côté.
-
-
-
Chaque fil passe par une petite ouverture sur la carte de circuit imprimé et est maintenu par une vis à tête plate.
-
Desserrez la vis juste assez pour retirer le fil en le tirant doucement avec votre main.
Hello I need to know or see where is plugged the blue wire, I think that know the problem it is disconnected? Thank you. if you need my e mail. charbonneau_eric66@hotmail.com
-
-
-
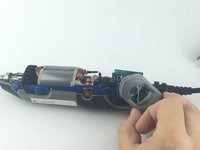
Tirez prudemment sur le puits pour le sortir du boîtier.
-
-
-
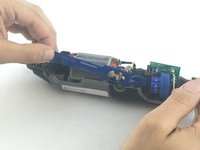
Tenez fermement l'ensemble du champ dans une main et l'ensemble des roulements dans l'autre.
-
Faites glisser avec précaution l'ensemble des roulements hors du montage sur le terrain.
Bravo pour les etapes. Qui connait les caractéristiques des deux roulements ?
-
-
-
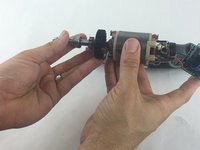
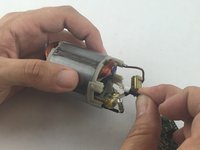
Tenez fermement l'assemblage de terrain dans une main, et tirez doucement sur les fils rouge et noir qui relient l'assemblage électrique à l'assemblage de terrain.
But where does the blue wire connect?
-
-
-
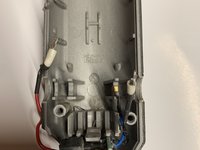
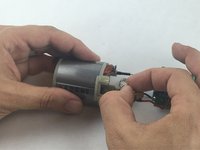
Il s'agit de votre assemblage électrique complètement retiré.
Como saber si este conjunto está bueno? Como lo pruebo. Q medidas tienen con el tester ?Hi
I have question
I have American Dremel 4300 but I'm in Europe
If I buy this in Europe
https://www.toomanytools.com/interrupteu...and change on my 4300, it will work ?
-


Pour remonter votre appareil, suivez ces instructions dans l'ordre inverse.
Pour remonter votre appareil, suivez ces instructions dans l'ordre inverse.
Annulation : je n'ai pas terminé ce tutoriel.
26 autres ont terminé cette réparation.
Merci à ces traducteurs :
100%

Schwarzer nous aide à réparer le monde ! Vous voulez contribuer ?
Commencez à traduire ›
Équipe

USF Tampa, Team 15-4, Remmell Spring 2016 Membre de l'équipe USF Tampa, Team 15-4, Remmell Spring 2016
USFT-REMMELL-S16S15G4
4 membres
13 tutoriels rédigés
15 commentaires
One of the brush holders has a component...small capacitor... ten cent part. If somebody can identify the value of the component, I could fix mine now that I've replaced the control board and still won't start. I shorted across the component and suddenly came to life.
DF110S 110c Thermal Fuse 16A 250V
“Thermal fuse DF is an one shot device, after operating function have to be replaced.”
Anyone with info about the third wire (on mine is blue ending with a small copper clip) serves? This is connected off of the switch, labeled W5 on the circuit board. [Edit. It is a ground] I suspect it is a feed back wire for speed sensor? But where does it attach? Some wear on the abovementioned capacitor crossing one of the brushes. Anny ideas?
You see the copper bushing slot at the top of the picture (next to the guy’s index finger) from step 9? Directly underneath it where the slot sits, there’s a tiny notch in the gray frame. Once you pull off the bushing slot from the frame (if you haven’t already), slide the small copper clip (from your 3rd blue wire) onto that notch. Then you push the bushing slot back onto the frame where it was. Essentially, the copper clip is “grounded” to that bushing slot.
An even better photo in step 11 showing the copper clip on the blue wire located beneath the copper brush holder
D Lee -
I have a dremel 4300 that shot out today. Opened the baby up and one whole IC on the variable speed controller has been blown. Parts seem hard to come by for the 4300. Is it okay if I use the Electronic assembly for the 4000?
Hi I am looking to replace the same as well. Did you manage to complete your repair/replacement? Was it a 120V or 220V part?
Jem Q -
not so easy to place that blue wire!!!
Yeah, that blue wire is a complete pain.
Waiting for a replacement Armature and then the replacement fun begins.
Hi. I just purchased a Dremel 4300 from America. I had to get an UK/IRL adapter to plug it in. I ran it on slow for under a minute and then POP & Flash. Now its completely dead - only a few hours old and only ran for less than a minute.
What would anyone recommend I do?
1, Contact the seller and send it back for repair (which will cost me extra for shipping etc)?
2, Try and fix it myself?
3, Replace the whole cord with my old Dremel cord?
Any help is greatly appreciated.
Thanks in advance.
Der
i have a dremel 4000 an the big resistor near the black power cable got grilled, can someone tell me the value of this?
I’ve got a Dremel 4000 and have replaced the electrical assembly. Except for the blue wire, it’s reconnected correctly; and I think the blue wire is connected OK. Now ready to re-assemble. Is there a trick to re-assembly? And don’t tell me to follow the instructions in reverse order. It’s close to being re-assembled, but it seems nearly impossible to get all the pieces in exactly the right position.
On my Dremel 4000 (220V) one of the passivated rectifier CS1M (the one with label D5) exploded. Looking at pictures of the electronic assembly I could guess that it’s the same rectifier as the 2 others D1 and D6.
Would this passivated rectifier CS1M be replaceable by a general purpose one such as 1N4007 ?
Thanks John, this was very helpful. My Dremel 400 died suddenly yesterday. The tool had been bouncing a bit, and I suspected the internal thermal fuse. After disassembly, I couldn't find anything obvious. The thermal fuse showed continuity with a multimeter, the coils of the field were also good, and nothing looked obviously burnt or damaged anywhere else. While I had it open I cleaned a bit of carbon dust out of the commutator gaps and cleaned the commutator bars with isopropyl alcohol, but I don't think this would have caused a sudden failure). I reassembled it, and it worked again. So I speculate that the blue On/Off witch had vibrated loose, and was no longer making contact with the switch on the circuit board, but reassembly re-seated it correctly. (I was confused by the blue wire too, but the second photo at Step 11 shows it very clearly).
Is this a joke??? Wanna maybe possibly tell US WHAT A COLLET NUT LOOKS LIKE?? I mean it's obviously very exposed (not exposed one bit. My Dremel 4000 looks exactly like it did before. No Collet nut suddenly stood out) and not all of us have advanced degrees in Dremel parts
Jeff Wagner - Réponse
Dam Jeff. I am not sure if you are being sarcastic or not, but maybe you should go lie down for while.
itguyfla - Réponse