Introduction
Si les roulements sont usés ou si le ventilateur est endommagé, le remplacement de l'ensemble des roulements est nécessaire. Après l'ouverture du boîtier, le palier peut être retiré à la main.
Ce dont vous avez besoin
-
-
Commencez par retirer le couvercle du boîtier en le dévissant.
-
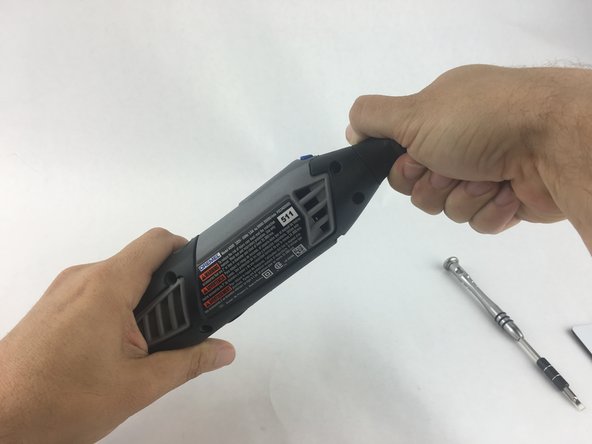
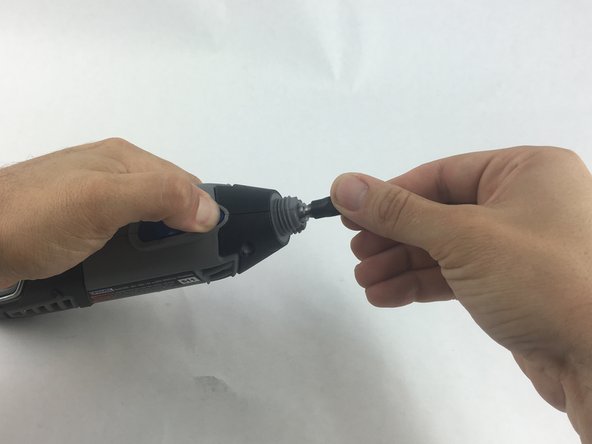
Ensuite, dévissez l'écrou de la pince de serrage maintenant exposé tout en maintenant enfoncé le bouton de verrouillage de l'arbre.
-
-
-
Avec vos mains, retirez soigneusement le cintre du boîtier.
Mine seems to have solid caps without the slot. How are this type removed?
This is getting worse. Maybe skipping the Collet Nut part threw me off - as there is no hanger. This description is PATHETIC!!!
I love how these pictures show you NOTHING related to what this guy is talking about
-
-
-
Retirez les capuchons des brosses (un de chaque côté) à l'aide d'un tournevis à tête plate.
I have found that the brushes are the most likely failure point on the Dremel tool. I haven’t purchased a new one in many years but they used to come with a spare set.
In general commutator brushes are made of a soft high carbon compound, usually found with new springs attached. The brushes can be carefully reshaped using files, sandpaper and a razor knife to fit the recesses of the tool.
Use the original to get necessary dimensions, a dial caliper is very helpful here to duplicate channels and recesses as well as determining how long the brushes should be. Should you need to shorten the brush a new concave can be established using a pencil or dowel wrapped in sandpaper being sure to match the concave to the channels so it matches the armature. It is preferable the curve be wider than the armature so edges don’t catch, it will naturally wear into a perfect curve. Blow off before installing.
Once the tool is reassembled turn on and off several times then run for a while varying the speed.
-
-
-
-
Pour dégager l'accès à l'ensemble électrique, retirez le capuchon du cadran à vitesse variable et le levier d'alimentation bleu, et mettez-les de côté.
-
-
-
Chaque fil passe par une petite ouverture sur la carte de circuit imprimé et est maintenu par une vis à tête plate.
-
Desserrez la vis juste assez pour retirer le fil en le tirant doucement avec votre main.
Hello I need to know or see where is plugged the blue wire, I think that know the problem it is disconnected? Thank you. if you need my e mail. charbonneau_eric66@hotmail.com
-
-
-
Tirez prudemment sur le puits pour le sortir du boîtier.
-


Pour remonter votre appareil, suivez ces instructions dans l'ordre inverse.
Pour remonter votre appareil, suivez ces instructions dans l'ordre inverse.
Annulation : je n'ai pas terminé ce tutoriel.
6 autres ont terminé cette réparation.
Merci à ces traducteurs :
100%

Schwarzer nous aide à réparer le monde ! Vous voulez contribuer ?
Commencez à traduire ›
Équipe

USF Tampa, Team 15-4, Remmell Spring 2016 Membre de l'équipe USF Tampa, Team 15-4, Remmell Spring 2016
USFT-REMMELL-S16S15G4
4 membres
13 tutoriels rédigés
5 commentaires
Nice guide. FYI, I've found that removing the rotor/bearing assembly is just as easy without removing the input power wires.
Absolutely, it is.
yeah why did we do that?
thats an abrupt end for someone trying to learn all of this the first time. which one of those is the field assembly and which is the bearing assembly? my guess is the bearing assembly is the cylinder looking thing on the right...
and then what? it just says do it all backwards to put it together again...? whyd we take it apart for? mines whistling or squealing or just going "EEEEEEEEEEEEEEEEEEEEEEEEEEEEEEEEEEEEEEEEEEEEEEEEEEEEEEEEEEEEEEEEEEEEEEEEEEEEE..." when i turn it on. just started today too. am i supposed to just, like, smack this can shaped part on the table and then cram it all back into its plastic case?
i mean, that works when the kids are acting up so im gonna give it a try.,..
Disassembly is shown, but main action of removing ball bearings from the shaft of the armature - vital essential sequence of removing - how to remove the collate pipe from the armature shaft, then how to pull out, ball bearings from the armature shaft is not shown. That is the most important procedure. No one wants to replace the whole armature and ball bearing assembly, at unnecessary high cost when the armature is okay. Please show how to remove ball bearings and replace them on the existing working armature.
Is this a joke??? Wanna maybe possibly tell US WHAT A COLLET NUT LOOKS LIKE?? I mean it's obviously very exposed (not exposed one bit. My Dremel 4000 looks exactly like it did before. No Collet nut suddenly stood out) and not all of us have advanced degrees in Dremel parts
Jeff Wagner - Réponse
Dam Jeff. I am not sure if you are being sarcastic or not, but maybe you should go lie down for while.
itguyfla - Réponse