Introduction
Ce guide vous montrera comment ouvrir votre Asus Zen AiO Pro Z240IC et comment remplacer la RAM à l'intérieur.
Ce dont vous avez besoin
-
-
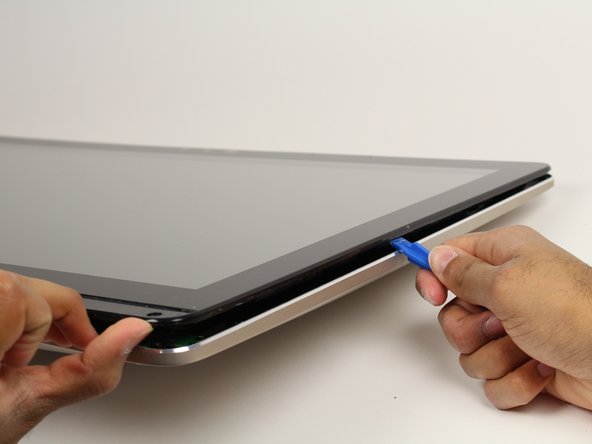
Utilisez l’outil d’ouverture en plastique pour dégager la bande de plastique noire au bas de l’écran en agitant l’outil entre la bande et l’écran.
-
Exécutez l'outil d'ouverture lentement le long de la base de l'écran, en retirant la bande noire jusqu'à ce que l'extrémité opposée de l'écran soit atteinte.
-
-
-
Placez l'ordinateur sur le dos, vers le haut.
-
Caler l'outil d'ouverture en plastique entre l'écran et la lunette du boîtier en aluminium de l'ordinateur.
-
Déplacez l'outil sur tout le bord de l'écran avec un mouvement de levier de haut en bas pour détacher l'écran du boîtier. Ne soulevez pas encore tout l'écran entier de l'ordinateur.
-
-
-
Soulevez l'écran du bord inférieur d'environ 6 pouces. Prop ce ouvert avec une main.
-
Regardez à l'intérieur de l'ordinateur et localisez cinq (5) câbles qui connectent les composants intégrés de l'écran (caméra, microphone, etc.) au reste de l'ordinateur.
Same here my model just had 4 cables.
-
-
-
Utilisez un doigt pour soulever les rabats de verrouillage en plastique qui maintiennent les trois (3) câbles ruban en place.
-
Retirez les câbles de leurs bornes en les glissant loin de leurs connecteurs.
When re-connecting take great care to ensure the ribbon cables are square and flat - I had to take mine apart again to re-seat one as the screen was blank - worked fine once re-seated properly.
-
-
-
-
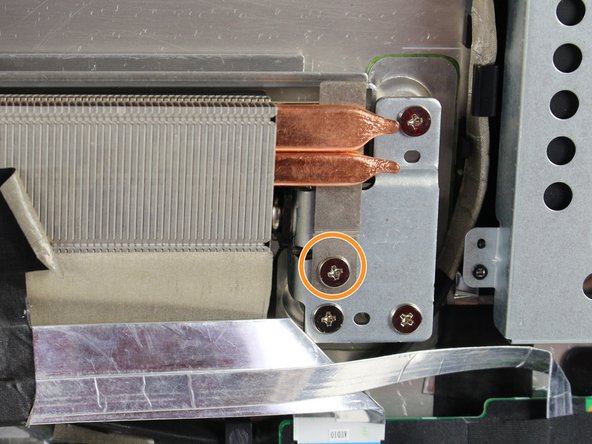
Utilisez un tournevis cruciforme n ° 0 pour retirer les trois (3) vis 4,8 mm du ventilateur.
-
Retirez le câble reliant le ventilateur à la carte mère en le tirant de son support.
-
-
-
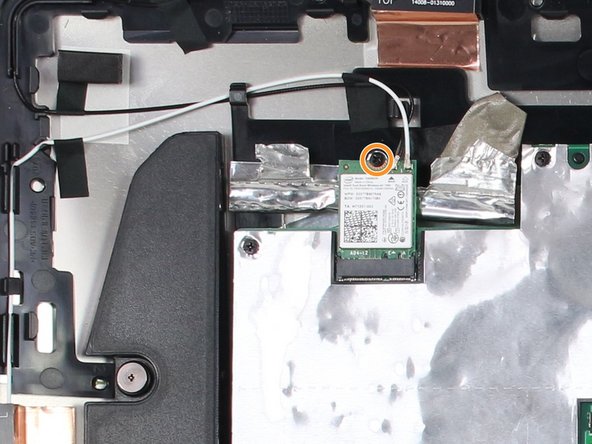
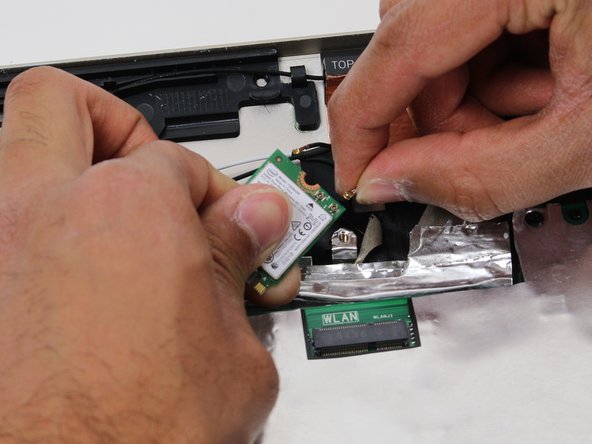
Localisez la carte WLAN dans le coin supérieur gauche de l'ordinateur.
-
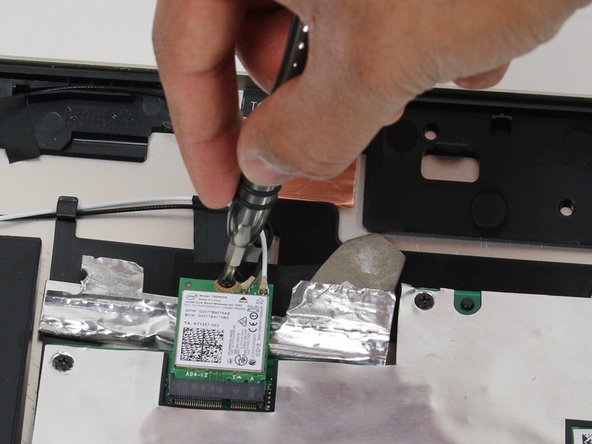
Utilisez un tournevis cruciforme n ° 1 pour retirer la vis de 3,2 mm située en haut de la carte WLAN.
-
-
-
Retirez les six (6) câbles ruban en soulevant les languettes de verrouillage en plastique, puis en les faisant glisser hors de leur prise.
-
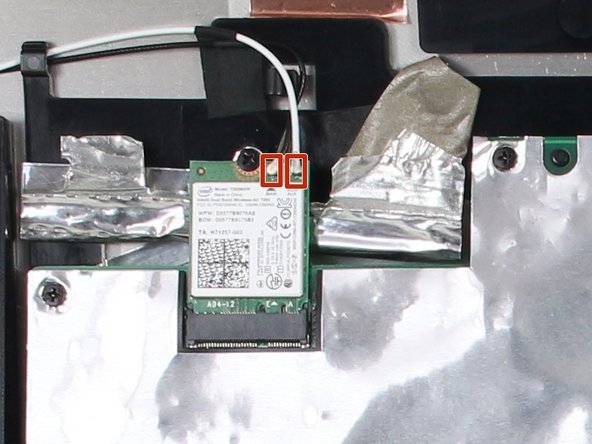
Retirez les deux (2) autres câbles en tirant tout droit sur les connecteurs blancs.
-
-
-
Retirez le bouclier métallique recouvrant le bélier en le tirant tout droit vers le haut.
-
-
-
Appuyez sur les deux languettes métalliques de chaque côté du stick RAM. Cela provoquera un léger soulèvement du bâton.
-
Retirez la RAM de son socket.
-
Répétez les deux dernières puces sur l’autre clé RAM.
-


Pour remonter votre appareil, suivez ces instructions dans l’ordre inverse.
Pour remonter votre appareil, suivez ces instructions dans l’ordre inverse.
Annulation : je n'ai pas terminé ce tutoriel.
8 autres ont terminé cette réparation.
Merci à ces traducteurs :
100%
[deleted] nous aide à réparer le monde ! Vous voulez contribuer ?
Commencez à traduire ›
Équipe

Cal Poly, Team S4-G1, Livingston Fall 2017 Membre de l'équipe Cal Poly, Team S4-G1, Livingston Fall 2017
CPSU-LIVINGSTON-F17S4G1
5 membres
25 tutoriels rédigés
4 commentaires
This was a great guide. The only thing I would add is to push “out” on the ram clips instead of down to actually get it out. I spent an unreasonable amount of time trying to push down and realized after a while it just wasn’t going to loosen anything up that way! Just upgraded my ram so thanks.
Great job! Beside RAM, wich type of disk drive will be more performance on this ASUS model? Can a ssd M2 be set for the system and use the mechanic HD for storage? Thanks
Late reply, but theoretically you could, but you do need an appropriate screw or double sided tape to keep it in place and reinstall Windows onto the new drive to get everything set up correctly (that means back up your data!).
Also do pay attention to the type of SSD you are shopping for, as it looks like the connector looks like it is set up for proper blazing fast M.2 NVMe 2280 (22mm wide, 80mm long) SSD. There are some SSDs on the market that have two notches on them which may or may not work with this computer but will still fit.
je vient de terminer l"opérations avec succès . j'aie maintenant 32 gh ram et 1 to ssd de disque dur une vraie bombe
On my machine, it was positively impossible to use a plastic opening tool, or even a razor to get under the plastic strip - even after heating up with a heat gun. However, I found another method that will also help prevent damage to the plastic strip: in pictures for Steps 2 and 3, you can see that under the plastic strip, next to some of the screws there are square holes in the plastic body. I was able to shape a sturdy paper clip into an “L” shape, and feed it through the right-most exhaust vent at the bottom to insert into this square hole from below. From there, you can use the paper clip to try to push the plastic strip up from below. It still required some heat from the heat gun, but eventually I was able to push the plastic strip up enough to be able to slip a razor blade under it.
Alexander V Trofimuk - Réponse
I too was unable to do this with the plastic tools, but used a small flat screwdriver to ply up the corned on the bottom curved corner and plastic tools form there - just left a small blemish on the plastic besel, but I can live with that.
Andy Monaghan - Réponse