Introduction
Consultez ce tutoriel pour remplacer la batterie usée ou morte de votre Samsung Galaxy Watch.
Si votre batterie est enflée, prenez les précautions nécessaires.
Pour votre sécurité, laissez la batterie de votre montre se vider en dessous de 25 % avant de vous lancer dans le démontage. Cela réduira les risques de déclencher un incendie dangereux si jamais vous abîmez accidentellement la batterie pendant la réparation.
Ce dont vous avez besoin
-
-
Dévissez les quatre vis Tri-point #00 (de 4,2 mm de long) du fond de la montre.
-
-
-
Insérez un outil d'ouverture entre le fond et la carrure de la montre.
-
Faites délicatement levier pour ouvrir le fond en plastique.
You may need to use a small screwdriver or letter opener to pry the case apart. I found with two different spudgers I could not get it to budge.
How do I Secure the sealing, and wish material du you use?
I managed to get the back cover to open with an unused pry tool on one side, however, to fully remove it I needed to use 2 iFixit opening picks from my toolkit as the one side wouldn't open with the pry tool.
I couldn't get the back cover off with any normal tools. However, I discovered I could slip a razor blade a short distance under the back cover. With this in place, something thicker (like a plastic spudger) could easily be pushed between the razor blade and the metal of the watch. Obviously, working with a razor blade like this is quite risky, I had mine in a little holder to protect my fingers!
-
-
-
Débranchez la nappe du capteur de sa prise sur la carte mère avec une spatule (spudger).
My 2019 Gear Sport has no flex cable it used a post where the flex cable is. This plugs into the mother board.
Much better for disassembly.
-
-
-
Ôtez le fond.
anyone where can find the rubber gasket?
is the gasket the Adhesive? If not, what adhesive suggested and how do you apply it?
No, the gasket is not the adhesive. As adhesive you can use this under the battery.
woher bekomme ich eine neue gummidichtung?
Hat jemand eine Quelle für die Dichtung der Rückabdeckung (rote Dichtung, 3. Bild Schritt 5). Hat jemand versucht die erfolgreich selber herzustellen?
Falls jemand die Gummidichtung im Netz findet, gerne hier posten. Wir konnten bisher noch keine finden. Selbst rounded.com hat es nicht, und die haben recht viel für (Samsung) Smartwatches.
Anyone know where to get a replacement gasket? I wear my watch showering and swimming, I don't want to loose the waterproofing
When I opened the back cover, the gasket was already muddy.
I purchased a liquid gasket because it is difficult to obtain a dedicated gasket.
It is for general-purpose waterproof packing used for cars and motorcycles, and is contained in a 5g tube.
Since it is necessary to apply it to a fine place, I attached a very thin nozzle for super glue to the tip of the tube and applied it.
I can't guarantee the waterproof performance, but I tried what I could.
-
-
-
-
Débranchez la nappe de l'écran de sa prise sur la carte mère à l'aide d'une spatule.
My display flex cable is cut … is it possible to replace only cable without changing display… if yes please leave a link to buy it
-
-
-
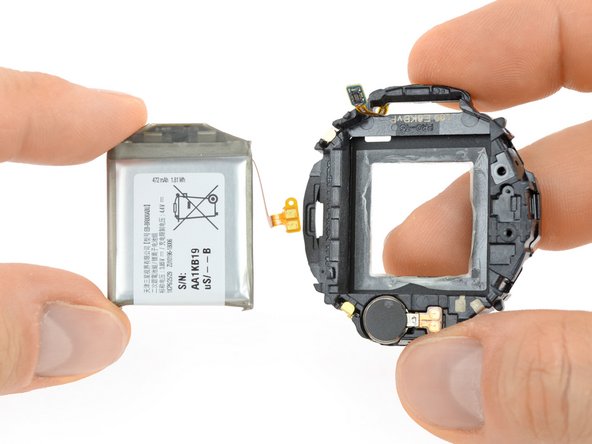
Soulevez le mouvement hors de la carrure.
Es sind an den Ecken des Kernstücks ein paar "Plastikdreiecke" mit dem man es mit einem Spudger leichter raushebeln kann!
Thanks @Marco Marinkovic. There are a couple holes or points, on which to leverage in order to free and lift the core unit. The core unit won't move otherwise as it is anchored there
-
-
-
Décollez délicatement les nappes des deux boutons du châssis en plastique avec une pincette.
-
-
-
Insérez une spatule dans le petit interstice sous la carte mère, au niveau de l'encoche dans le châssis en plastique.
-
Soulevez la carte mère en faisant pivoter votre spatule.
-
Faites glisser la carte mère vers l'extérieur, sous l'attache en plastique.
There is a plastic clip holding down the motherboard in the corner opposite to where you’re prying. After lifting slightly, the motherboard should be slid out from underneath that clip to avoid damaging it.
Thanks for the hint. Added an additional image and bullet to point that out.
-
-
-
Poussez à travers l'encoche dans le châssis en plastique sur la batterie pour la faire sortir de son compartiment.
-
Enlevez la batterie.
Wo war denn das Kabel vom Akku vorher befestigt? Musste man das vorher lösen? Fehlt dieser Schritt in der ansonsten sehr detaillierten und guten Beschreibung? LG Heidi
Das Kabel vom Akku ist nicht wirklich an etwas befestigt. Es hat auf der einen Seite lediglich die beiden Kontakte (goldene Rechtecke) welche über zwei Federn, die am Motherboard sitzen, den Kontakt herstellen und auf der anderen Seite ein wenig Klebstoff, mit dem es in seiner kleinen Vertiefung befestigt ist.
FANTASTIC!! Thank you for your help!
Does using a heat gun help when removing the back cover ?
Not necessarily, the back cover sits quite tight sometimes and is "sealed" with a rubber gasket (and grease, and gunk, and dirt) not with adhesive that could loosen when using heat. A watchmakers knife might do the trick (or a wide and thin flathead screwdriver), but be careful not to scratch the housing.
Gracias por este post!! Reemplacé la bateria sin problema siguiendo estos pasos, y al conectar, la batería tenía un 60% y empezó a cargar unos minutos con aparente normalidad, y después parece como que no conectasen bateria y reloj, ya que aparece carga al 0% y no carga, a qué se puede deber? Mil gracias de antemano por vuestra ayuda. Salud!
I have ordered the 46mm battery, the magnetic project mat, and essential electronics toolkit to replace the battery in my Samsung Galaxy Watch. My question though is about the instructions in the conclusion section of the ifixit replacement instructions. In the conclusion, it says to "secure the new battery with pre-cut adhesive or double-sided adhesive tape". How critical is that? Also does the battery or the kit come with any adhesive strips?
Una real joda. Lo más seguro es que algo salga mal y el reloj se malogre.
Ist die Uhr danach noch wasserdicht ?
LG Basti
Hi Bastian,
durch das Öffnen de Uhr werden die wasserdichten Dichtungen beschädigt. Wenn diese nicht ersetzt werden, ist die Uhr nicht mehr wasserdicht. Wie wasserdicht die Uhr nach der Reparatur tatsächlich ist, hängt aber davon ab, wie passgenau neue Dichtungen eingesetzt und die Uhr verschlossen wird. Das IP68 Rating wird sie in jedem Fall verlieren.
-


Si possible, allumez votre appareil et testez votre réparation avant de poser une nouvelle couche d'adhésif et de le refermer.
Fixez la nouvelle batterie avec de l'adhésif prédécoupé ou du ruban adhésif double-face. Pour la positionner correctement, appliquez le nouvel adhésif dans la montre, là où il y avait de l'adhésif avant, et non directement sur la batterie.
Pour remonter votre appareil, suivez ces instructions en sens inverse.
Pour une performance optimale, calibrez votre nouvelle batterie : chargez-la à 100 % et laissez-la charger pendant au moins deux heures supplémentaires. Puis, utilisez votre téléphone jusqu’à ce que la batterie soit vide et qu’il s’éteigne. Enfin rechargez-le à 100 % sans interruption.
La réparation ne s’est pas déroulée comme prévu ? Consultez nos conseils basiques de diagnostic ou demandez de l'aide à notre communauté de réponses.
Apportez vos déchets électroniques à un recycleur certifié R2 ou e-Stewards.
Annulation : je n'ai pas terminé ce tutoriel.
116 autres ont terminé cette réparation.
Merci à ces traducteurs :
100%


Ces traducteurs nous aident réparer le monde ! Vous voulez contribuer ?
Commencez à traduire ›

Équipe

49 commentaires
thank you,it really help alot
Where can I buy the battery?
We hope to have them in our store soon. Check on our Samsung smartwatch parts over at [[ lien de pièces invalide ]]
How much does this cost for a battery and labor
labour is pretty straight forward, can do it youself. i payed around £15 for a battery and tools
The battery charged after replacing and the screen showed it was charging but it will not turn on. Says 100%
You might want to try and restart the watch. Sometimes just leaving it on the dock (no power plugged in) will bring it back to life.
merci , fantastique c est facile à suivre et il ne manque rien
merci à l l'auteur et aux traducteurs
Cordialement
Jean Pierre
Tobias Isakeit
just finished the install on the new Battery after taking the old one out over a week ago. Needed to wait for the new battery to be back in stock. With this guide, it was a cinch.
Hope to see more on other devices.
Why type of battery does it take?
Good guide. Only issues: I had to use a metal tool (like a letter opener) to very carefully pry the case open as no plastic spudger was working, and then when i got to pulling the motherboard/battery assembly out it just would not come out for some reason (I did coax it out eventually). Otherwise very straightforward process. Hoping my Galaxy watch works reliably again! (Charging up now, but already verified it still works!)
Great step by step, lots of care put into it as it was SUPER easy to follow.
The only think I could think of to add value to this is to add best practices and lessons learned to each step. I purchased the tools from IFixit but I had a hard time trying to get between the metal frame.
I so appreciate these instructions and the toolkit. I just replaced the battery and everything is in working order again. Thank you! As someone already mentioned, the only part I had trouble with was Step 2. The opening tool was not slim enough to insert between the back cover and the metal housing. I had to use a razor blade/box cutter blade and was careful not to hurt myself, but that did the trick. Also, the hall sensor flex cable (see Step 8) entirely came off of the plastic frame during step 13. I must have bumped it when removing the battery. From the pictures, I was able see how it should be reattached, so that turned out ok as well. Thanks again for making this possible! Go IFIXIT.com! These instructions are helping give new life to our valuables and keep them out of landfills!
I have a samsung galaxy active 40mm watch, will the 42mm replacement battery work with it? I have been unable to find a 40mm replacement battery anywhere on the internet.
Excellent!! This is exactly what I needed. The most difficult thing was finding a y00 bit but that came in an ifixit toolkit I found at a
Wow, perhaps the most clear, precise, concise, well illustrated & carefully designed set of step-by-step instructions that I've ever seen. Thank you, I couldn't have even begun to do this without you. Great photos too.
Excellent instructions.
What Adhesive is suggested? How and where do you apply the Adhesive? And is the Watch still Waterproof after installing the new battery?
I would double down on this question. Can you please answer it?
Ecaflipe -
As adhesive you could use double sided tape. It’s meant for under the battery (if it does not come with adhesive pre-installed). That will keep it in place (although it already sits neat between the motherboard and the core frame—you might get away without adhesive).
Regarding the water proof topic: It’s about that rubber gasket on the back cover (see step 5 last pic). If it’s not damaged you should be fine. Unfortunately we couldn’t find a listing for that gasket, yet.
Thank you for the excellent instructions! I was able to finish in ~40 minutes, despite having difficulty opening the bottom case for a while (the seal was good and sealed :).
I have a question. What adhesive are you talking about? And where can I buy some? I want to make sure I'm fully prepared before doing this.
As adhesive you could use double sided tape. It’s meant for under the battery (if it does not come with adhesive pre-installed). That will keep it in place (although it already sits neat between the motherboard and the core frame—you might get away without adhesive).
Thank you very much for your guidance in this problem it was very helpful and easy to complete
hello will the watch be waterproof even after i replace the battery?
Since the back cover is screwed-on it should be as water resistant as before providing an intact gasket (see step 5).
Is it possible to replace the battery with one that will be higher performing or is the amh not able to be upgraded
If you find a battery with the same specs but a higher mAh it should work (the voltage is the critical part for the watch to be able to charge it properly).Although I have no experience on how the watch calculates charging time and battery status. If you find more information on this (or try it out yourself), please share here for others to read :)
Lots of success
Hi KBL, we are convinced you can accomplish the repair yourself. That is what we want to accomplish with this platform—empower people to fix their devices. If you need tools you and get them in our store (and some spare parts as well). We don’t offer a repair service. But their might be (authorized) repair shop near your place if you feel better giving it away for repair.
Followed your guide and was shocked at how easy it was but after I finished the watch is now over heating. Has this happened with anyone else?
I have not attempted the battery replacement procedure on my Samsung Watch yet but I have used IFixit instruction modules for several other items all achieving success. I am confident therefor that my watch battery replacement will go equally successfull as long as I still have a steady hand. Thank you for this service it is important.
The only instruction which I needed was that the battery replacement had a film on the underside which prevented the tab from going over the pin in the plastic base. Once that was removed then it all went back together well.
In case anyone else has issues removing the core module, on the unit I changed, there were a couple of small metallic clips holding the core module in place - I had to use the pointy edge of a spudger to depress them to get the module to release. They are very small, so it's super easy to miss. It might be worth adding that to the guide :-)
one of the TY00 head is damaged, and I can't unscrewed it. any tip?
Only the regular "life hacks" ;) for removing stripped screws.
What if the back won't come of?
Very professional work.
Thanks
cuanto tiempo dura una bateria antes de dejar de funcionar, o cuantas cargas
Eine hervorragende Anleitung !!! ;-))))
guide was easy to follow but I need a new rubber gasket and I can't find a replacement anywhere.
Super Ausführliche Anleitung, die Uhr Repariert sich von Selbst ,daher Top Bilder Galerie die Ausreichend ist um denn Akku zu Wechseln
einfach ist aber auch anders
bin mal gespannt wenn s soweit ist.....
After succesfully replacing the battery, my watch requested the last OS update. I let it update, then all the sensors stopped working (gyroscope, HR, barometer). Unfortunately, I don't know if they were working BEFORE the software update. I read that many users had issues with the sensors after one of the last updates, so the point is that I dont' know if it's ad hardware issue - maybe I did not reassemble the watch properly? or a software one. Did someone have a similar problem?
I can't get them to budge
Irene - Réponse
Same here, its impossible to get the screws off. They’re almost stripped now too.
Prabhat - Réponse
Sorry to hear that. Here are some tips on how to get those screws off hopefully: Comment enlever une vis cassée
Tobias Isakeit -
Just started working on watch. Can not get the screws out. I purchased the recommended tools. Screws won't budge. I have not stripped them yet. How do I get them to loosen up?
joyce c - Réponse
Same here. I did buy your Electronics repair Bundle. The Y000 is too pointy, we need a flatter tool
Robertob67 - Réponse
Hi Ladies & Gentleman, please try as follows:
Use a spray can of "WD 40" with a spray pipe/tube but DO NOT spray into the screw holes. Just spray shortly on a piece of paper, a drop of WD40 will remain at the end of the spray pipe. This drop I put into the screw hole position. Do this for each screw hole and leave the stuff approx. 10 minutes alone. Afterwards use the screw driver as normal to turn the screws out.
*** After the drop is placed into the hole do not wait too long as WD40 is crawling into "even not existing gaps"
*** just use a small drop of WD40.
*** I intend for using 4 new screws as the head (Tri-Pont profile) seems worn out. But if I get new screws for sure I will go for a TORX profile because its the best as you don't need to apply axial force on screw driver.
Very best regards from Harald (a German machine building engineer)
Harald - Réponse
Harald again to Robertob67:
It is NOT the Tool Y000 but the Y00
Best regards
Harald
Harald - Réponse