Il est possible que cette traduction ne reflète pas les dernières mises à jour du tutoriel source. Aidez à mettre à jour la traduction ou bien consultez le tutoriel source.
Introduction
Ce tutoriel de réparation provient de l'équipe iFixit et n'a pas été soumis à l'approbation de Google. Pour en savoir plus sur nos tutoriels de réparation, c'est par ici.
Consultez ce tutoriel pour remplacer la batterie morte ou usée d'un Google Pixel 2 XL.
Avant de démonter votre téléphone, déchargez la batterie en dessous de 25 %. Une batterie lithium-ion chargée risque de prendre feu et/ou d’exploser si on la perce par accident.
Si votre batterie est gonflée, prenez les précautions nécessaires. Ne chauffez pas votre téléphone. Si nécessaire, appliquez quelques gouttes d'alcool isopropylique (> 90 %) avec un compte-gouttes ou une seringue dans les coins de la coque arrière pour ramollir l'adhésif. Une batterie enflée peut être très dangereuse, portez donc des lunettes de sécurité et faites extrêmement attention. Ou bien adressez-vous à un professionnel si vous avez des doutes sur la procédure à suivre.
Ce dont vous avez besoin
-
Étape 1 Procédure d'ouverture
Attention : les étapes 1 à 12 sont issues d'un tutoriel marqué comme en cours.
-
Posez une ventouse le plus proche possible du bord côté fente SIM en évitant la partie incurvée.
-
-
-
Tirez fermement et constamment sur la ventouse et insérez un médiator entre le panneau frontal et la coque arrière.
Whatever happened to “Do not heat your phone. If needed, you can use a dropper or syringe to inject isopropyl alcohol (90+%) around the edges of the back cover to weaken the adhesive.”?
It is in concern with swollen batteries.
I spent an hour trying to get the glass screen apart from the body. I tried the hairdryer etc but made no progress. However, when I used a sucker to gently pull on the glass it was easy.
I used a heat gun, and the metal spatula in the iFixit kit. I broke the screen. Then, continuing with a blue plastic triangle, the screen continued to break. It seems to be quite brittle.
Never use metal tools on glass component
p43j77 -
Just broke the screen as well. I’d say heat gun is a must, otherwise it’s really hard to slide pick at the top and bottom without breaking the screen. It’s a very thin line of glass over there.
I thought I did this perfectly. I used the iOpener to heat the glue, and the picks to slide around the screen to release the adhesive. I preformed the rest of the repair (charging assembly and the battery) with little issue. Just reassembled and the volume rocker side of the screen is white. I took less care on this side since the instructions said that you didn’t need to worry about how far the pick went in. NOT TRUE! There is a curvature to that edge that will push your pick up into the back of the unprotected display. It clearly doesn’t take much to damage it. I was so careful! F&CK!! I should have just created the e-waste and bought a new device. So mad!
-
-
-
N'insérez pas le médiator de plus de 6 mm (0,25") dans le bord inférieur du téléphone. Si votre outil touche la partie repliée de la dalle OLED, cela risque d'abîmer l'écran.
-
Ne coupez pas le long du bord gauche, vous pourriez endommager les nappes de l'écran, qui sont fragiles.
-
Faites des découpes peu profondes dans le coin supérieur gauche pour éviter la caméra frontale.
-
-
-
-
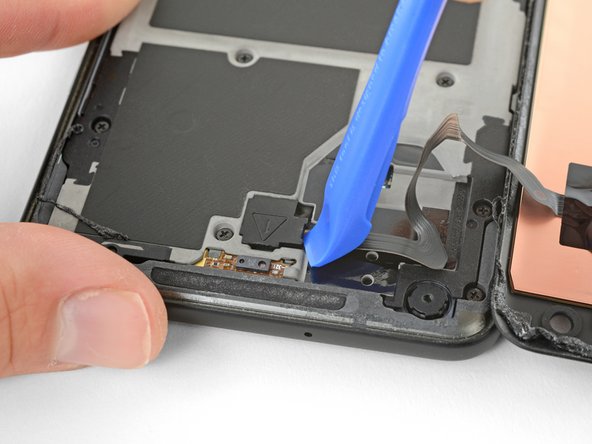
Servez-vous du coin d'un outil d'ouverture pour faire levier sur le cache du connecteur de la nappe de la vitre tactile.
-
Retirez le cache du connecteur.
Lol mine shot off and Ricocheted off the ceiling! Then landed on my shoulder haha
It literally popped me right in the middle of the forehead. My wife is still making fun of me.
Mine flew off while I was laughing you guys, never too be seen again: (
I decided to work outdoors, didn't read any comments first, so when mine flew off I found it five cursing minutes later in a crack on the driveway. Should have read the comments first! Thanks hamiltont. Will now read every comment BEFORE attempting step.
Confirmed, this $@$* can fly!
-
-
-
Prenez la pointe d'une spatule (spudger) pour soulever le connecteur de la nappe de la vitre tactile vers le haut et hors de sa prise sur la carte mère.
This small connector gave me fits getting it located correctly, is there a trick to getting it aligned since it’s difficult to see around edge of the connector?
-
-
-
Prenez l'extrémité plate d'une spatule pour débrancher le connecteur de la nappe de l'écran de sa prise.
-
Enlevez l'écran.
BE EXTRA CAREFUL HERE, and during reassembly! There are 2 itty bitty parts directly under this ribbon cable connector that, if damaged, will render your loudspeaker unusable. The only sure way to fix it if you break it is to replace the motherboard. There are some reports of people being able to solder the spots and shorting it to make it work, and that worked for me for a time, but they’re really tiny (about 0.5 mm) and if you don’t get a secure solder, or if you bleed over, it will also mess up your top speaker.
Saw this comment after I’ve done replacing and sure enough, the loud speaker was broken. The resistor was knocked over but still hanging in place so I just stuck it back and it works for now.
They are 2 black resistors at the end of the cable’s connector. So follow the above photo exactly and pry the connector from the side, not from the end of the connector like I did
What wasn't clear to me here (because I didn't put Step 13 together with Step 12, I suppose?) is that if your replacement part came with speaker grills and camera gasket, Step 12 is your final step. You are done, except for replacing the cables and covers, then placing the adhesive strips onto the replacement part and sticking the phone back together.
I ordered my screen from iFixit and it came with new grills and camera gasket already installed. I was able to use the thinnest strips on the supplied Tesa patch to line the entire screen perimeter piecemeal, then stick it back together like new.
-
-
-
Dévissez les onze vis cruciformes de 3,8 mm qui fixent le châssis central.
-
-
-
Insérez un outil d'ouverture dans l'encoche du châssis central, à côté des boutons de volume et soulevez le châssis central vers le haut pour l'écarter du téléphone.
-
Retirez le châssis central.
How do I reattach the midframe? it seems like there are a lot of tabs that need to be reinserted carefully
Slide in the bottom part at an angle in first since it has some tabs. Otherwise it will get stuck halfway on top
-
-
-
Prenez l'extrémité plate d'une spatule pour débrancher le connecteur de la batterie.
-
-
-
Si disponible, appliquez quelques gouttes d'alcool isopropylique sous chaque coin de la batterie et laissez pénétrer pendant quelques minutes pour contribuer à faire ramollir l'adhésif.
-
Ou bien, appliquez un iOpener chauffé au dos du téléphone, au-dessus de la batterie pendant au moins deux minutes. Refaites chauffer et reposez l'iOpener autant de fois que nécessaire jusqu'à ce que l'adhésif de la batterie soit suffisamment mou.
-
-
-
Ôtez la batterie.
-
Décollez tous les résidus d'adhésif du téléphone avec une pincette et nettoyez les zones d'adhésion avec de l'alcool isopropylique et un chiffon non pelucheux.
-
Fixez la nouvelle batterie avec de l'adhésif prédécoupé ou du ruban adhésif double-face. Pour la positionner correctement, posez le nouvel adhésif sur le téléphone et non sur la batterie. L'adhésif ne doit toucher aucune des nappes sous la batterie.
-
Appuyez fermement sur la batterie pendant 20 à 30 secondes pour la faire adhérer.
Wie versiegelt man das Gerät wider?
Mit Tesa 61395 tape.
I ran into an issue when reapplying the double sided sticky tape and closing everything back up. I forgot that the 2XL has "active edges," where you can squeeze the sides of the phone to activate Google Assistant. I apparently put the glue strips too near the sensors, and they always thought I was squeezing the phone. I had to disable the active edges. I could have opened the phone again, removed the glue, and tried reapplying it, but I don't use the feature much so it was easier to turn it off. But if this is a feature you like, I'd recommend doing more research than I did!
-


Pour remonter votre appareil, suivez les étapes ci-dessus en sens inverse.
Pour des performances optimales, après avoir terminé ce tutoriel, calibrez votre batterie nouvellement installée.
Apportez vos déchets électroniques à un recycleur certifié.
La réparation ne s’est pas déroulée comme prévu ? Consultez notre Forum pour obtenir de l’aide au diagnostic.
Annulation : je n'ai pas terminé ce tutoriel.
61 autres ont terminé cette réparation.
Merci à ces traducteurs :
85%


Ces traducteurs nous aident réparer le monde ! Vous voulez contribuer ?
Commencez à traduire ›

19 commentaires
Just completed this last night. They weren't kidding when they all say the battery is no fun.
I managed to get it, but doesn't mean the old one wasn't bent like crazy when I was done. I was planning on keeping it as a backup since it wasn't bad, but I don't think I would risk it at this rate. Getting a thin stiff plastic to push through the adhesive along with the spudger helped.
There are a lot of components and boards along the edge of the battery. It's hard to pry without touching them. I saw a guide recommend taking the guts out to remove the battery.
One thing I would recommend while you're in there is to replace the thermal paste. Mine wasn't too bad after a year, but I'm sure it won't make a solid and effective cover on the processor to the heat pipe.
Can I just use Artic silver MX4 for thermal paste? Or is there a paste specifically for it?
DheerajR -
Arctic Silver should be fine!
Its pretty easy to do if you use the iPhone battery tool/pryer thing!
Never again, a nightmare to get it changed out.
What is the recommended adhesive when putting the screen back on?
Batteries wear out, that’s a fact of life and should be as easy to replace in a phone like they are in a flashlight. The phone manufacturers just want to sell replacement phones not batteries. They all suck!
Thanks iFixit team. Can you please sell the battery replacement kit for this phone, as you do for the Pixel XL
Hi Michael, we do sell a Pixel 2 XL battery replacement kit! Good luck with the repair!
Hello
Completed this last night and after reassembly my screen presents horizontal lines all over the right part from top to bottom.
Do you think the screen get damaged during opening ? Or it could be the connector ?
Looks like Google made sure that we break the screen if battery replacement is attempted.
Tip: Be super patient with the battery. Put ~5-10 drops of alcohol on each side of the battery, then wait 5 minutes. Put the opening picks on the right side of the battery and very gently pry up as shown. If the battery starts bending, wait some more. Once you have the picks underneath the right side of the battery, pour another 10 drops of alcohol where the picks and battery meet, and slightly tilt the phone in all directions to allow alcohol to flow under the battery. Wait another 5 minutes. Gradually work the picks underneath and around the sides of the battery, reapplying alcohol and waiting often.
To avoid applying too much alcohol, gently tilt the phone and check the sides of the battery tray. I was able to change the original battery with no damage to the adhesive or bending the battery this way
It went relatively easily, but with patience.
This repair went a lot easier than I expected. I was very patient when doing it, and honestly felt like I was being slow. My biggest suggestion would be to use lots of heat on the screen. I actually used a hot compress (instead of an iOpener or heat gun) before using the suction to pull up the screen, and it came up very easily. And the plastic picks made separating the screen a cinch. At no point in the process did I feel like the screen would break. But then again, I used a lot of heat and patience because I'd seed that several people had broken their screens.
The funny thing is that I've already replaced the phone with a Pixel 5a, so now, I have a refreshed phone that I don't really have a need for lol. I guess gaining the confidence that I can fix a modern smartphone is plenty
For me the hardest part was to remove the glass. If I can give one piece of advice, it is to use plenty of alcohol and heat, while the plastic pick must enter little so as not to damage the display. Following the instructions and with a lot of patience I was able to replace the battery.
The phone is really easy to repair (as long you manage to open it without breaking the screen). Turns out the screen is really, really fragile. Be careful with the top, that's where i cracked it. Otherwise the repair was easy but the screen is TOTALLED! The top part's touchscreen doesn't work anymore and there are strips all over the screen. I damaged the screen because of iFixIt's INACCURATE instructions. They say put the sucker as close to the sim slot as possible but on the picture they pry it open on the other side with the power buttons. Also you should put the heated iOpener on the edges so that it loosenes the adheisive. Now i have to spend extra money on unnesecary parts. Also after I installed the new battery, it was draining in seconds. I put it on the charger and I hope that the battery calibration actually does the job because otherwise I would have spent money on new battery and new screen for nothing...
It's often said it's so hard to replace the battery on the Pixel series that's because they have thin vesels and super duper fragile.
To prevent this problem, we have to heat the display properly and using picks applied little amount of IPA and pry it over with them not to touch the LC part. After that you can put older display and replace it. It does take so much effort.
That solution is all my personal opinion.
Anyway I hope your battery is good
MU-TON -
everything went smoothly for me! Putting on the adhesive stripes included in the kit took very long, would be nice if the precut adhesive was still available but I'm already surprised that there are still parts for such an old phone.
One thing that would have been good to know beforehand was that the phone will not turn on when the middle plate from step 14 is missing. The screen works and shows the battery charging if you plug the phone in so obviously the only two parts I touched are working but it's like the power button is disabled when that plate is not installed. Would be great if this could be added to the guide (or other guides as well if this is a common thing)
Shouldn’t this be “As close as possible to the volume rocker”?
Mihai Turdean - Réponse
Forget about the tiny toy suction cup they provide to battery replacement kits. I used a dent puller from an automotive shop. The smallest they had was just small enough for the Pixel's screen. I still needed to heat the edges with a heat gun.
Tamás Polgár - Réponse
I wish someone tell me in advance that if I doing this replacement after using phone for a few years it better to have spare "display adhesive" and be ready to follow Google Pixel 2 XL Display Adhesive Replacement
Original adhesive become dirty with time and fat chances it will be damaged during opening phase. In my case I replaced battery but can't use the phone, as still waiting for adhesive to be delivered
Maxim Vorontsov - Réponse