Introduction
Votre Huawei P8 lite ne tient plus la charge ? Ce tutoriel vous aidera à remplacer une batterie usée sans retirer toute la carte mère.
Avant de démonter votre téléphone, déchargez la batterie à moins de 25 %. Celle-ci peut prendre feu et/ou exploser si on la perfore accidentellement, mais les risques sont moindres avec une batterie déchargée.
Ce dont vous avez besoin
-
-
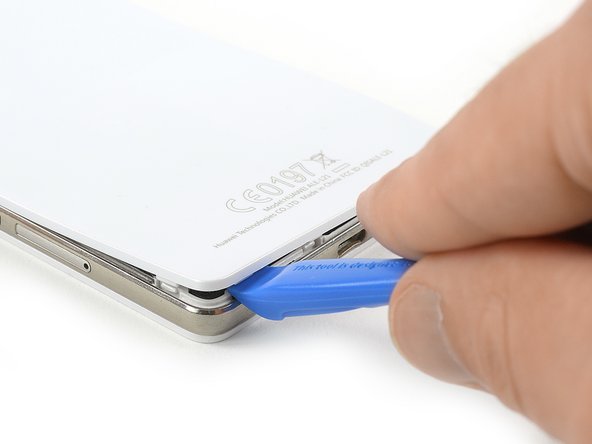
Avec un outil d'ouverture, commencez à soulever la coque arrière de votre Huawei P8 Lite en bas de votre téléphone.
-
-
-
Des clips fixent la coque arrière sur tout le tour du châssis. Ouvrez-les tous avec l'outil d'ouverture.
-
Une fois que tous les clips sont ouverts, enlevez la coque arrière du téléphone.
The back panel is really really easy to brake, be careful :)
In my mobile phone the back panel was kept in place also from 2 strips of bi-adhesive tape. Pull gently to detach it to remove the panel.
right. it has 4 strips of adhesive tape
To facilitate the detachment of these double-sided tapes, I recommend heating with a hairdryer along the edges of the back cover, especially at the four corners.
Nicola -
-
-
-
Décollez l'autocollant de garantie sur la vis en bas à droite de votre téléphone avec une pincette.
The 4 screws wich hold down the lower part of the loudspeaker are Torx screws for me. But it's a French Huawei, doin' nothing like the others :)
Die Wasserschadenindikatoren sitzen unter dem Mainboard. Bei den Aufklebern auf den TORX handelt es sich um Garantiesiegel.
Danke für den Hinweis, wurde so übernommen.
Bonjour, il vous faut un tournevis ou un embout cruciforme #00 pour dévisser une vis cruciforme #00. Bonne réparation !
-
-
-
-
Dévissez les trois vis cruciformes #00 qui maintiennent la plaque métallique en place.
-
Retirez la plaque métallique avec une pincette.
-
Débranchez le connecteur de la nappe de la batterie avec une spatule (spudger).
-
-
-
Dévissez la vis cruciforme #00.
-
Retirez le cache en plastique avec une pincette.
-
Décollez soigneusement l'étiquette NFC et retirez-la.
Auch bei mir ging es nicht wie in der Anleitung beschrieben, da die Antenne auf beiden Seiten eingefasst ist.
In my case, the small black plastic cache, was glued with the nap of the buttons which is just under the cache. I totally screw the connector for the buttons, carefull removing this plastic cache !!
Pour moi, le cache en plastique était collé avec la nappe des boutons physique qui est dessous, j’ai du coup complètement pété le connecteur de cette nappe… gaffe !
-
-
-
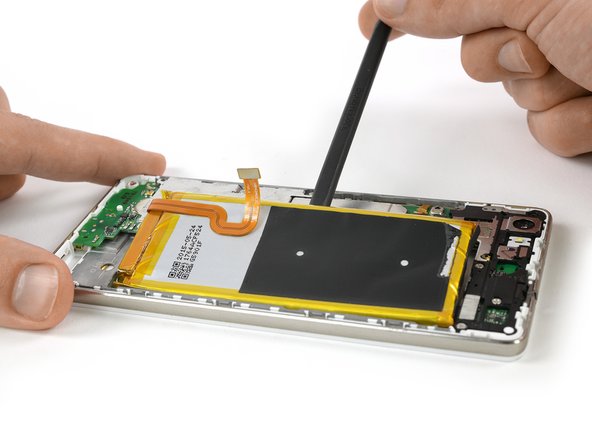
Faites soigneusement levier sur la batterie avec une spatule pour commencer à la déloger.
Slip a stiff playing card(poker) into one corner of the battery and work your way through the bottom. I didn’t have the tools to remove the adhesive so this really helped. I’d tried brute-forcing my way through with the spudger and screwdrivers but that ended up almost causing an electrical fire
A playing card is a good idea that could work. But please, never ever use a screwdriver on a battery.
To facilitate battery unstuck (which notice is attached tenaciously!), I advise you to proceed as follows. First of all, I found it easier to operate from the base of the battery (where the flexible cable connector starts) since there was a little more room to work than at other points. From here, patiently begin to perform these two actions alternately: heat inside with a hairdryer and gradually introduce a thin object (the one I used was plastic, longer than the battery and about 2 cm wide), also making movements side. If you have a contact cleaner or alcohol, you can spray some inside. You will see that little by little, with patience, you will come up above and the battery will come off!
-
-
-
Retirez la batterie.
Bei Schritt 9.2 (Kunststoffkappe vor NFC-Antenne hilft es, die Kreuzschraube links neben dem NFC-Anschluss zu lösen, dann lässt sich die Abdeckung einfacher entfernen. Ansonsten funktioniert die Anleitung sehr gut.
-


Pour remonter votre appareil, suivez les instructions en sens inverse et posez des nouvelles bandes adhésives si nécessaire.
Pour remonter votre appareil, suivez les instructions en sens inverse et posez des nouvelles bandes adhésives si nécessaire.
Annulation : je n'ai pas terminé ce tutoriel.
60 autres ont terminé cette réparation.
Merci à ces traducteurs :
100%


Ces traducteurs nous aident réparer le monde ! Vous voulez contribuer ?
Commencez à traduire ›


10 commentaires
Très bon tuto ! Merci beaucoup :-)
ps : j’ai galéré a décollé la batterie
Hat wunderbar funktioniert! Nun läuft mein P8 Lite wieder!
One thing to be careful of that I just did, and screwed up my nieces phone.
You see that black square hole in the aluminium chassis under the battery? Yeah be very very careful when sticking your prying tool under the battery. The LCD us right behind it. Try and stay very far away from those holes in the chassis when you do your prying.
Her screen now has Horizontal and vertical lines right across the centre of the screen.
Sigh.
Super Anleitung, Danke kann ich weiter empfehlen!
Great tutorial. I applied it on my P8 lite 2017 PRA LX1 and it worked greatly. I adapted some step.
Main differences are:
Step 1&2: it’s very hard because P8 lite 2017 hasn’t clips, but only glue on the edge under the cover. It’s very difficult to insert the lever under the inner part of the cover.
Steps 3 to 5: it’s not necessary to release amplifier because it’s separated from the battery.
Steps 7 to 9: they doesn’t apply
Step 10: to release the battery you must be careful of 2 stripes of contacts under the battery. Scotch tape is all along the right side of the battery and on the left side in the upper left side and in the lower right side.
Battery inclines to bend and to warp while removing it.
THANK YOU VERY MUCH!
salve,ho seguito alla lettera tutta la procedura ma il telefono non si accende più ne con la bat nuova e nemmeno con la sua originale,dove ho sbagliato,grazie x l’attenzione,saluti
Ciao @andrea68 ,
Ci dispiace che il telefono non funzioni come prima. Magari puoi provare di spegnere e riaccendere il telefono e/o di fare un reset.
Se hai comprato la batteria su iFixit, rivolgiti al nostro dipartimento di supporto: eustore@ifixit.com (in caso di un acquisto sul sito europeo) o support@ifixit.com (in caso di un acquisto sul sito americano). Sarà un piacere aiutarti!
Cordiali saluti,
Claire
Alright, so I just performed the “surgery” on mine. There’s a couple of things I would like to share: a) Be REALLY careful when taking the back cover as the plastic part around the camera breaks unbelievably easy. Just pry very slowly and patiently, don’t rush it. b) When prying the old battery, it’s necessary to pry back AND forth, millimeter by millimeter. It seems the tool doesn’t go the whole way in, thus why it’s needed to (very) slightly deform the battery’s edges. BE CAREFUL HERE. c) When assembling the phone again, during the re-installation of the NFC antenna, the black cover of the PCB where the antenna connector attaches, has two little flaps, it might need a very slight trimming with scissors if it doesn’t get back into the sockets where it latches. DO NOT FORCE IT IN, as this might damage your PCB and it’s better to damage one of the little flaps to damaging the PCB. All of that being said: Thanks so much for the guide!. Battery replaced, waiting for a full charge to start using!.
El celular no tiene ese tipo de tapa es como sellada, que debo hacer para saber si es por la pila que no agarra carga porxa
maguada1106 - Réponse
Wenn man langsam langsam arbeiten und vorsichtig ist, dann kein problem gibt es.Ich hätte keine Problemen zu öffnen.Das ist sehr leicht.
Athanasios Georgopoulos - Réponse