Introduction
Retirez en toute sécurité la batterie collée à l'intérieur de votre MacBook Pro à l'aide de ce tutoriel et d'un kit de dissolvant pour adhésif iFixit. Le dissolvant contenu dans le kit iFixit dissout l'adhésif fixant la batterie, ensuite vous pouvez l'enlever facilement.
Le dissolvant iFixit est extrêmement inflammable. Utilisez-le seulement dans une pièce bien ventilée. Ne fumez pas et tenez-vous éloigné de flammes à découvert durant toute la procédure.
Pour minimiser le risque de dommages, déchargez la batterie avant de commencer la réparation. Si une batterie lithium-ion encore chargée est percée par accident, elle risque de déclencher un incendie dangereux et incontrôlable. Si votre batterie est gonflée, prenez les précautions appropriées.
Remarque : le dissolvant utilisé pour dissoudre l'adhésif de la batterie peut endommager certains composants en plastique. Suivez toutes les instructions et faites très attention lorsque vous manipulez le dissolvant.
Ce dont vous avez besoin
-
-
Allumez votre Mac et lancez Terminal.
-
Copiez-collez ou tapez la commande suivante dans Terminal :
-
sudo nvram AutoBoot=%00
-
Cliquez sur la touche [return]. Si nécessaire, saisissez votre mot de passe d'admin et cliquez sur la touche [return]. Remarque : il est possible que cette touche porte le symbole ⏎ ou l'inscription "enter".
-
sudo nvram AutoBoot=%03
-
-
-
Avec un tournevis Pentalobe P5, dévissez les six vis fixant le boîtier inférieur :
-
Deux vis de 6,2 mm
-
Deux vis de 5,3 mm
-
Deux vis de 3,4 mm
Before any repair is carried out that involves removing the bottom case, the machines auto-boot function has be disabled. This can be disabled via the terminal command “sudo nvram AutoBoot=%00” once the repair has been completed the auto-boot function can be re-enabled via the vermin command “sudo nvram AutoBoot=%03”.
I recommend that you have an organizer tray for all the small parts, and label it in advance with the numbered “step” associated with each removal of screws and other parts. It really helped me when I needed to put everything back in reverse order, after the new battery is glued in place.
Finished the repair last week. Some key comments that helped me:
- Step 12, Robert
- Step 13, MikeG1
- Step 13, Rick Jaffe (take a photo when disassembling)
Also added some own comments on Steps 15, 18, 22
-
-
-
Posez une ventouse au milieu de la partie avant du boîtier inférieur.
-
Tirez sur la ventouse pour créer un petit espace entre le boîtier inférieur et le châssis.
To replace the bottom just line it up just like it came from the factory. Make sure it clears the display connectors. And press firmly down until the clips connect to the bottom again.
-
-
-
Insérez à nouveau votre médiator sous le bord avant du boîtier inférieur, à côté d'un des trous de vis centraux.
-
Faites pivoter le médiator d'un geste ferme pour ouvrir le troisième clip fixant le boîtier inférieur au châssis.
-
Répétez la procédure à côté de l'autre trou de vis pour ouvrir le quatrième clip.
My 3rd and 4th clips released simultaneously with clip 1 and 2.
Therefore I was looking to do something which had already been accomplished.
yeah be sure not to bend those clips by the display bottom. You pull towards yourself to get it off
-
-
-
Tirez le boîtier d'un geste ferme vers l'avant du MacBook (en l'éloignant de la charnière) pour ouvrir les derniers clips fixant le boîtier inférieur.
Difficult to explain clearly, but worked easily for me by gripping the adjacent bottom and top corners then pulling in opposite directions, rather than trying to grip the hinge corner which is too narrow to afford a strong grip.
This helped me. It needed more force than what I expected. Basically grab the corner with 6.2mm screw with one hand and the cover of that same corner with the other. Then pull the cover and push the laptop. Careful, it pops off with force!
I initially tried shifting the whole panel off the front after using the separating tool to make some space at the back where the hinges are. I only had luck when I pushed the panel back to it’s normal state and using the separating tool again to open the front, then getting my fingers underneath the slide it off the front was easy. I guess the lesson is to not use the separating tool to “push from the back“.
This step really through me through a loop. My last two MBP were a 2011 and 2013 and on those the bottom just lifted off when you removed the screws. The clips and this sliding lock design added in the 2017 model was frustrating the first time. I was following a youtube video first and he did not explain the sliding part at all. I should have come here first, this guide explains it pretty well. The second time I opened my 2017, I kept an “opening pick” between the bottom panel and the body on each side, and used my two smallest screwdrivers as levers in both “front” corner screw holes. Used the same method without the picks to put it back together at the end. Wayyy easier that trying to grip the panel or laptop body. Just make sure the screwdrivers/pins that you’re using as levers are small enough to be loose in the screw holes and have room to move
I used a pick underneath one of the back corners and nudge it (push down and towards the front - to get it off the hinge). This will make it easier to do the same for the other corner. The lower case will move off the middle plastic L-clips (which you will see after you inspect it.) Cheers! =)
I have found that your iFixit blue pry tool is excellent at giving me leverage to slide the bottom case forward to release it from the internal clips.
-
-
-
Retirez le boîtier inférieur.
I used the green prying tool in the air gap at the rear to nudge the bottom forward.
That is far easier and more reliable.
David. I agree. I've found the blue iFixit prying tool most helpful. I place it with the curve of the tool around the hinge and move the bottom case towards the front to release it from the slide-in clips. I consider myself to have pretty good grip strength but I have had some bottom cases that just wouldn't budge until I used this method. Scott The Mac Doctor
Like Dave and "themacdoctor" said, this job is MUCH easier if you use a spudger or similar tool to gently push the cover away from the air gap, at the rear of the laptop. Once you do this, you've loosened clips that are on the inside of the bottom case. This is much easier than tugging on the case itself.
-
-
-
Soulevez délicatement la large bande adhésive qui recouvre le connecteur de batterie, sur le bord de la carte mère le plus proche de la batterie.
-
Enlevez la bande.
once the tape's back in place, it doesn't look tightly attached. not sure, did I do something wrong here or it should be so.
The tape will likely not adhere as well as when it came out of the factory. This isnt an issue! As long as the tape is in place when the lower cover is put back on the device you should be good to go.
The underside of the tape is not uniform. Therefore, pay attention to which direction it is placed by looking at the underside when you remove it. Possibly mark one edge so that you can replace in the same direction during reassembly.
Mark one of the tape’s edges and, upon removal, stick it down with the same orientation. The first time I was inside the MacBook Pro (to upgrade the SSD) I failed to do this, and spent almost 30 minutes trying to get it back like it had been. Making a photo also helps.
-
-
-
Décollez soigneusement le petit morceau de ruban adhésif recouvrant le connecteur de la nappe de données de la puce de la batterie.
-
-
-
Avec la pointe d'une spatule (spudger), relevez le petit clapet de retenue noir fixant la nappe dans son connecteur.
-
-
-
Déconnectez la nappe de données de la puce de la batterie en la faisant glisser hors de sa prise.
-
Faites-la glisser parallèlement à la carte mère, en suivant la direction de la nappe.
The little tab that you pull back on, at least in my cable, was simple glued onto the rest of the cable. I tried to carefully remove the cable, and the tab came off. I did not have flat tweezers in the ifixit replacement kit and did not want to pinch the cable with sharp instruments. Therefore, be extremely careful when removing the tab as it is difficult to reattach the cable without it.
-
-
-
Repliez la nappe de données de la puce de la batterie pour qu'elle ne vous dérange pas lors des étapes suivantes.
-
Si vous remplacez la batterie, vous devrez peut-être retirer et transférer complètement cette nappe sur votre nouvelle batterie. Déconnectez les deux côtés de la nappe et retirez-la soigneusement. Lors du remontage, faites attention de la poser à l'endroit et dans le bon sens. Pour cela, observez comment elle est orientée sur la photo.
The new battery I received did not come with the battery board data cable, so I had to remove the existing one and transfer it. The lock at the smaller end is the same mechanism as the one at the end shown in steps 11 and 12, but smaller (and harder to see. It helps to gently straighten the left end of the cable before trying to insert it in the end of the replacement circuit board.
I can corroborate MikeG1’s comment. My battery came without the long data cable as well. I had to remove it from the fried battery. Plastic lock tab mechanism on the ZIF connector is smaller. My inspection microscope helped to transfer the cable to the new battery board. Thanks Mike!
Likewise - the new battery came without a data cable. The cable was successfully removed from the old battery assembly and installed on the new battery, but it was tricky and nerve-racking (the cable is delicate and the connectors are very small) without instruction provided! The instructions should be updated to highlight the missing cable possibility, and provide information/illustration on transferring the cable.
In step 13, notice the amount of the data cable that sticks out of the connector. When moving this cable to the new battery, it is difficult to tell how far to push the cable into the connector or when it is fully inserted because the cable is so bendable.
AMEN!! This was the hardest part of the ENTIRE process! Hard to know when the small end of the cable was “fully” inserted. Cable is SOOOOO delicate!
my old battery was working but could not hold a charge very long so I replaced the battery and now my mac does not recognize the new battery. Thought it was a bad battery at first but I purchased a new batter and still the same problem, My mac will work off power outlet but does not register it has a battery at all now. I tried putting my old battery back on but i damaged the very small clip when i slid out the flex cable so its gone now. Could this cable be at fault? I don/t know what else it could be, i only messed with the battery.
I have this same problem! Did you figure out what the issue was? Do I need a new flex cable?
I am having the same issue as Leo. After install. Is there a way to identify the fault?
Although the rest of fixit manual on this is excellent, this step is woefully lacking and the fact that the replace “kit” doesn’t have the Battery Board Data cable included makes the replacement kit significantly lacking (especially compared to other kits and instructions I’ve used before from them)
-
-
-
-
Avec un tournevis Torx T5, dévissez la vis à large tête plate de 3,7 mm fixant le connecteur d'alimentation de la batterie.
When the battery management “BMS” circuit board is re-installed, loosely install the two 3.7 mm screws, put a spudger on the left side of the BMS board to wedge theBMS board to the right then tighten the two 3.7 mm screws. The reason for doing this is that the two power traces on the board may not make physical contact with the battery connector (connector at where the spudger is on step 15). One clue that you didn’t have physical contact is if you reinstalled everything but there is no power unless the AC supply is plugged in (with battery meter on the top at 0%). This was what happened to me. The reason is that when you bend the battery connector in step 15, it’s no longer in alignment with the traces on the BMS board and hence, you have to shift the BMS board to the right to compensate. Once I did this, voila 64% power.
-
-
-
Avec une spatule, soulevez délicatement le connecteur d'alimentation de la batterie, pour déconnecter cette dernière.
-
Faites pivoter le connecteur suffisamment pour éviter un contact accidentel avec la prise lors de la réparation. Cela pourrait endommager votre MacBook Pro.
On disassembly note the position of the connector before you lift. It has two gold-plated connections on the underside. On reassembly these need to make contact with the matching battery board connectors. Bending the connector out of the way deformed it a bit, and on reassembly I could see that the connectors didn't align well with the board's connectors. I needed to adjust the battery board position to the left a bit by loosening the 3.1 mm screws in step 23. Possibly this could be the reason why some people report that new battery is not detected.
-
-
-
Avec un tournevis Torx T5, dévissez les deux vis de 2,1 mm fixant le support du connecteur de la nappe du pavé tactile.
-
-
-
Préparez un iOpener et posez-le sur la nappe du pavé tactile pendant environ une minute, afin de ramollir l'adhésif qui la fixe sur la batterie.
-
Si vous n'avez pas d'iOpener, un sèche-cheveux peut également faire l'affaire. La nappe doit être chaude, mais pas brûlante. Faites attention à ne pas surchauffer la batterie.
-
-
-
Avec un tournevis Torx T5, dévissez les deux vis de 3,1 mm fixant la carte de la batterie.
-
-
-
Insérez l'extrémité plate d'une spatule sous la carte de la batterie du côté le plus proche de la carte mère.
-
Faites pivoter la carte sur environ 45 degrés. Si nécessaire, soulevez le connecteur d'alimentation de la batterie pour que la carte de la batterie ait plus de place.
A ce moment là, il faudrait déconnecter la nappe de données de la carte de la batterie et la mettre de côté
At this point I Jump to step 30 . I do not use the liquid adhesive remover method. I use a silicone rubber kitchen food scooper. The scoop end is a soft, silicone rubber material with a beveled edge. The handle is a hard plastic. This tool I’ve used in about 50 retina battery swaps. No floss, credit cards or metal spatulas for me.. The angle of the ends and the rubber pliability combined with the hard plastic handle is ideal. After a few repairs you will get better at it. Be careful when applying pressure or leveraging to get between battery and base. You don’t want to slip & “overshoot” the scoop end into the logic board. EASY DOES IT…Save yourself the mess of applying the liquid. I can remove a battery in 10 minutes. Here’s the link to this tool that I found in my GF’s kitchen:
This and the dental floss are great ides that I wish I'd seen before following the method in this guide even though it worked, I think there are better ways.
Amazon says these are no longer available, no idea if or when they will be again.
You can order a single scooper from amazon.
google: Tovolo Mini Scoop and Spread Tool
etcremer -
-
-
-
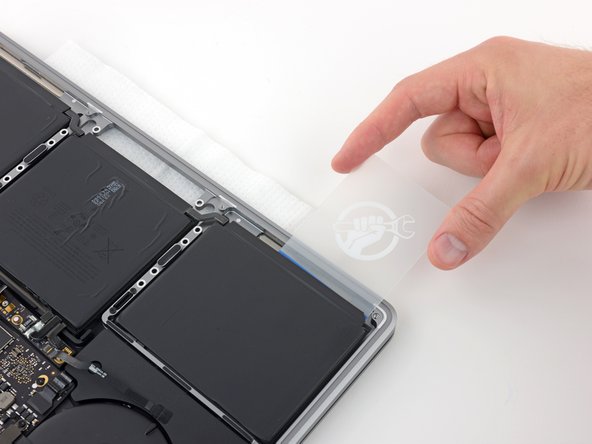
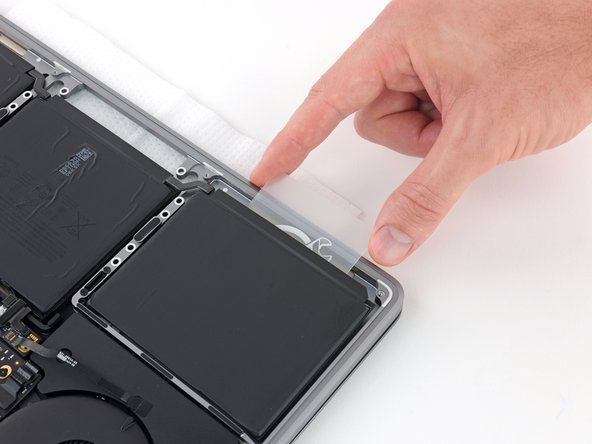
Pour protéger votre écran pendant les étapes suivantes, placez une feuille d'aluminium entre l'écran et le clavier et laissez-la en place pendant que vous travaillez.
-
Vous pouvez en plus poser du papier essuie-tout directement sous la zone du trackpad pour absorber le dissolvant.
-
-
-
Maintenant que votre MacBook Pro est paré pour le combat, il est temps de vous préparer.
-
Protégez vos yeux pendant que vous manipulez le dissolvant. (Une paire de lunettes de protection est incluse dans votre kit.)
-
Ne portez pas de lentilles sans mettre de lunettes de protection.
-
Des gants de protection sont également inclus dans le kit. Si vous craignez de vous irriter la peau, enfilez-les.
Wenn das Trackpad ausgebaut ist, kann man den alten Akku auch ohne Klebstoffentferner relativ gut auslösen.
-
-
-
Retirez le bouchon en caoutchouc noir de votre bouteille de dissolvant.
-
Utilisez des ciseaux pour couper la pointe scellée de l'applicateur.
Au moment de ma commande le kit complet avec le dissolvant ifixit n’était pas disponible, mais seulement la batterie sans accéssoires, j’ai utilisé quelques gouttes d’acétone à la place. la battéerie originale s’est décollée sans difficulté à l’aide d’une carte de credit
Can I use isopropyl or ethanol instead?
Petite astuce après une réparation fructueuse : pour simplifier cette étape, munissez vous d’un dissolvant fourni ou non, prenez les élastiques de masques chirurgicaux et imbibez le avec le dissolvant. À l’aide de cures-dents, l’insérer entre le châssis et la batterie puis faire un mouvement d’aller et retour tout en avançant au fur et à mesure que la batterie se décolle. Cette astuce m’a fait gagné beaucoup de temps et elle permet de ne pas endommager la batterie lorsque de son extraction. Plus sur, plus rapide et plus facile !
A little tip after a successful repair: to simplify this step, take the surgical mask elastic bands and soak them with solvent. Using toothpicks, insert it between the frame and the battery then move back and forth while moving forward as the battery comes off. This trick saved me a lot of time and avoids damaging the battery when removing it. Safer, quicker and easier.
The glue remover is a mix of Acetone and Isopropyl alcohol I believe.
The adhesive remover they are currently selling does not need to be cut open, it is black and already has a small hole. Check yours before you cut off something you don't need to.
A little warning for those of us who don't know a lot about acetone. DO NOT spill any on any finished wood. It will take the finish off of a wood surface faster than you can wipe it off. It won't harm clothes surprisingly, but your hardwood floor or wood table are not going to look great if you spill this on them.
I ordered just the battery, and successfully used "Goo Gone" to loosen the adhesive. I found it useful to place the plastic card along the edge of the battery, then dribble the Goo Gone on the card (when runs down the card to the edge of the battery). In my computer the adhesive is in three strips running across the length of the cell, each strip is about 1/4" wide
-
-
-
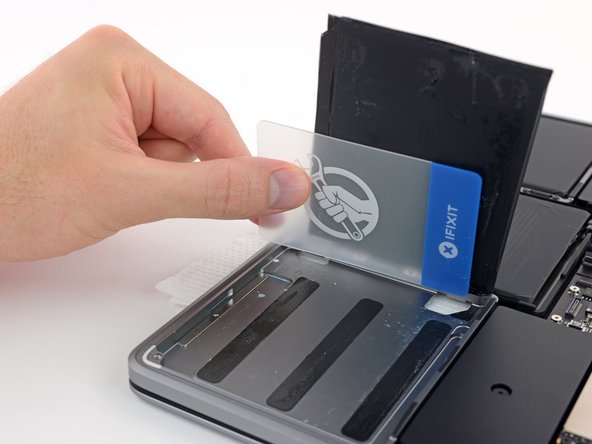
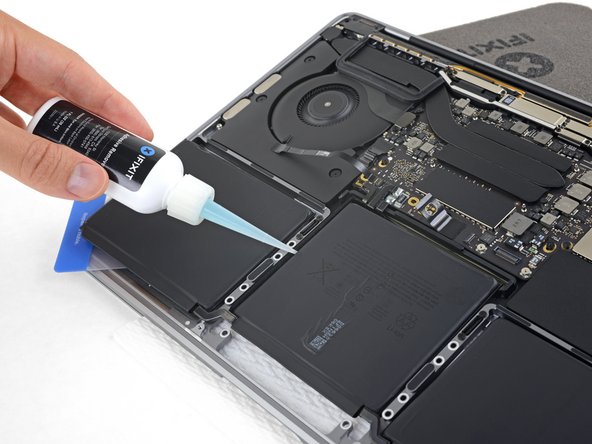
Quand les 2-3 minutes sont passées, insérez une carte en plastique sous le bord de la cellule où vous avez mis le dissolvant.
Agreed, hardest step. “Several drop” was not enough, I had to add more twice, so take your time.
Just like on the picture, the corner close to the track pad seem to be a weak point, strat pushing the corner of the plastic card there.
There is a metal lip that blocks you from pushing it in. I recommend you start from the corner with the lifted metal part. (top left corner of battery in picture)
the adhesive is in three 'bands' running parallel to the front of the computer. my method was to insert the card part way, then drip the adhesive onto the card and let it slide down to where the card met the adhesive. this seemed to work best. it seems unlikely that the adhesive will run all the way to the rear adhesive when you apply it from the front.
-
-
-
Poussez délicatement la carte sous la cellule de batterie pour faire céder l'adhésif la maintenant en place.
They are RIGHT, let the acetone do the work. It did need more than a few drops, but not much more. Wait 3 min, apply again. Wait 3 min again. Then take the card and aim the point of the card toward the middle of the adhesive. Wiggle wiggle wiggle moderate pressure. It will penetrate the first strip and then work it left and right. Repeat for the next two strips.
-
-
-
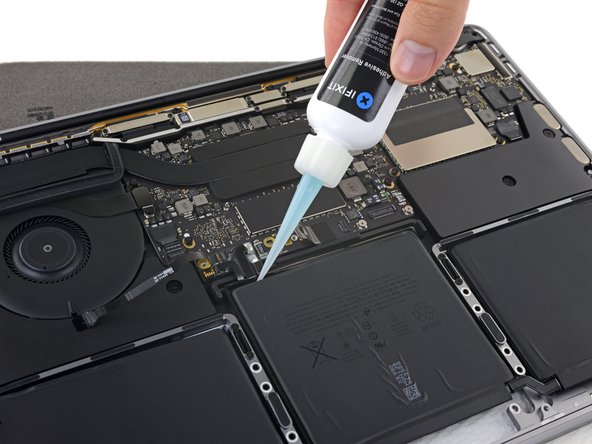
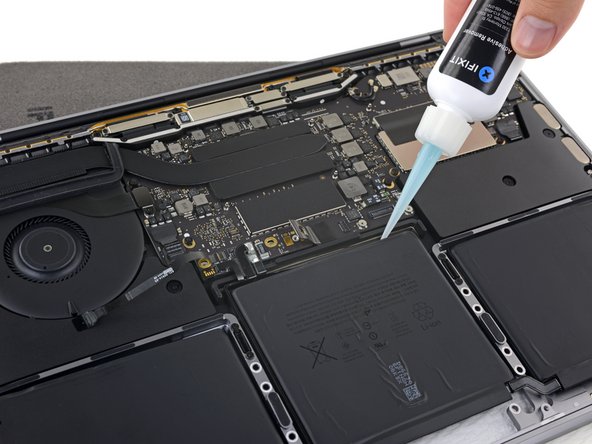
Pour décoller la batterie du milieu, commencez par soulever le bord arrière de votre MacBook Pro et posez-le sur un bloc de mousse ou un livre pour que le dissolvant ne se répande pas en direction de la carte mère.
-
Déposez quelques gouttes de dissolvant (environ 1 à 2 ml) le long du bord arrière de la cellule de batterie.
-
-
-
Insérez une carte en plastique sous un des côtés de la cellule du milieu.
-
Il peut être utile de faire délicatement pivoter la carte pour créer un léger espace entre la cellule de batterie et le boîtier du MacBook Pro.
I don't see how starting from the side is even possible, it's too steep and the card is not flexible enough.
I started from the top. To do so, I had to lift the battery control card (step 24) enough to be able to put the power connector (step 15) back below it. That way I could slide the card all the way.
Because of the way the tutorial describe it, I was conservative on the quantity of remover. That may be why this step was not easy.
-
-
-
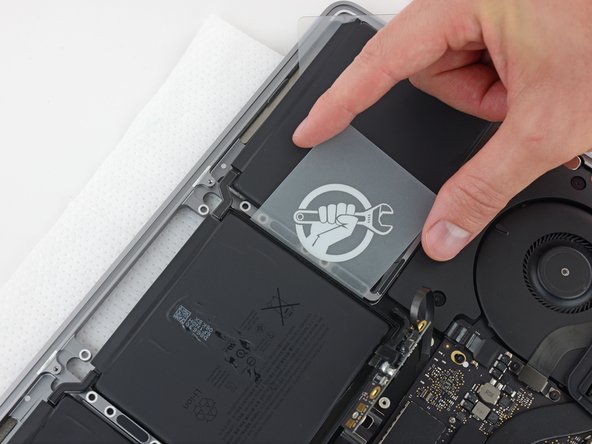
Retirez la batterie.
-
Avec un peu de chance, vous arriverez à enlever toutes les bandes d'adhésif avec vos doigts.
-
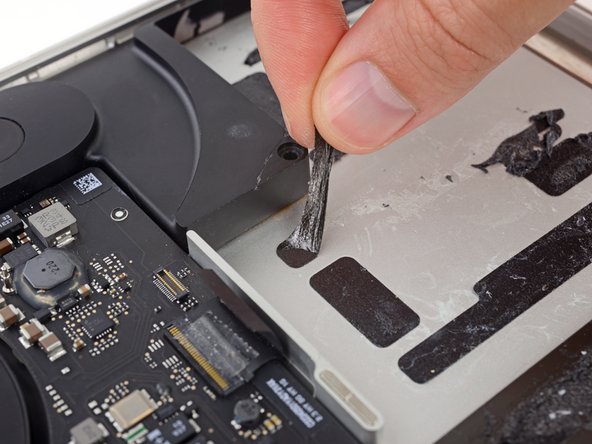
Sinon, imprégnez l'adhésif d'un peu de dissolvant, attendez 2 à 3 minutes et raclez à l'aide d'un outil en plastique. Il s'agit d'un travail un peu pénible qui nécessite de la patience.
-
Épongez tous les résidus de dissolvant et laissez votre MacBook Pro sécher à l'air pendant quelques minutes.
-
Calibrez votre nouvelle batterie avant de l'utiliser : Chargez-la à 100 %, puis laissez-la charger encore au moins deux heures. Utilisez votre appareil normalement jusqu'à ce que la batterie soit vide et qu'il s'éteigne. N'oubliez pas de sauvegarder votre travail à temps. Attendez au moins 5 heures, puis rechargez la batterie à 100 % sans interruption.
Hi Jeff,
Thank you for the great instructions! With a piece of dental floss it goes even better. Also it’s good to explain to shift the back cover out after removing the bolts. At the moment to put in the new batteries it’s the best to tighten the batteryprint first and at last to fix the batteries. Put three pieces of plastic under the batteries to prevent fixing too early to the bottom.
Frans.
Thanks for your comment! It was really essential since dropping the battery in the case without its control card being attached could have resulted in the impossibility to connect it.
I had a non-ifixit battery replacement fail due to battery wiring (flat coated copper) touching the sharp edge of the case aluminum. Eventually vibration caused the insulation to wear off and short the middle cell to the case. Failure after a couple weeks.
Tuto au top.
J’ai remplacé la batterie de mon MacBook Pro en suivant à la lettre ce Tuto.
Un grand merci.
Overall good guide. The battery removal was by far the most difficult and time consuming.
It's important to understand stand that the battery is separate from the mother board so you can get somewhat aggressive when removing the old battery without worrying about damaging it.
As a general rule do not be rough with a lithium battery unless you like out of control lithium fires. It is best to use plenty of solvent and be as careful as possible while removing the old cells.
Also a good idea to discharge the battery fully before working on it.
I'm also one of those that just can't stand the idea of using solvent to do the job. FYI, I used a bent and 'sharpened' plastic card, much like a credit card, to carefully separate the battery from its adhesive. I was even able to get the center section out by working the card in from the sides (mostly from the right side, as I'm right-handed), so I didn't have to remove the trackpad assembly. I figured there are huge risks in however we do these complicated jobs, so I'm more comfortable with the risks associated with my technique than the ones associated with the solvent technique. And the bonus is that I finished in less than an hour!
I've done enough of these battery replacements now that I'm confident about dealing with the fussy little ribbon cables and their connectors, which is an added bonus when tackling a newer model like this.
Good luck to all who are taking this on for the first time! Take your time, read all the way through before starting, and be sure to read all the comments throughout!
Can someone clarify the statement "Wait at least 5 hours, then charge your laptop uninterrupted to 100%." in this last step"? It does not state this in the directions I received on a small card with the battery replacement, nor does it in the Conclusion below.
I followed this guide to replace the battery in a Mid 2017 MBP. The original was stuck at 0% even after 3 hours on charge even though the cycle count was 2 digits only.
I dry tested the replacement battery first. It had 38% charge. I left it plugged in and it reached 100% fine. The next day, I stuck the new battery down and low and behold now the machine won't power up.
I reconnected the old battery and the machine powers up ok. I tried reseating the connections 3 times with the new battery and it still won't power up. I've tried an SMC reset too. So I'm guessing it's a faulty new battery. Either that, or the rumours that Apple are deliberately locking out non-genuine Apple parts is true.
Trouble is, this seems to be quite a common scenario with this model.
I just did a battery replacement and after 3-4, SMC resets, checking all connections inside, etc. I cannot get my laptop to show a battery is even installed. I doubt it is a bad battery but as Cool_Breeze suggests, can anyone confirm this may be an Apple "block"? So frustrating!
Bonjour, ils indiquent que je n’ai pas de batterie, quoi faire ?
Merci
Referring to the messages from Cool_Breeze and Karen.
Does this battery replacement technique still work or have Apple somehow 'blocked' it?
Thanks
I don't recommend to calibrate the battery at the end and even Apple do not recommend to calibrate since a decade. It seems the battery is already calibrated with 2 cycles already. I followed your calibration tutorial and my new battery lost 6% health statut... Probably because of letting cels at 0% during 5 hours.... It's totally a non sense!!!
-


Comparez votre pièce de remplacement à la pièce d'origine. Il vous faudra peut-être transférer d'éventuels composants restants ou retirer des films adhésifs de la nouvelle pièce avant de commencer le remontage.
Pour remonter votre appareil, suivez ces étapes en sens inverse.
Pour une performance optimale, calibrez votre nouvelle batterie : chargez-la à 100 % et laissez-la charger pendant au moins deux heures supplémentaires. Puis, utilisez votre appareil jusqu’à ce que la batterie soit vide et qu’il s’éteigne. Enfin rechargez-le à 100 % sans interruption.
Apportez vos déchets électroniques à un recycleur certifié R2 ou e-Stewards.
La réparation ne s’est pas déroulée comme prévu ? Consultez notre communauté de réponses pour obtenir de l’aide au diagnostic.
Annulation : je n'ai pas terminé ce tutoriel.
79 autres ont terminé cette réparation.
Merci à ces traducteurs :
100%


Ces traducteurs nous aident réparer le monde ! Vous voulez contribuer ?
Commencez à traduire ›


29 commentaires
Does the replacement battery comes with the same strong adhesive as the original battery?
I ordered my battery for the 2017 version of the Macbook Pro with function keys from ebay and it didn’t came with a adhesive strip. I am sure you can use your own adhesive strips or double sided tape, as long as you mind the gabs on the aluminum frame,
Serj Nko -
Hi Jeff,
Thank you for this great work to beat Apple greediness. I followed the exact steps and everything went well, but my battery is not charging nor the status is shown on the bar! I tried restarting and resetting and even restoring and it did not work would that be something you can help me with?
If the old battery still works, try putting it back in, and see if that clears up the problem. If it does, the new battery is defective.
i did this one today with just 1 bankcard in 30min time no adhesive loosener needed no head needed…. you don’t even have to remove the mousepad…
i might have to start making my own repair guide….
Glad yours was easy! The strength of the adhesive can vary a lot depending on age, heat cycles, how much was applied at the factory, etc. I’ve seen a few that were easy and quite a few that were absolute monsters to remove. Most fall somewhere in between. This guide should have you covered in all cases, but it probably doesn’t hurt to poke and pry a little before you start, in case you lucked out and got an easy one. Just be very careful not to puncture the battery. Thanks for your comment!
Thank you! This excellent guide gave me a lot of confidence in the replacement of the battery. All went precisely according to plan.
I just completed the swap… awesome guide and really easy.
The only Problem i had was the missing data cable from the battery board to the logic board which was not included with the new battery. Thanks to some comments from other users I used the cable from the old battery.
Everything Else worked as described.
Vielen Dank für die gute Anleitung. Der Akkutausch hat ohne Probleme sehr einfach in ca. einer Stunde geklappt.
Thank you for the great guide! I did not want to ship my Mac to official Apple service centre - as I was advised I would need to wait one week for battery replacement and I needed laptop for my daily work. Decided to replace battery on my own. Thanks to this comprehensive guide I made it in 2 hours. I do appreciate clear and comprehensive way author has explained the procedure. Again big thank you! Also useful comments of users are appreciated. Thanks. Andrew
Petite astuce après une réparation fructueuse : pour simplifier cette étape, munissez vous d’un dissolvant fourni ou non, prenez les élastiques de masques chirurgicaux et imbibez le avec le dissolvant. À l’aide de cures-dents, l’insérer entre le châssis et la batterie puis faire un mouvement d’aller et retour tout en avançant au fur et à mesure que la batterie se décolle. Cette astuce m’a fait gagné beaucoup de temps et elle permet de ne pas endommager la batterie lorsque de son extraction. Plus sur, plus rapide et plus facile !
A little tip after a successful repair: to simplify this step, take the surgical mask elastic bands and soak them with solvent. Using toothpicks, insert it between the frame and the battery then move back and forth while moving forward as the battery comes off. This trick saved me a lot of time and avoids damaging the battery when removing it. Safer, quicker and easier.
good guide, but that adhesive did not come off easy. Used a Bank card and adhesive remover. everything else was smooth ad though ;)
I suggest examining the two connection points of the skinny battery data cable. Possibly you failed to either, fully insert the cable or forgot to press the clamp down. Also, I believe Fixit fails to tell you to lift the clamp before removal and it is impossible to insert without lifting the clamp. You might need extra strong reading glasses to see it properly. Good luck.
I need to buy one, but you guys don't ship to India, is there any way you guys can help ? i needed urgently/
Great guide,
got the spare battery from your store and followed the guide. But now I have the issue that my macBook sometimes needs to be plugged in to wake/start even tough the battery got enough charge. could this be a battery related issue?
Terrific guide, thank you very much!
Got a replacement battery from eBay (UK supplier) and didn't need any battery calibration or the like afterwards.
This was only my second replacement, and it's actually not that complicated. But the tiny screws and clamps and the sh%$&§y glue...
Speaking of glue: I can handle solvent (isopropanol etc.) but I wanted to minimize damage to the screen. So I took the butcher/surgeon approach and cut the battery out with the "plastic cards". Took a while but worked. Total time for first replacement 2 hours, second one 1 hour.
The adhesive strips of the replacement battery were not as strong as those of the original battery, but that may actually reflect aging and effect or repeated heating of the glue. In any case, the replacement battery sits tightly enough to not require any correction.
Cheers
I just did this and it worked a treat. Bought a replacement item from Amazon that had plenty of positive feedback and went to work. I used a plastic scraper and some solvent to get the batteries out and it was definitely the hardest part of the job - took at least an hour - that plus cleaning and prepping the surfaces for the new battery.
But it was really therapeutic and when the computer booted up and Coconut showed me a healthy 100% functional battery the feeling was GREAT!
I made the mistake of removing the trackpad and had to realign it a couple of times but with this operation, I don't think it is necessary to remove it. I'd definitely be able to do it in half the time if I ever needed to again. :D
Hi, I have just done this and all seemed to go well, but just plugged my mac into the mains and it is not charging or switching on at all. Unsure if it could be that the battery data cable isn't connected in well enough as it was quite fiddly to put back in?
I support wholeheartedly the goals of iFixit -- sustainability, support for true ownership of the products we purchase, and elimination of the domination of corporate entities. The guide provided here for replacing the battery in a Macbook Pro was spot-on and even a fraidy-cat like myself had no problems in accomplishing the task. Hooray! Unfortunately, I have found the battery itself to be of low quality, i.e., just six months later a fully-charged battery is completely spent within two hours, even with the screen dimmed to 50% and when doing nothing more demanding than word processing. It is unfortunate that the good intentions of iFixit are not supported by quality products.
Hi there, thanks for this very detailed manual. I followed every step. Everything looks like it work except for one thing : since then my spacebar is not working anymore :/ I'm not sure what happened. If you have any clue to help me I'd be very grateful. A computer without a spacebar is worst than without a battery I'm afraid.. :(
While I do not intend to criticize the writer of this guide, I believe that the directions provided are incomplete without being reversed step-by-step. As a first-time hardware worker, I found several steps to be more complicated than the instruction "follow the above steps in reverse order" suggested. Specifically, installing the new battery required precise alignment of the battery board, which I only discovered after I had already placed the new battery. I had to lift it back out, which was difficult as it was already adhered, to adjust the location properly. Furthermore, connecting the battery board data cable connector to the new battery was challenging, and I was unsure of how much force to apply or how far it needed to go in. After completing the installation, I was concerned that I had made a mistake and potentially damaged the device. If that had been the case, I would have been disappointed that I had spent $119 on a replacement kit.
I followed this guide to replace a battery because my partner's mother's MacBook was only functioning when plugged into the wall. After successful install, I tried booting the computer, but it would not boot unless it was plugged into the wall. It came to life, with the fan running at full. I checked in SysPref to check the battery, and it wasn't listed; therefore, when I unplugged the power cable, the device died. It refused to turn on again unless I re-seated the battery logic cable. I feared the logic cable had been damaged during the repair, as without that cable, the system won't recognize the battery.
If this happens to you, understand it is very important that you turn back on the Auto Boot feature!
With Auto Boot enabled, I was able to perform an SMC reset by:
1. Plugging in the laptop to the charger, with the lid closed
2. Opening the lid and quickly holding Shift+Control+Option+Power for 10 seconds
3. Pressing the power button again
This calmed the fans and the battery now charges and is displayed.
Is this step necessary? I can’t perform this step as I am attempting to repair water damage and need to remove logic board & most likely replace the battery.
Macrepair SF - Réponse
@mac_medic You definitely don’t want the power coming on while the board is wet. In your case, I think powering on the machine to disable Auto Boot would do more damage than it prevents. I agree, skip this step and be prepared to disconnect the battery quickly if the laptop automatically powers on. Good luck!
Jeff Suovanen -
Thats right! You don't want power running while working on your logic board.
Dan -
This did not work when running High Sierra.
Kyle B - Réponse
Tried this on a 2018 MBP 13” Touchbar (there’s no iFixit guide for this model yet). Need to replace a broken screen.
Luckily I managed to connect to an external screen (Cmd-Down Brightness to switch displays) and enter above command. Seems to work, but there’s another problem with this model - it powers up as soon as any key is pressed……. ffs <gnashes teeth>
Cool_Breeze - Réponse
I unscrew the battery first and wrap electrical tape over the logic board battery connector before attempting any repairs to the board. Haven’t had any problems yet and I’ve worked on about 10 of these models already. Also when you open the bottom case use a suction cup at the bottom and pull up then run a plastic spudger along the edges to disconnect the clips. Also only use a plastic spudger on the board. Saw a youtube video from a repair shop and he did not disconnect the power and used all metal tools during the entire process of removing the board. His last step was to disconnect the battery terminal.
Brian - Réponse
Is this step necessary if my mac can turn on? Battery fully dead(
Nursat b - Réponse
BEFORE YOU START: The included torx head stripped off before I was done (and you might need an additional T4) so stop now and go buy a good one. Also they fail to warn you above to get some blue threadlocker ahead of time.
Jason Sherron - Réponse
This command did not work for me and I read that sometime in later 2020 Apple stopped this command from working…any ideas on a work around?
Patrick Machacek - Réponse
Not able to do that with damaged screen
richardjgreen - Réponse
If you have a damaged screen you can still use a converter from thunderbolt (USB 3) to HDMI and plug your Macbook Pro to your TV as monitor display. Just make sure to chose the right Source (HDMI IN) in your TV. I did it and to make it work I unplug and plug again in my Macbook and so I could disable the Auto boot
Roberto Sanchez Bustos -
Hi. This does not work on 2018 13” MacBook Pro with Touch Bar. I did exactly this to disable auto boot. But when I check by using nvram -p it says: auto-boot true. Am I doing something incorrectly? I did everything step by step. Copied and pasted the sudo command, pressed enter and then entered my password. I have Big Sur 11.1 installed. Is there any other way since I need to replace the screen. Thank you. Adrian
Adrian Vizik - Réponse
Hi everyone. This is also a little pointless if you can’t see anything on the screen, and you don’t have a display adapter to USB C to display it. I agree with Brian about removing the back and disconnecting the battery cable before you even think about opening the lid of the MacBook. Applying the insulation tape is also a handy little tip that just makes sure there is no way to discharge from either the board or battery.
Roberto Enrieu - Réponse
running `nvram -p | grep 'AutoBoot'` in terminal verifies that it was accepted
result: `AutoBoot %00`
Marek Polák - Réponse
Running Big Sur 11.6.7 on a 2019 16" MBP, it's "auto-boot". So it's:
nvram -p | grep 'auto-boot'to display the current state, the default istrue- and then to change it,sudo nvram auto-boot=falsewhich turns it off.Ed Mechem -
This step is completely unnecessary if you follow the guide to disconnect the battery properly. Just put some tape between the battery and logic board connection to prevent it from accidentally touching and therefore powering on the laptop.
Grant Ormsby - Réponse
It took me a few tries to make this command work, as I was able to copy and paste the command into Terminal, but could not type in my laptop’s password. I finally typed my password into a text document, copied it (command C), and then pasted it into Terminal and it worked.
tommy404 - Réponse
I didn’t do this. Mine never auto-booted before I replaced the battery. Now it does.
hatuxka - Réponse
BEFORE YOU DO ANYTHING - CHECK THE BATTERY!
I-fixit sent me a bad battery, which I didn’t realize until it was already install. They sent me a new one, but I wasted hours uninstalling and reinstalled.
Get a volt meter and measure the voltage on the output of the battery pack. If it reads 0 V, SEND IT BACK. It should read over 2 V.
bcardanha - Réponse
I've just received my replacement battery and it reads 0,042V between the two main connectors. Do you think it's dead?
peter sussex -
When I did this from Terminal.app within Recovery Mode, the “sudo” was not recognized but I could invoke it without the sudo part. It seems to have been accepted when looking at “nvram -p”
johann beda - Réponse
When in Recovery Mode, you already have superuser powers. So you don't need to prefix commands with the sudo command to invoke them with root privileges; you already have them. Do a
pwd(print working directory) after opening Terminal in Recovery Mode, and you'll see that you're in the root user's directory.Ed Mechem -
I received the battery kit for my 2018 MacBook Pro and as per the above comment from bcardanha - Oct 12, 2021, I checked the voltage on the pads marked + and - . It was zero volts so I panicked a bit.
I sent a message on the iFixiT Facebook page and I got no reply. I finally found the customer service email for Ifixit Europe and sent them an email voicing my concern as I was not keen to work for couple of hours just to discover that the battery is faulty. I had an almost instant reply on the email (kudos to them) and they adviced me to go ahead and install the new battery as the voltage measured when battery is not connected is not relevant.
I took a leap of faith and after two hours… the new battery showed 50% charge and everything seems to be working just fine. I am happy it worked.
Mircea Comanici - Réponse
After removing the old battery and installing the new battery I powered up the MBP before screwing the bottom on. I discovered the my keyboard would not function. It took a few hours of investigation and frustration that I discovered the track pad power ribbon had become partially dislodged from the trackpad. I was able to see that this through the little machined slot where the battery sat. I had to remove the trackpad to reinsert the power ribbon back into the connector in the trackpad. after reassembling and reinstalling the battery etc the keyboard worked. Just food for thought if your run into the keyboard issue.
Ed Mease - Réponse
This should be the default. IMO I tell you to power on - not the lid.
G Sena - Réponse
Est ce que cela fonctionne sur un macbook pro 2017 sans touchbar ?
maël muzelet - Réponse
Bonjour Maël, oui, ce tutoriel concerne "les MacBook Pro 2016 (et plus récents) et les MacBook Retina 12" 2017 (et plus récents)"
Claire Miesch -
Excellent instructions. I was able to follow and install the new screen. I recommend that you get a good set of tools before you begin. I started with an inexpensive repair kit bought online. The Penta and torx bits failed. I bought an IFIXIT kit with quality bits and I was able to do everything I needed.
Tom Markham - Réponse
If you're not running an admin account the sudo command won't work (which honestly, you should not be running admin). Rather than logging in to your admin amount via the OS, in the terminal type "login [admin username]," then the password and you'll be able to do the sudo command as described above. Once you're complete, type "logout [admin username]" and you'll be good to go. Obviously replace [admin username] with whatever the account name for your admin user is.
arichard2401 - Réponse
For those unable to complete this step because the screen is too damaged I recommend leaving your macbook on until the battery dies.
Nicholas R Licato - Réponse
Just replaced my 2018 15" MBP battery. Running Sonoma.
I found no way to disable AutoBoot (The status can be checked in the Power section of system report).
Anyway, i left my battery completely drain before opening the MBP, and had no issues during the process.
Cédric Bontems - Réponse
After sending this command in terminal when I checked what happens if I now open the lid, instead the screen lit slightly up (still black) then a battery symbol showing the charging state showed up.
Now, after replacement of the battery, this is all I get to see.
No reset of NVRAM nor PRAM helped.
Currently the new battery charges (58% atm) and it feels like it‘s mocking me.
webrockers - Réponse
I suspected the keyboard or TouchID sensor wouldn’t work, so I went on and checked every connector.
I missed connecting the left TouchID sensor from step 31.
webrockers -