Introduction
Même des années après sa sortie en 2014, OnePlus One est un smartphone populaire. Cependant, ses batteries intégrées seront probablement épuisées après toutes ces années d'utilisation.
Bien que les batteries intégrées n'aient pas été intentionnellement conçues pour être remplacées par des utilisateurs finaux, cela est encore possible. Les batteries de rechange sont disponibles dans les magasins en ligne. Certains d'entre eux conservent même le design original des batteries OnePlus One.
Les piles sont connectées à la carte mère via un ruban qui doit être préalablement déconnecté. À cette fin, vous ouvrez le smartphone et démontez le capot de la carte mère. Les batteries elles-mêmes ne sont pas emballées dans un couvercle dur. Par conséquent, un soin supplémentaire est nécessaire lorsque vous les retirez.
Ce guide vous guidera étape par étape dans le processus d'enlèvement des piles et vous fournira des conseils utiles sur les difficultés mentionnées. Après avoir retiré la batterie, vous pouvez simplement vous connecter en exécutant les étapes en ordre inversé.
Ce dont vous avez besoin
-
-
Enlevez le tiroir SIM.
-
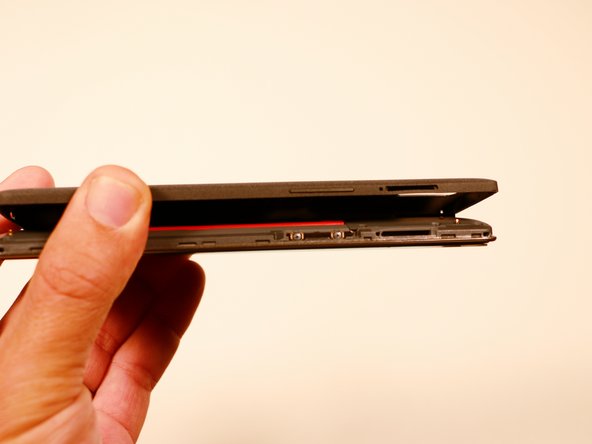
A l'aide d'un outil d'ouverture en plastique, séparez délicatement la coque arrière du corps principal du téléphone. Soyez très prudent au niveau de la fente de la carte SIM et aux autres endroits fragiles.
-
Vous pouvez rencontrer une certaine résistance en raison des clips de verrouillage situés sur le rebord interne du smartphone. Ne vous inquiétez pas. Déplacez délicatement l'outil d'ouverture dans une seule direction plutôt que de zigzaguer d'un endroit à l'autre.
-
De haut en bas, de gauche à droite, dans le sens des aiguilles d'une montre ou dans le sens inverse des aiguilles d'une montre. Une fois que vous avez fait le tour de la moitié de l'appareil, la coque est facilement démontable à la main.
-
-
-
Retirez les caches en plastique à l'aide d'une pincette.
-
Retirez les trois vis de 3,175 mm qui se trouvent sous ces caches. Utilisez un tournevis cruciforme #00.
-
Utilisez le même tournevis pour retirer les six autres vis de 3,175 mm.
A needle works best to remove the plugs.
I second this. I used a sewing pin and the plugs came out in no time!
Liam Ong -
when I lifted the motherboard cover the battery cable stuck on it so that I lifted both, the plastic cover and the cable - step 4 below was not necessary to perform. Be careful!
anyone know what is the 6 orange screws in step 2 are called?
e.g. M2 x 2
I lost some screws.
So where can I buy some replacement of these screws?
-
-
-
-
À l'aide d'un outil d'ouverture en plastique, soulevez délicatement le cache en plastique noir et retirez-le du téléphone.
-
-
-
Après avoir retiré le cache de la carte mère, on constate que la batterie est intacte et qu'elle est reliée à la carte mère par une nappe noire.
-
A l'aide d'une spatule, commencez délicatement à soulever la batterie par le côté opposé à la nappe. La batterie est fixée par un adhésif de haute qualité qui maintient celle-ci dans son emplacement. Procédez avec prudence.
Is it OK to use the battery if I bent it during removal? I had to 'iron' it flat, but I think it might still be useable...
the best way to remove the battery is to lever the left side up from the bottom and remove it from the glue with an old credit card
Do this! it comes up very easily this way. All the adhesive is on the right side.
Great suggestion with a card to remove the battery!
Thanks for this trick saved me a lot of time
George P -
I second Dangerous Picture's suggestion. I found it very helpful to remove the ribbon from the dock (it was easy to do) before trying to remove the battery.
on my phone extensive use of glue was concentrated on just one side (right hand side). Not impossible to remove, little tricky
I mistakenly removed the battery with force, and the back peeled and brought out smoke, seemingly like it's gonna explode. Help !!!
-
-
-
Une fois la batterie dégagée, utilisez notre si pratique spatule noire afin de déconnecter la nappe de celle-ci.
Thought I was going to snap my battery in half but patience and slight pressure did the trick.
Also agreeing the battery should be disconnected as soon as possible.
From where do I procure a new battery for it?????????
There are several connectors to the motherboard. In the picture above, one connector above and, below the screw thread, three more connectors. Be careful to reconnect any connectors accidentally disconnected while disconnecting / removeing the battery. In my case the connector shown at the top of the row came unconnected.
salut, pour moi le connecteur à la nappe était collé au cache en plastique qui couvrait la carte mère … mais le reste s’est bien passé.
Merci pour le tuto !
Thanks Buddy, I replaced battery of my one plus one and when I switched it on, touch was not working. It was heart sinking panic moment...Then I came across https://forum.xda-developers.com/oneplus... post, simple trick of sliding piece of paper below battery solved and infact improved the touch response. Thanks !
Kifch nikmandha
When putting in the new battery, the battery ribbon cable did not line up with the dock on the motherboard, on the replacement battery I ordered from iFixIt. I was able to carefully peel back the foil covering ribbon cable, align the cable, then press the foil back in place. Now, everything seems to be working.
-


Pour remonter votre appareil, suivez ces instructions dans l'ordre inverse.
Pour remonter votre appareil, suivez ces instructions dans l'ordre inverse.
Annulation : je n'ai pas terminé ce tutoriel.
198 autres ont terminé cette réparation.
Merci à ces traducteurs :
100%


Ces traducteurs nous aident réparer le monde ! Vous voulez contribuer ?
Commencez à traduire ›
Équipe

USF Tampa, Team 3-3, Brown Fall 2014 Membre de l'équipe USF Tampa, Team 3-3, Brown Fall 2014
USFT-BROWN-F14S3G3
3 membres
20 tutoriels rédigés
36 commentaires
The Apple iPhone sim ejector is not long enough to work on an OPO. A paper clip is a better option.
There will be a compatible battery with one pin OnePlus
Successfully accomplished, thanks to your clear instructions. One note: the adhesive on my unit was applied in about a quarter inch strip along the right underside of the battery as you view it from the back. Peeling up the left side allowed me to reach and release the adhesive on the opposite side with the spudger or knife blade.
Thank you! I use a slim (but not sharp) butter knife to nudge the battery out slowly by poking the adhesive tape along its length. It was a bit unnerving because I was afraid of damaging the soft battery. Worked out in the end.
One note to add is that the original battery connector's top was glued to the motherboard cover. I had to remove the battery before I could successfully sepearte the 2. My phone is still working and I'm charging it right now! :)
Thanks for the very detailed guide.
How can I tell if the charging port or the battery that is damaged?
After doing this my screen no longer works. It's just a black screen whether I use the old battery or the replacement.
Fixed the black screen issue by taking the cover off and then checking all connections and putting back together. All good now. Hardest part was to get the cover off. Starting from the sim card port worked eventually.
anyone knows where can i buy a good quality battery? i dont want a cheap replacement...
I just got mine from this Ebay seller: http://www.ebay.com/itm/162062594869. It is an original battery, as far as I can tell.
Ordered it on Monday, received it on Friday. It took me about 30 minutes to replace the battery and it seems to work.
Hi everypone! Recently i bought the new original Oneplus One battery from this site, in few weeks i'll make an update.
Thanks it was verry useful and at the end succesful. With this tutorial i was verry confident.
I am looking for the new battery to replace old one in my Oneplus one. Can anyone help me, where can I get the genuine one or at-least a good one?
Good manual! Be careful the battery cable is attached to motherboard cover. Don't tear it off right away. Loosen the motherboard cover and SLOWLY and CAREFULLY lift it to see whether yours is attached too. Also get 1-2 plastic cards like credit cards to lift the battery from the tray. Mine was glued on the right side if you look at the battery with phone lying on the table face down. Make sure to discharge your battery before removal.
My phone only comes on when it's plugged to power. Could this be a battery problem? How can I get a new battery in Nigeria?
Great post i have been using one plus one since its release in india still i have that phone no lagging no any issue great phone ever at that price .
Thanks on your marvelous posting! I certainly enjoyed reading it. I will remember to bookmark your blog and will eventually come back from now on.Also Look for <a href="http://www.cabs2go.in/tours/mumbai-to-ma... style="text-decoration:underline;" target="_blank" >Mumbai to Mahabaleshwar taxi</a> I want to encourage that you continue your great writing, have a nice day!
Absolutely flawless. I followed the guide with the recommended battery and some simple tools. It worked like a charm at the very first trial and in 10 minutes. THANK VERY MUCH, SIR.
my oneplus one works only when charger is plugged in…turns off immediately or reboots when unlugged…could this be a battery issue…
Since there have been none of these batteries in stock for a long time, I found a Spanish website that sells them quite cheap. They appear to be official OnePlus batteries. Quite handy for any peeps in the EU :) www.impextrom.com
Bought a new battery for USD 9.50 via Ali Express. Lots of suppliers. Thanks to the clear and concise instructions I completed the battery replacement in no time, using a sharp knife to pry things apart and a plastic throw-away knife to help further. Put things back together and the OPO works as a charm. Just goes to show that OnePlus were environmentally friendly back in the old days. Nowadays you throw the phone away when the battery is dead, USD 500 (OP 5T) for a replacement phone. And thanks to the guys at ifixit, their efforts help us keep the world clean.
Réussi. Merci Javier !
DONT BUY from this seller. battery not work well https://www.ebay.com/usr/xiongdoudou17?_...
I've had my Oneplus One for nearly 2 years now and while I'm very happy about the hardware and even the software (still on Cyanogen), the battery is starting to become really weak. It used to last way longer with a single charge than it does now and I want to replace it
i think battery is dead because i play many unblock games on my mobile
Since the day I met him, he knew that today
One day, my memory is filled, surrounded by pictures of me surrounded. Struggling forever in a sentence, "now what to do?...... Play Game: basketball games
Everything worked like a charm from the first time. Very clear and detailed instructions. Thank you!
Great, I peeled off the repaired battery, exactly what you told me, thank you. and now the battery is back
anyone know what is the 6 orange screws in step 2 are called?
e.g. M2 x 2
Worked like a charm. Like others have said, most difficult part was removing the back cover. The adhesive on the old battery was a little tough as well. My battery cable was also stuck to the back cover. Connecting the new battery cable was pretty easy, just needed to look closely to make sure aligned to snap in. Many thanks!
Your post is very meticulous and impressive for me, I hope to get more good posts. shell shockers
Super Anleitung Danke
Super Anleitung Danke
thanks for the guide. Battery cable was sticking to the motherboard cover. Like comments before mine also had a glue strip on the right underneath the battery. So tilting it up from left works, be careful not to break it.
It doesn't mention you have to remove SIM tray first.
pawel - Réponse
I used the #0 for the rear panel screws. The #00 is too small and will slip, stripping the screws if you're not extra careful.
anonymous 2668 - Réponse
where can i buy the battery??
Shaun Davis - Réponse
Has anyone answered this? I am looking too.
Elie Daou -
They sell it on here, although I found mine on eBay.
Roger -
Aliexpress for $9 (original)
David van Ballegooijen -
The last three hidden screws are a !&&* of a time consumer to remove. probably you would need only a certain type of tweezers - I got stuck at midway and now I cannot get go have my phone detect the sim card either probably because the six screws are removed. I can now turn the phone back on but with no service or wifi connections are detected. This phone is a disaster!
Manan Shah - Réponse
Ivdid that too but son in law found I had reinstalled sim card in backwards or upside down.
wildcat75666 -
Where did you buy the micro USB piece? Thanks a lot!
Davide Rota - Réponse
EBay. I bought new battery cause old ibe was dead would not charge. Just ordered new cables fit 9.00 something free shipping. Anyway hope this fixes problem cause new battery did not fix problems.
wildcat75666 -
I was able to open going from the microusb slot and working my way around. The corners are tough, though.
Roger - Réponse
in my phone the battery was glued with double sided adhesive tape, only on the right side. I pried the left side up first, and carefully removed the battery. to lift the battery I used first used a suction cup(?) followed by a plectrum like tool to lift te battery, and keep it lifted
Eelco Busch - Réponse
A word of caution: the back panel is harder to remove than you might think. Especially because you may be removing the *screen* by mistake. When you have a "grip" with the tool make sure the metallic border is not coming off with it, and when you have removed enough to be able to lift the panel, make sure it isn't attached by ribbons - in that case you've been removing the screen. A good idea is to gently press your finger nail against the weak plastic located between the back and the SIM slot, and going up and down and sideways until you hear a click. Then you can start from there with the opening tool. As recommended be very gentle around the SIM slot.
Menahem Julien Raccah Lisei - Réponse
Where do I get the plastic opening tool?
Julie Hejducek - Réponse