Introduction
Au fil du temps, la durée de vie de la batterie peut devenir faible et cesser de se recharger. Ce guide vous montrera comment remplacer la batterie. Vous aurez besoin d'un outil d'ouverture en plastique, d'une pince à épiler, d'un tournevis Phillips #00, d'un pistolet thermique et d'un spudger en plastique pour compléter ce guide.
Ce dont vous avez besoin
-
-
Retournez le téléphone de manière à ce que le panneau arrière du téléphone soit orienté vers le haut.
-
Calez l'outil d'ouverture en plastique entre le panneau extérieur noir et le panneau latéral argenté.
-
Appuyez sur l'outil d'ouverture en plastique pour séparer le panneau arrière du reste du téléphone.
-
Continuez à faire cela sur tous les côtés du téléphone jusqu'à ce que le panneau arrière se détache complètement.
-
-
-
-
Retournez le téléphone de manière à ce que l'écran soit orienté vers le haut.
-
Calez l'outil d'ouverture en plastique entre l'écran et le panneau arrière.
-
Appuyez sur l'outil d'ouverture pour séparer le panneau du téléphone.
-
Continuez à faire cela sur tout le téléphone jusqu'à ce que le panneau arrière ne soit plus connecté à l'appareil.
-
-
-
Calez l'outil d'ouverture en plastique sous la carte mère qui se trouve en haut du téléphone.
-
Appuyez sur l'outil d'ouverture en plastique, en soulevant la carte mère du téléphone.
-
Continuez à faire cela sur tous les côtés de la carte mère jusqu'à ce qu'elle soit complètement retirée du téléphone.
-
-
-
Utilisez une pince à épiler pour décoller le ruban adhésif au bas du téléphone.
-
-
-
Calez l'outil d'ouverture en plastique sous la carte du port de charge au bas du téléphone.
-
Appuyez sur l'outil d'ouverture en plastique pour que la carte s'éloigne du téléphone.
-
Continuez à faire cela autour de la carte du port de charge jusqu'à ce qu'elle se détache complètement du téléphone.
-
-
-
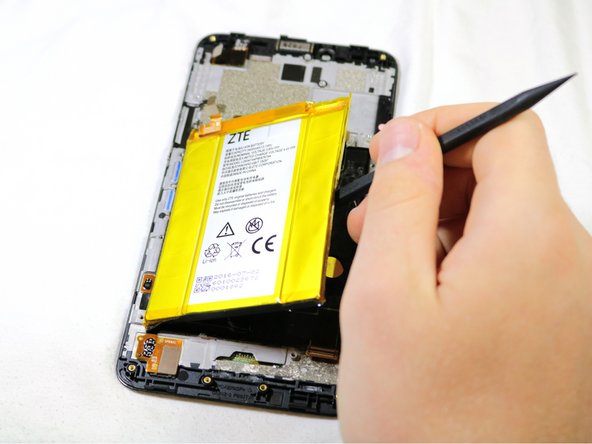
Utilisez une spatule en nylon pour retirer la batterie du téléphone.
Great instructions, however, if you - like me - just want to replace the battery: steps 10-15 are not necessary. After step 9, proceed to 16. Makes it a whole lot easier
Battery change worked, but now the screen is not working. Any ideas?
I accidentally ripped open the plastic on the grey side of the battery. Is it still okay to use?
After installing the new battery I got, my display wasn’t coming on. For me, I just didn’t seat the display connector (next to the top most antenna post). Disconnecting it and reseating it did the trick.
Also, you can run a thin plastic card (like a gift card) behind the battery to gradually work at the adhesive behind it. Just pop up a side with a spudger for clearance and shimmy the card back and forth to gradually remove the adhesive.
-


Pour remonter votre appareil, suivez ces instructions dans l'ordre inverse.
Pour remonter votre appareil, suivez ces instructions dans l'ordre inverse.
Annulation : je n'ai pas terminé ce tutoriel.
18 autres ont terminé cette réparation.
Merci à ces traducteurs :
100%
[deleted] nous aide à réparer le monde ! Vous voulez contribuer ?
Commencez à traduire ›

Équipe

Cal Poly, Team S17-G3, Livingston Spring 2018 Membre de l'équipe Cal Poly, Team S17-G3, Livingston Spring 2018
CPSU-LIVINGSTON-S18S17G3
4 membres
16 tutoriels rédigés
14 commentaires
This is much more difficult than it is depicted; while I’m not an electrician, I’ve acquired skills as a sailor over the past 8 years. Damage to the device is nearly guaranteed. I would NOT recommend trying this operation.
Have you actually tried? With the proper tools and care it doesn’t seem that difficult. But then I was a computer tech and repaired laptops. For anyone inexperienced or lacking patience, you’re probably right.
It’s actually pretty easy. I’m guessing your main concern is ESD… You can avoid electrostatic discharge by using the proper tooling and ESD mats.
The instructions were good. Please note the cable under the yellow tape is very thin and not really visible against the backdrop. Mine tore and made camera not function correctly.
Also note, I couldn't remove the last screw off the motherboard. It was too tightly inserted and was stripping by attempts. I turned my phone face down with gorilla glass against a heating pad on a low setting for just a few minutes to warm the adhesive on the battery. Keep the top section with the motherboard off the heating pad. This was the easiest thing to remove. Use a plastic spatula not a metallic one.
Just hit camera to ‘restore default' and camera seems fine. Guess this step was needed after reinstallation. So, only the fingerprint feature was slighted due to torn cable. I've had my phone nearly 3 years and never used that feature.
The time I needed to do the replacement was longer than the 20-25 minute estimate, because I made sure to double-check each step as I went in order to do it right.
While I wouldn’t recommend it, I softened the battery adhesive with a hair dryer, but the downside is that the battery is much more difficult to remove because the adhesive doesn’t soften as much (if at all), increasing the risk of physical/puncture damage to the battery during that step.
Anyway, I enjoyed this project, and the guide was great! It’s nice to be able to repair my own stuff, saving money and electronic waste in the process.
Pretty solid guide, thanks for posting. The hardest two steps are the first, and the 17th. In the first step, I was unable to remove the back cover using the plastic tool alone, and instead carefully used a very thin metal tool to get the process started. At that point, the plastic tools were sufficient to complete removal. In contrast, for step 17, I strictly used the plastic tool as indicated and via slow, steady application of force removed the battery. Heat may have helped but is not strictly necessary, or at least, I did not require it.
All in all a great guide, thanks again.
Anybody know the parts number to use when replacing the ZMAX pro battery
Li3934T44P8h876744 thats for the original 3400MaH
Great guide and easy to follow! Was able to complete this repair with ease!
All this is not necessary to change the battery. Only need to go to step 8! DONT pull the mother board and DONT pull the charge board SKIP all that then just disconnect and pull the battery then install the new battery. If you pull the boards you may have problems and waste a lot of time at the least! Other than your instructions that have TOO many unnecessary steps it is well done and good reference to see inside the phone before trying to change the battery so Thanks for that : )