Introduction
Vous devez déconnecter ou remplacer la batterie de votre Dell XPS 13 9380, ce guide est alors fait pour vous !
Ce dont vous avez besoin
-
-
Dévisser les huit vis (Torx M2x3) qui fixent le panneau arrière.
-
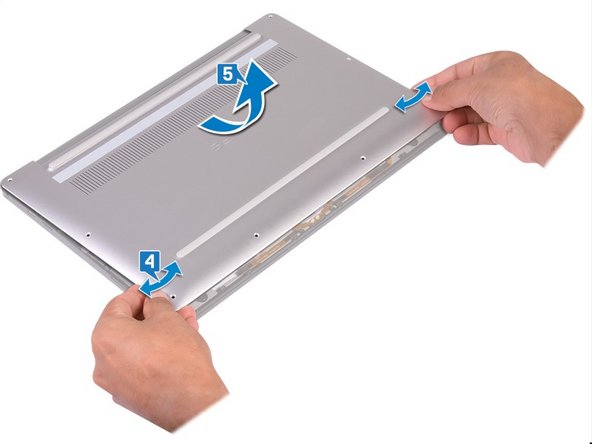
Retournez l’ordinateur, puis ouvrez-le en l’inclinant.
-
À l'aide d'un Spudger, faites levier sur le panneau arrière.
-
En faisant glisser le panneau arrière de gauche à droite, libérez les clips qui le fixent. Vous pouvez ainsi le retirer.
-
-
-
-
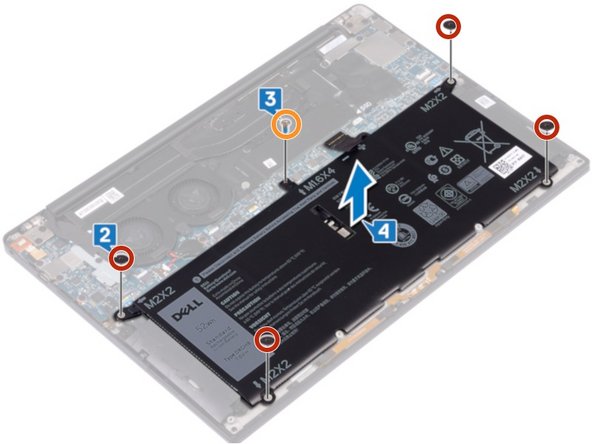
1- Déconnecter le câble de la batterie.
-
2- Retirer les quatre vis (M2 x 2) qui fixent la batterie
-
3- Retirer la vis (M1,6 x 4) qui fixe la batterie.
-
4- Retirer la batterie de son emplacement.
-


Pour réassembler votre appareil, suivez les instructions dans l'ordre inverse.
Pour réassembler votre appareil, suivez les instructions dans l'ordre inverse.
Annulation : je n'ai pas terminé ce tutoriel.
17 autres ont terminé cette réparation.

Équipe

3 commentaires
The backpanel is a bit tricky to remove, but it can be managed.
The "Essential Electronics Toolkit" is very useful! I recommend to order it with the battery.
I am confused because according to dell.com the battery for the XPS 13 9380 is the G7GV0, not the G8VCF (DXGH8) which you are selling here:
https://www.dell.com/en-uk/shop/dell-4-c...
vs.
The hole for the M1.6x4 screw is too large, allowing the head to go through the hole and not hold the battery. I sawed off the tab from the old battery to use as a washer.