Introduction
Utilisez ce tutoriel pour remplacer une caméra frontale défectueuse sur votre iPhone 7 Plus. Cette caméra fait partie d'un ensemble plus complet comprenant un microphone et les capteurs de proximité/luminosité ambiante, tous remplacés d'un seul bloc.
Ce dont vous avez besoin
-
-
Éteignez votre iPhone avant de commencer le démontage.
-
Enlevez les deux vis Pentalobe de 3,4 mm sur le bord inférieur de l'iPhone.
-
-
-
Chauffer la partie basse de l'iPhone aide à ramollir la colle qui maintient l'écran. Il sera alors plus facile d'ouvrir celui-ci.
How long should I use a hairdryer for?
I used it until it was hot to the touch but not too hot where you burn yourself.
gczarny -
Hey, I just took apart my first iPhone 7 plus today, and it was easier for me to use guitar picks and a magic glass tool. I did tear the home flex on the screen—now I know to be more careful of that on disassembly—-~Katrina of iPad Rehab Microsoldering
Get a T-shirt add heat to a lil corner of it, with either a hair straighter or an Iron , touch the T-shirt if it’s seems hot but doesn’t burn u hold that lil hot piece of T-shirt against the edge ur trying to pry open , if it’s still not opening add a I’ll more heat,
I took a hot water bottle and layed it on the display of the iPhone for a minute, because I did not have an iOpener. That worked for me perfect.
How can I get all this tools
-
-
-
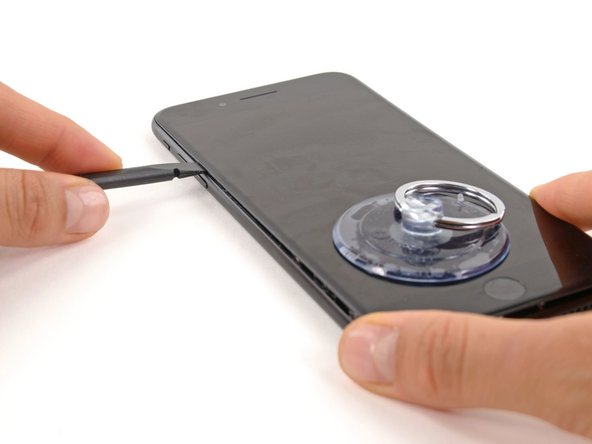
Posez une ventouse sur la partie basse de l'écran, juste au-dessus du bouton home.
Hi! My suction cup doesn’t work. It won’t strongly suck on my screen. Does anyone have any advice?
Heat it up just a little with a hair dryer make sure it’s flat , let it coo a bit now try it??
The suction cup you provide sucks. In that it doesn’t hold. Luckily I had a set of heavy duty suction cups from when I worked on my iMac.
-
-
-
Tirez sur la ventouse de façon ferme et constante pour créer un petit espace entre le panneau avant et la coque arrière.
-
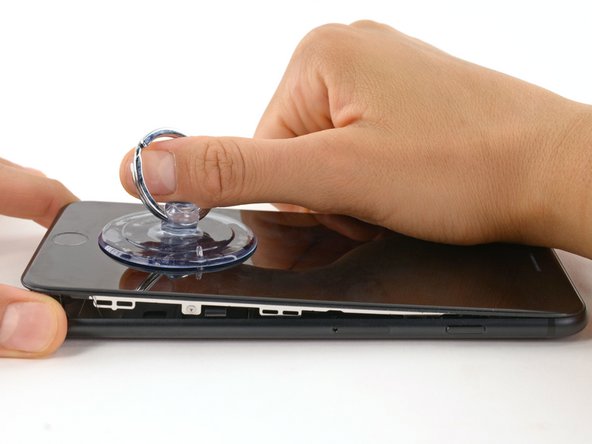
Insérez l'extrémité plate d'une spatule (spudger) dans l'espace créé.
-
Pendant que vous tirez sur la ventouse, bougez la spatule (spudger) pour agrandir l'espace entre l'écran et le boîtier arrière.
Be very careful not to pull up with too much force. My screen just shattered while I was pulling up with my suction cup. (There were no previous cracks or chips or anything).
I’m stuck on this part. I’ve heated the bottom up and attached the suction cup right above the home button, but I can’t pull it apart. I feel like I’m going to break the glass display. Tips?
Someone mentioned above, using strong tape helps .
My first 7 Plus opening. I pulled up the screen just enough to insert a thin guitar pick at the bottom of the phone to break the adhesive. I didn’t even create a gap as such. I then ran the pick along the sides to continue to detach the adhesive, just like iFixIt show in Step 10 for the top of the phone.
My screen already had a crack at the bottom, near the home button, so I was nervous about pulling too hard on the screen. It had a screen protector fitted so maybe that helped keep it all together.
iFixIt’s use of a spudger at the bottom of the phone looked hazardous to me, especially with my damaged screen.
This must be a joke. I’ve been trying for days to pull open the iphone like this. Doesn’t work. I bent the ring on the suction cup trying to pull it off, but nothing happens, no gap, not remote possibility of a pick or spudger getting in there.
Ended up using a blowdryer and a razor blade. Bottom got scratched up, but there was no way that fat plastic spudger was going to fit. I got the razor under the corner, from there worked to middle and twisted with repeatedly adding heat. Lots of heat.
Be aware that there is a small connector, under the home button.
I found that the edge of the spudger was too thick, so I sanded it down to almost a knife edge. This made it much easier to insert into the gap.
Use the Opener and a razor blade to cut through the adhesive. It takes about 45 seconds to heat up the Opener in a 1000 watt microwave. Be careful not to damage the thin display ribbon cables on the right side iphone. After you use the razor blade to cut the adhesive on the two sides and bottom you should be able to use the spudger to remove the display screen.
-
-
-
Insérez l'extrémité plate d'une spatule (spudger) au bord inférieur gauche de l'iPhone entre le panneau frontal et le boîtier arrière.
-
Faites glisser la spatule le long du côté gauche en commençant par le bord inférieur et en travaillant vers les boutons de contrôle du volume et le commutateur du silencieux, pour défaire l'adhésif qui maintient l'écran.
-
-
-
Faites glisser un médiator sous l'écran le long du bord supérieur du téléphone pour décoller l'adhésif restant.
I couldn't find the pick in the tool set, so made my own. Then I found the original in the battery box. %#*@.
Same thing for me
-
-
-
Éloignez légèrement l'écran complet du bord supérieur du téléphone pour ouvrir les clips le maintenant à la coque arrière.
-
Ouvrez l'iPhone en faisant pivoter l'écran vers le haut en partant du côté gauche, comme s'il s'agissait de la couverture d'un livre.
So if I broke the cable that connects the display to the logic board. What replacement part would I need to order now?
Probably the screen
-
-
-
-
Retirez les quatre vis tri-point Y000 suivantes fixant le cache de la nappe d'écran inférieur à la carte mère :
-
Trois vis de 1,2 mm
-
Une vis de 2,6 mm
Is it really safe to lay the device fully open like a book? The cable leading to the LCD gets stretched across the sharp edge of the aluminum edge of the back cover.
Generally I'd say no, it's not safe. In reality I've seen a bit of variance in the cable length, and sometimes it'll be fine—but mostly I'd be prepared to prop the display up or hold it in place at a slight angle so it doesn't put too much stress on the cables. On prior iPhones it was easy to rubberband the display to a box or a can of soda, and something like that would probably work well here too. Use your own judgment.
You could stick the suction cup back on, near the right side of the phone, with the blue hook oriented in such a way that it becomes a stand for the screen. That way it won’t open much more than 90 degrees, and leaves both your hands free.
Mark -
The tri wing screws are so hard to remove. What's the trick?
I cannot remove one of the corner screws in this step and i have used the tweezers and the y000 tri tip and i am afraid that it is stripping it. is there a work around for this step?
@katmonday1 No workaround unfortunately. Make sure the driver tip is in good condition and fits the screw correctly. Seat it in the screw, hold the driver perfectly vertical, press down hard (and maintain it), and turn. It’ll come out. If it’s really stripped you’ll have to get more aggressive—try one or more of the techniques in this guide or get some help. Good luck!
A tip to remember which screw is which as the differences are pretty tiny: I used different colored sharpie fine-points and made a mark on the top of the screws before removing. I thought about having strips of tape that I stuck similar sizes to, but the coloring seemed to work more easily. I only did this for step 11 and it saved me down the road when trying to differentiate the 1.2 and the 1.3mm screws!
STOP! Before you remove Any screws, be sure to create several bins to hold the various sizes in… or mark them like Trey suggested. I failed to pay attention because I thought they were all the same… they are not. It is very hard to figure out the sizes if you remove them all and store them in a single location.
i had a piece of paper with the steps numbered that involved screws. I had double sided tape on the paper and the number of screws and thier position marked. This was so helpful in removing and then finding and installing the tiniest screws on earth. And i have TINY hands. I can’t imagine someone with large paws being able to accomplish any of this.
there is one screw thats 1.2 mm but its bigger than the others and will fit in no hole of the entire phone. i got it out bot now i have no idea where it has to go i tried every hole. can somebody help me?
what do i do if one of the screws dont want to come off
-
-
-
Retirez le cache de la nappe d'écran inférieur.
I am confused, please help. LOL the bracket, the very first one being removed. I see it has three screws the same size and one a different size? I've been trying to fix my daughter's phone and ordered a 0.6 mm Tri Wing screwdriver for iPhone 7 plus /Apple watch. It seems to fit the screws and it seems to be turning them although I can't see that well but they're not coming out. However when I used it on a smaller bracket with two screws they came right out so I'm thinking I don't have the right screwdriver I am at my Wit's End!! I have been working on this phone or attempting to for a while now. I cannot find a list anywhere of the exact size screwdrivers needed to Take apart an iPhone 7 plus. Any help would be greatly appreciated.
If your tri-wing screwdriver worked for other tri-point screws in the phone, then it should work for the screws you are struggling with! If it feels like the screws are spinning but not coming out, try to use tweezers to pull them out. I often struggle with tri-point screws, and need to apply some downward pressure to remove them. This can be risky though, as you do not want to strip the screw or damage components underneath the bracket. If you continue to struggle, you can give this driver and this bit a try.
Also be aware that the battery connector might stick to the bottom of the steel bracket. This part had me a bit puzzled at first. lol
Just gently pry the connector off the steel bracket to release it and be sure the connector isn’t allowed to accidentally reconnect to the board.
-
-
-
Utilisez la pointe d'une spatule (spudger) pour soulever le connecteur de la batterie de sa prise sur la carte mère.
on reassembly, make sure that the connector cable is back in place, along side the battery, and not up, or on top in any way.
I slipped a small piece of paper under the flap.
After this step it is worth jumping to step 36 and disconnecting the lighting connector assembly (indicated with the orange rectangle) and connecting the new cable to test it out. After attaching the new lightning connector assembly, reattach the battery, and try plugging it in to see if the new assembly works correctly. If it does, then power down the phone, disconnect the battery, and disconnect the new lightning connector assembly. Then continue. If it doesn’t work, this check will save you a couple of hours of work.
-
-
-
À l'aide de l'extrémité plate d'un spudger (spatule) ou d'un ongle, faites levier sur les deux connecteurs d'écran inférieurs afin de les déconnecter de leurs prises sur la carte mère.
What can happen if the battery is not disconnected before the two lower display connectors?
Hello, by my expierence and what i have learned iphone repair videos you can ‘blow up’ capacitors which one in logic board, screen is sensetive with voltages and etc….
When I removed the lower display cable bracket in step 12, the top connector stuck to the bracket and became disconnected.
My replacement screen wouldn't sit in the display connector properly, (wouldn't clip in both sides at same time) so I made sure it sat on one and it was lined up and got a thin piece of dense sponge and placed that over the connector, then proceeded to install the connector shield and screen works perfectly fine without a hitch. Very good tutorial just earnt me £25 lol
have the same issue, sometimes it doesn’t sit on the left side, other time not on the other, the difference is iphone not starting at all or looping with apple logo reboot…
ibisiki -
-
-
-
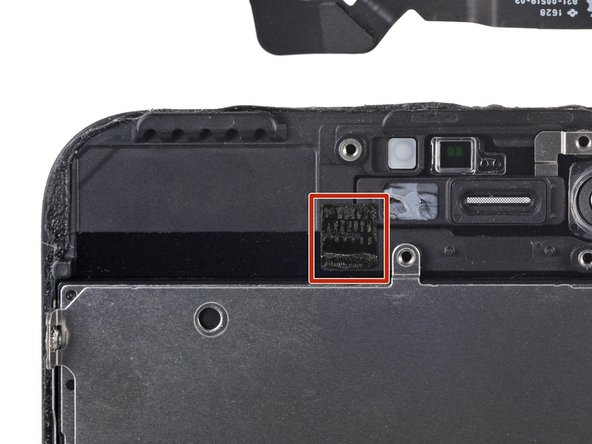
Retirez les trois vis tri-point Y000 fixant le support au dessus du connecteur de l'ensemble capteur du panneau frontal:
-
Une vis de 1,3 mm
-
Deux vis de 1,0 mm
-
Retirez le support.
Posted a comment above on the first step. The screwdriver that I ordered Works taking out these two screens shown in the picture. However it does not work on the first bracket that needs to be removed. It seems that all screw sizes are somewhat different but I'm not finding a list showing different screwdriver sizes needed. Does this make sense? Could anybody please give me some advice on this thank you much.
What happens if you break “tear in half” the black tape stuff?
Unfortunately if you tear the black cable you will need to replace it !!!
Chris West the screwdriver that probably came with the kit was pentalobe to get the first two screws out to open the case. you need a .6mm Y tip driver for internal. its deceptively Phillips looking but is not it only has three blades in a Y, not 4 in a +
I called the y tip a triangle tip until I read these comments. Thanks for the correction
Hello is it if I put wrong screw can damage the board?
Care should be taken while removing the last 1.0mm screw, on the far right in the picture. This screw is screwed into another screw (or standoff) beneath the bracket. This standoff may come unscrewed and upon removing the bracket you may find the screw and standoff are still attached to the bracket. Do not lose this part if you decide to separate them , the standoff is not a normal phillips, and may require a special driver to reinstall. I used the phillips to start it back in, and relied on the screw to tighten it upon reassembly.
I know this is late bit a trick I use to put the standoffs in (had to do 2 cause someone lost the screws I was replacing) is to take the screw that goes in it srew them together loosely to give it a fake phillips head then gently screw both into the spot the standoff goes in. you can then take the phillips out (may need to put a spudger between the screw and standoff to keep the standoff down then use a tiny flathead to gently tighten the standoff down. its a few steps but makes life easier if you need to replace it quickly.
I was able to remove the first 1.0 mm three tri-point Y000 screw from the bracket but I cannot for the life of me get the other 1.0 mm screw undone or the one 1.3 mm screw undone. Any tips?
I tried pressing down a bit harder and I even put the first screw back in to see if it helped me loosen the other two but it did not work.
My screwdriver was doing the job up until this point, and I’m worried I’ll strip the screw if I keep trying.
Would appreciate any advice!
Dear IFixit: First, I want You to know I love your repair guides. I consider You to be the absolute best repair manuals available. But, hopefully as your friend I am going to point out once the bracked is removed a 2.0 mm Standoff screw should appear. It’s 1 of 2 screws holding the Antena Flex Cable in place. Rob
-
-
-
Déconnectez le connecteur de l'ensemble capteur du panneau frontal de sa prise sur la carte mère.
Make sure that the orientation of the cable when you attach is correct! See the picture for the correct orientation. If it gets installed 180 degrees out(i.e., the ribbon goes up instead of down, then the earphone, front camera, and Home button will be inoperative. Ask me how I know!?! Worked great when installed correctly!
Thanks Kevin. I would be stuck if I hadn't read your comment!?! Great input.
That's save my life!thanks god!
neg -
-
-
-
Retirez l'écran complet.
When removing the old adhesive from the edges, duct tape can be useful. Simply use small strips of duct tape and your spudger to press the tape’s adhesive side carefully into the edges of the phone’s display and slowly peel the duct tape away from the display. The duct tape should pick up the remaining adhesive and carry it away from the edges. use the tip of the spudger to gently scrape away any remaining dirt or film from the crease around the edge and repeat the action with a new strip of tape to pick up any dirt, adhesive or grime from the surface. This should save considerable time.
Thank you for including a link to the iPhone Display Adhesive Replacement guide, this was very helpful!
is it really necessary to remove the display? the screen connectors are delicate and I fear re-assembly errors. I changed the battery and did not remove any screen connectors. no problems.
Due to the fact that THIS is the repair guide for replacing the DISPLAY it IS necessary to remove the display connectors. There is another guide for changing the battery -- you might want to follow that one.
Hannes -
I did not remove the display and ended up ripping one of the lower display cable ribbons when I turned the phone to remove one of the connectors. Be careful. I had to get a new display and move the Touch ID button.
I think that moving the replacement of the seal lower in the chain of events would be more beneficial. I'm replacing the battery, and stretching the adhesive tabs that held the battery in at a low angle kept sticking themselves to the newly-installed adhesive seal.
In the end, I wound up having to just remove the section of the seal along the bottom of the case :-/
If I'd been looking at the bigger picture, I'd have wanted to put the seal on right before reattaching the screen cables.
This guide does not show you the removal process for the top camera assembly. My screen looks like the one pictured but my replacement doesn't have the top connector or any of the front facing camera components and since the ribbon for the connectors looks like its coming out from underneath the display I can't see how to swap it over to the new display.
-
-
-
Retirez les cinq vis cruciformes fixant le cache du haut-parleur interne :
-
Deux vis de 1,8 mm
-
Une vis de 2,3 mm
-
Une vis de 2,4 mm
-
Une vis de 2,8 mm
-
-
-
Utilisez l'extrémité plate d'un spudger pour soulever la caméra frontale hors de son emplacement.
-
Reliez doucement la nappe de la caméra sur le côté pour accéder au haut-parleur interne en dessous.
How is this bit waterproofed on re-assembly?
The screen/display that I got, already included a camera/speaker. So I didn’t have to remove it.
I finished my repair and then started to use the phone again. I noticed Facetime was not working anymore (cameras, speakers and microphone was OK). I tried a few solutions I found on the Internet but nothing seemed to work. I open the phone back up and replaced the pre-installed camera with the old one I had on the broken screen/display. Closed the phone again and now Facetime works without any issues. I just wanted to pass that along.
-
-
-
Retirez le haut-parleur interne.
If you’re looking to continue on and replace the speaker mesh, take a look at the camera/cable replacement guide.
Remplacement de la caméra frontale et de la nappe de capteur de l'iPhone 7 Plus
I almost forgot to clean the spring contacts, thanks for reminding me.
-
-
-
Repliez doucement la caméra et la nappe qui y est fixée vers le bas de l'iPhone pour accéder aux composants en dessous.
-
-
-
Insérez le bord pointu d'un outil d'ouverture iFixit sous la nappe de l'ensemble decaméra, du côté opposé à celui de la caméra frontale.
-
Faites levier pour décoller la nappe derrière l'écran.
prying this up is sometimes difficult. I always keep a new one on hand incase. they are not expensive. if you separate the black strip, prox sensor will not work.
what if the black tape and the flex got seperated, is there a solution to get the earspeaker work gain? coz i tried putting the adhesive tape again behind the flex but still no luck.. what can i do?
Mac -
i think this just happened to me…
With this repair, you can just re-apply light heat to the front glass before removing this flex cable. The heat will transfer to the adhesive and will allow you to remove this flex cable very easily. Ensure that you have followed the previous steps so that you do not damage the ambient light filter and the proximity sensor. Always make sure that you pull very gently here as this is one of the most common damages caused to an iPhone 7 series. If the black strip sticks to the frame during removal, just make sure to put it back in it’s right place and you should have no issue; assuming you didn’t damage the flex cable. Always wear gloves. - TM
-
-
-
Retirez l'ensemble de la caméra frontale et de la nappe du capteur.
-
Un morceau de ruban isolant double face noir se trouve entre l'écran et les trois rangées de contacts en cuivre au dos de la nappe de la caméra/capteur. Il peut rester collé à l'écran ou se détacher avec la nappe.
Is there instruction on how to bend the cable?
You really need that tape, If still no sound after placing the tape in place, then you might have damaged the flex cable. Worthy to mention, that some replacement screens come without the ambient light filter (white film seem on the screen) and without the plastic brackets for the camera and proximity sensor, which in those cases, you would have to transfer those parts to the new screen. Also in some screens, the holes for the proximity sensor are not properly done and you might end up with a non-working proximity sensor. In those cases, just remove the pain with the spugger where the proximity sensor locates (removes the black paint) and then add some black permanent marker over it to make it black. That way, it will look pristine form the outside but just thin enough for the proximity sensor to work.
I had issues regarding sound after reassembling the iPhone. I initially used kapton tape. I could hear the caller but they could hear me. I checked every avenue I thought of, I recorded myself speaking which was fine so there was nothing wrong with the mic. I ended up heating the black insulator and transferring it and reseating the earpiece and flex assembly. After a couple attempts the mic was restored to normal operation.
yeah the mic and the earpiece not working , what is the solution for this problem ?
Do not pull on the cable an be gentle with the heat. There is a potential that the cable, which is soldered together on this part.
I had an issue with a costumers flex cable an the ear speaker stopped working bit the cable looked okay and I did not pull on it. So I used an soldering iron with a small tip, put some flux tape where the doubled-sided tape sits on the pads and soldered the cable back together at about 390 degrees celsius. It now works perfectly again.
After replacing screen, front camera doesn’t work. Replaced camera cable cable with a new cable; still no front camera. Rear camera works fine. Also, have a software “Home” button showing up. Finger Touch ID works and works as the Home button should as far as I can tell, How do I get rid of it?
Earpiece is also not working
So i had the same problem that the erapiece only is not working after replacement..
my soulotion was to reassmble all the flat out the there is a black double sided tape that need to put exactly on the back of the golden points behind the flat.
once the tape back on those golden tips it should work properly
Another thing to be careful of is the area where the black tape sits is actually two pieces of cable that are glued together and are connected by about 15 tiny contacts.
I must have heated the cable too much and ended up separating these two layers when prying… I put them back together but it must have not been lined up correctly as the proximity sensor and earpiece speaker did not work (the parts on the layer that came off), whereas the front camera did as that is on the same layer as the camera and was therefore intact.
I may attempt to re align the connectors again but I feel as though a replacement flex assembly may be the more appropriate solution!
I admit that this is my fault for overheating the component and not taking enough care, but what a weird design! Why couldn’t it have been one whole cable?
Did the replacement flex fix this issue?
is it okay to use electric tape in that case to cover the copper pieces? i installed everthing and the front camera works and the speaker works just when i make a call it turns off.. any recommendations?
why wouldnt it come with the tape on already? Im about to put electric tape because i dont have anything else.
なぜiPhone7Plusのフロントカメラフレックスケーブルには裏面に金属端子のような部分があるのでしょうか?
iPhone7やiPhone8にはこの部分がありませんが必要な役割がありますか?
After replacing iPhone 7+ screen I can’t call out or answer calls everything else works cleaned contacts with alcohol wipes put it back together and same thing the time is right I even updated the os since installing the new screen but phone reboots every time a call comes in or I dial out any suggestions
-


Pour réassembler votre appareil, suivez ces instructions dans l'ordre inverse.
Pour réassembler votre appareil, suivez ces instructions dans l'ordre inverse.
Annulation : je n'ai pas terminé ce tutoriel.
113 autres ont terminé cette réparation.
Merci à ces traducteurs :
100%


Ces traducteurs nous aident réparer le monde ! Vous voulez contribuer ?
Commencez à traduire ›


17 commentaires
Do I have to do this if i buy a new phone screen or do they usually come with one?
If this Speaker is Not Working or it has any Noise Issues, Apple will Replace whole Front Display Section. Under their Policy, they won’t repair it. Neither Fully Replace your iPhone, only Front Panel Replacement.
macktm -
Does 7 and 7plus has the same camera/sensor strip?
No, it’s a bit different.
The spacing between the metal dots for the earspeaker isn’t there on the 7+ model, but is on the 7.
Anybody got a solution to earpiece not working after ribbon swap?
Seems to be mega common with this repair. I’ve heard a few ideas but nothing concrete. More advice about this issue would be greatly appreciated by me and a bunch of people.
@linx7 Make sure the speaker spring contacts are intact and clean. Give the four circular contacts on the ribbon cable a wipe with some IPA and try not to leave any skin oils on them. Double and triple-check to make sure the flex cables are connected and seated properly and that the sockets are clean. Double-check the insulating tape as explained in this step. If none of that works, something is damaged or defective—replace the entire sensor/cable assembly and try again. Good luck!
@jeffsu thank you man, a few pieces of electrical tape and cleaning the connectors worked perfect.
After replacing the front camera/sensor/speaker cable, everything works. But I could not get the AMBIENT LIGHT SENSOR to work.
The AUTO BRIGHTNESS ON/OFF TOGGLE under DISPLAY ACCOMODATIONS is GONE.
I can only MANUALLY adjust the setting. It’s really annoying and disappointing.
Even after resetting the iOS Settings, the TOGGLE is still gone.
Any Suggestions?
I was also having trouble with my ambient light/prox sensor working when I got the other problems resolved. I turned out that screen’s black or white color Comes from a thin layer of paint applied to the back side of the glass.
I ended up taking a sharp pair of tweezers and gently scraping away the paint inside, right were the sensor sits. Viola the sensors can see and work again.
It left an ugly clear mark so I could under the glass, but since my screen is black a little sharpie blended it in fine and left a translucent window for the sensor.
I never had the buttons in iOS be disabled tho. Maybe the phone knows the sensor can't see, or it could be a bad cable or hardware. I'm not completely sure on the issue.
there’s a white piece of plastic very small to the left of the ambient light sensor that does not come with the new screen replacement. Do we have to transfer that into the new screen as well? the answer is not shown in this tutorial and I am having issues with the ambient light sensor.
yeah some replacement screens don’t come with those (2?) tiny brackets. I cant believe they skipped over it either… I dont think they come with this ribbon assembly either. On one build i had to pop the brackets off of the old screen (they we glued to the screen’s frame) and use a tiny piece of electric tape to hold everything in place on the new screen’s frame. It took a little patience but amb/prox still sit in place and works fine months later.
I accidentally separated the two ribbon cables. (Front Camera and proximity sensor) Could this cause a problem with the home button? Because, now the home button works only when the phone is laying down but after lifting it up and moving around, the home button stops functioning. Could it be that the ribbon cables were glued but now they are loose? Just asking to rule out the home/touch id button or the camera/proximity sensor cables. The cameras work fine by the way.
Hi guys,
i replaced this flex cable, because the old was broken and now my light sensor wont working, the button for auto-brightness is gone, all connections are checked and is fine, only the light sensor is wont working
I replaced this sensor cable put everything back together turned it on….just shows the apple icon don’t go to home screen???
i assemble new flex cable but still proximity sensor does not work
just take in mind that if you break the proximity sensor, both speakers won’t work anymore.
The recommendation of discharging the battery is completely unnecessary. Even a 25% charged battery can explode. Completely ridiculous suggestion.
pargoff - Réponse
The risk of thermal runaway on these batteries decreases with the battery's SOC (state of charge). Below 50% charge the risk is fairly low, and at 25% charge the risk of a thermal event is near zero. If I recall correctly, the same suggestion appears in Apple's official (non-public) service manuals for the iPhone.
Jeff Suovanen -
@jeffsu Yes, that is correct. Apple does require all certified staff to discharge the battery below 25%. This is an industry standard for all LiION batteries. If you don’t want to do this, just make sure to not puncture the battery and disconnect it first thing.
iHelpU.Tech - Réponse
Hang on a second here, doesn’t the Ifixit part I ordered come with the seals? The display assembly? It doesn’t. Now I have to wait another week?!
Vanessa Pinter - Réponse
How do you turn off if the screen isn’t responding to touch?
adam - Réponse
The replacement battery came with the seal—but how do you put it on???
lkollar - Réponse
Instructions for replacing the seal are here: Remplacement des bandes adhésives fixant l'écran d'un iPhone
bester - Réponse
I just found the instructions on how to install the seals AFTER I was completed and had to figure it out. Maybe, just maybe you should link this somewhere on the guild instead of buried in a comment. Just a thought.
Charles Meitin - Réponse
Step 1 is: Read through all the steps and comments or the method prior to starting on this Step 1. There's a lot of much needed information and experience that you can learn from which will reduce the chance of struggling, wasting time or even breaking your device.
My favourites are:
Use a hot water bottle.
Label all screws you remove with their size and location on a piece of paper with double sided sticky tape.
Test the lightning assembly at step 13
There is a Standoff driver bit in the box, don't use a screwdriver.
etc...
Neil Eriksen - Réponse
A tip for looking out for all those little screws. I used an ice block tray, for all the little screws etc. I numbered each with the step number, as in the instructions, but not all steps have bits to look out for. Where two different size screws are used I had a tray for each size and marked step a and step b. For this I coloured each tray sticker with the colour of the screw as shown in the instructions. All this worked a treat with no confusion or using the wrong part.
Herb
Herb Adler - Réponse
The screw size for those with a screw set is P2.
Gareth Flandro - Réponse