Introduction
Avec ce tutoriel, remplacez la carte fille E/S dans votre Samsung Galaxy S8. Un connecteur USB-C ou un microphone endommagé justifient le remplacement de la carte fille.
Ce tutoriel inclut le retrait de la coque arrière en verre et vous aurez besoin de bandes adhésives de remplacement pour refixer la coque arrière au téléphone.
La carte mère et la carte fille diffèrent légèrement, selon que vous avez la version nord-américaine Snapdragon (G950U) ou la version internationale Exynos (G950F) du téléphone. Ce tutoriel se base sur la version nord-américaine. La carte mère et la carte fille ne sont pas interchangeables entre les deux versions.
Avant de démonter votre téléphone, déchargez la batterie à moins de 25 %. Elle risque de prendre feu et/ou d'exploser si vous la percez accidentellement, mais le danger est moindre avec une batterie déchargée.
Ce dont vous avez besoin
Vidéo d'introduction
-
-
Remplissez une casserole ou une poêle avec suffisamment d'eau pour immerger complètement un iOpener.
-
Faites chauffer l'eau jusqu'à ébullition. Puis éteignez le feu.
-
Placez un iOpener dans l'eau chaude pendant 2 à 3 minutes. Assurez-vous que l'iOpener est complètement immergé dans l'eau.
-
Utilisez des pinces pour extraire l'iOpener chauffé de l'eau chaude.
-
Séchez soigneusement l'iOpener avec une serviette.
-
Votre iOpener est prêt à être utilisé ! Si vous devez réchauffer l'iOpener, portez l'eau à ébullition, éteignez le feu et placez l'iOpener dans l'eau pendant 2 à 3 minutes.
-
-
-
Ouvrir votre téléphone peut compromettre son imperméabilité. Préparez un adhésif de remplacement avant de commencer. A défaut, si vous remontez votre appareil sans remplacer l'adhésif, prenez soin de ne pas le mettre en contact avec un liquide.
-
Chauffez l'iOpener puis appliquez-le sur le long bord de votre S8 pendant 2 minutes.
-
Un sèche-cheveux, un pistolet à air chaud ou une plaque chauffante peuvent servir d'alternative mais veillez à ne pas surchauffer le téléphone. L'écran OLED et la batterie interne pourraient en souffrir.
-
-
-
Au cours des étapes suivantes, vous ferez céder l'adhésif autour du bord de la vitre arrière.
-
L'adhésif est réparti dans la coque arrière comme illustré par la première image.
-
Le schéma d'ouverture vu de l'extérieur comprend les zones suivantes :
-
Couche épaisse d'adhésif
-
Couche fine d'adhésif
-
Évitez de faire levier ici, afin de protéger le lecteur d'empreintes digitales.
-
-
-
Une fois que la coque arrière est chaude au toucher, posez une petite ventouse le plus près possible du bord chauffé du téléphone tout en évitant le rebord incurvé.
-
Si la partie arrière de la coque est fissurée, la ventouse pourrait ne pas coller. Essayez de soulever avec du ruban adhésif épais ou bien mettez de la superglue sur la ventouse et laissez-la sécher avant de continuer.
-
Soulevez la ventouse et insérez une spatule hallebarde (spudger halberd) ou un médiator sous la vitre arrière.
-
-
-
Utilisez une pincette pour décoller tout adhésif restant du châssis du téléphone. Nettoyez ensuite les zones d'adhérence avec de l'alcool isopropylique à haute concentration (au moins 90 %) et un chiffon non pelucheux afin de préparer la surface pour le nouvel adhésif.
-
Retirez le film adhésif de la nouvelle vitre arrière, alignez soigneusement un bord de la vitre contre le châssis du téléphone et appuyez fermement la vitre sur le téléphone.
-
Vous devrez peut-être également transférer le cache de la caméra sur votre nouvelle coque. Si tel est le cas, suivez notre tutoriel de remplacement du cache de la caméra.
-
-
-
-
À l'aide d'un tournevis cruciforme (Philips #000), dévissez les onze vis de 3,7 mm.
-
-
-
Insérez un éjecteur de carte SIM dans le petit trou sur la gauche du bord supérieur du téléphone.
-
Appuyez pour éjecter le tiroir.
-
Retirez le tiroir de la carte SIM du téléphone.
-
-
-
Utilisez l'extrémité plate d'une spatule pour déconnecter le connecteur de la batterie.
-
-
-
Avec l'extrémité plate d'une spatule, déconnectez le connecteur de la rangée des capteurs.
-
-
-
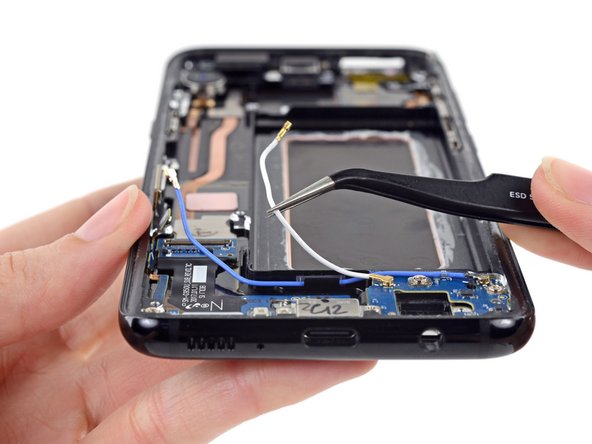
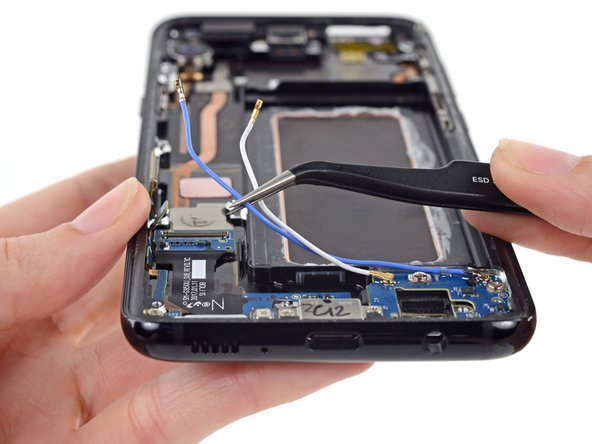
Tirez avec une pincette sur les deux câbles d'antenne pour les sortir de leur rainure à côté du compartiment de la batterie.
-


Posez l'adhésif et suivez les instructions en sens inverse pour remonter votre appareil.
Une fois la réparation terminée, suivez ce tutoriel pour contrôler votre réparation.
Posez l'adhésif et suivez les instructions en sens inverse pour remonter votre appareil.
Une fois la réparation terminée, suivez ce tutoriel pour contrôler votre réparation.
Annulation : je n'ai pas terminé ce tutoriel.
51 autres ont terminé cette réparation.
Merci à ces traducteurs :
100%


Ces traducteurs nous aident réparer le monde ! Vous voulez contribuer ?
Commencez à traduire ›

9 commentaires
Something you should add is that the battery temperature sensor is actually on the wireless charging coil. Unless you screw that part on, adding a new daughter board and plugging it in will result in the phone thinking the battery temperature is too low and thus it won't charge
Hi i just change the motherboard and the battery is new the display show ( ! ) is not working. Can you help me to solve the problem. Thank you
Step 22 does not apply to the Samsung galaxy s8 SM-G950F, the daughterboard is different and does not have that connector for anyone trying to source one !
sm-g930F, daughter board does not have the 3mm screws .it seems to use an elastic at each en to hold in place. has anyone successfully replaced this daughterboard?
Andrew Murray28/09/2020
That battery temperature thing really confused me while testing as I put things back together. Makes sense it worked fine when I put back together after I'd had enough.
I found the finger print reader easier to put on after removing it from the case. My finger print reader didn't work after I put it back together. But started working the next day.
I found it easier to connect the motherboard to the daughter board when the daughter board is fixed in, then you just hold the motherboard vertically, click them together and tilt the motherboard back into place while using something to poke the flap connectors out the way.
Those two wires/ arieals? They loop under the motherboard for when the speaker goes back on.
As you're testing as you put things back together, the volume buttons only work when everything is screwed back in. I've come across this before on other samsung phones, killed me the first time trying to figure it out!!