Ce dont vous avez besoin
Vidéo d'introduction
-
-
Avec un outil d'ouverture en plastique, insérez délicatement l'extrémité de levier entre le numériseur de verre et le cadre argenté à l'avant de l'appareil.
-
-
-
Travailler lentement et avec précaution, se déplacer sur la totalité du visage de l'appareil. Les petits clips en plastique devraient se relâcher, sinon, appliquez une légère pression vers l'extérieur jusqu'à ce que vous entendiez les clips sauter.
I used a dull knife blade and just slide it along the grove. You may have to slide the knife back and forth a couple of times but, the cover will unsnap.
-
-
-
-
Pour commencer à retirer la pile elle-même, retirez les quatre vis désignées à l'aide de votre tournevis.
-
Une fois les vis retirées, utilisez l'extrémité de votre tournevis ou une paire de pinces pour tirer le connecteur de la pile vers le haut. Tirez directement vers le haut et le connecteur devrait sortir.
-
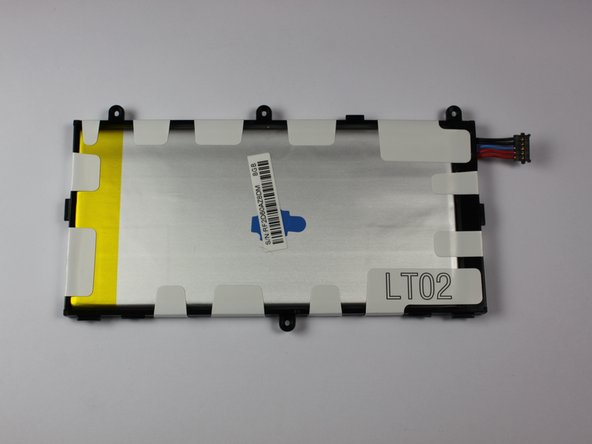
Une fois la batterie retirée, elle devrait ressembler à la troisième image.
Gently lift the battery from the inside edge using the battery connector. The battery is hinged on the outside edge by two plastic protrusions which fit into the plastic frame where the battery is located.
Because I was only removing the cameras, I did not have to touch the battery. However on the motherboard; there are 4 screws up top you have to remove. Where your headphones plug in; gently pull up the connector away from the board. Tilt the motherboard up at a 45-60 degree angle. With a pair of tweezers, pull both cameras up (one at a time) while pulling side to side. The connectors will slide out. Then make sure the bottom of motherboard is slipped under small tabs then replace screws up top. Snap connector for earphones back into place.
-
-
-
Pour terminer le remplacement de la pile, placez votre nouvelle pile là où se trouvait l'ancienne pile dans votre appareil, comme indiqué sur l'image.
Don't forget to insert the battery on the outside edge first, locating the plastic protrusions into the frame around the battery. Use the tip of your screwdriver to push down on the protrusions to locate them in the frame. Once the battery is located correctly, it should sit flush with the frame that surrounds it.
No explanation of how to separate the glass from the body in order to access the battery.
Its the 1st step, pry tool down between glass and edge, all the way round. It has pressure clips
-
-
-
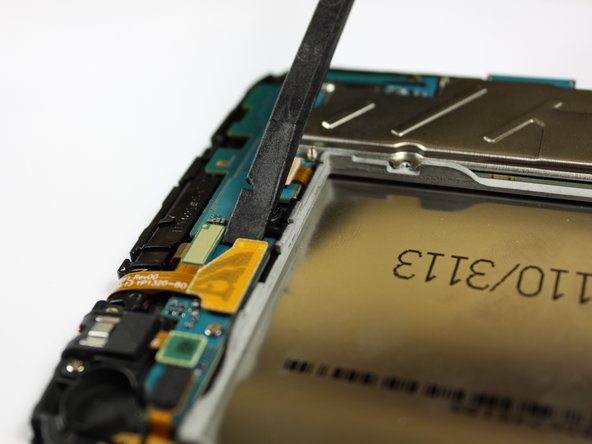
Commencer le remplacement de la carte mère en libérant toutes les connexions qui maintiennent la carte mère, montré dans la première image.
-
Pour ce faire, utilisez votre spudger, une pince à épiler ou un outil d'ouverture en plastique et soulevez doucement les connexions de leurs ports.
-
Une fois que vous avez séparé toutes les connexions, l'arrière de votre appareil devrait ressembler à celui de la troisième image.
-


Pour réassembler votre appareil, suivez ces instructions dans l'ordre inverse.
Pour réassembler votre appareil, suivez ces instructions dans l'ordre inverse.
Annulation : je n'ai pas terminé ce tutoriel.
48 autres ont terminé cette réparation.
Merci à ces traducteurs :
100%
[deleted] nous aide à réparer le monde ! Vous voulez contribuer ?
Commencez à traduire ›
Équipe

Cal Poly, Team 7-20, Regan Spring 2014 Membre de l'équipe Cal Poly, Team 7-20, Regan Spring 2014
CPSU-REGAN-S14S7G20
4 membres
10 tutoriels rédigés
8 commentaires
So I will add to this, please do not take the back case off as shown here, it will cause damage to the case and will not snap back in place properly. The casing comes off around the digitizer itself, if you decide to do this yourself slide your spudger or plastic pick along the sides of the screen, applying enough pressure to snap the casing from the screens frame. I work on Samsung tablets for a living and know doing it the way they show will cause damage to the casing. Basically what is shown in step 2 of removing the silver frame is what you should do first, not in separate steps. If you don't have any warranty then by all means do it how you want, if you have warranty dont do this as it can void your warranty.
Even if's it's not a screen replacement instruction it really help me start on the replacement. Thanks for the help
Where can I get a motherboard for a T-211?++My email is gemartin46@gmail.com
Thanks
Am i able to just replace the hard drive or remove it and put it on a different motherboard? My device wont charge or turn on despite having a fully charged battery.....
There isn't a hard drive but flash storage soldered on the mobo (motherboard). It might be repairable but (I think) you have to get a new one. To get your storage you have to: desolder the storage and solder it back on the new mobo. It is very hard to do this so I recommend you take this to a tech repair shop.
I replace my motherboard. Right now when I try to open it, the startup does not complete. It just Show me samsung on the screen and stay like that for hours, what is the problem?
my email is abrahamcadet95@gmail.com
Maybe you should try flashing stock ROM with Odin? Follow this tutorial for how to flash with Odin: https://android.gadgethacks.com/how-to/u...
I tried this with my Galaxy Tab A. I only wanted to remove the front and rear cameras.
wmcarroll13 - Réponse
How hard do i need to push the plastic part? i tried it but i wont pop off.
Emil Klock - Réponse