Il est possible que cette traduction ne reflète pas les dernières mises à jour du tutoriel source. Aidez à mettre à jour la traduction ou bien consultez le tutoriel source.
Introduction
Utilisez ce tutoriel pour remplacer la nappe supérieure contenant le flash, le microphone, les boutons de volume et le bouton marche/veille.
Ce tutoriel nécessite le retrait de la batterie. Retirer la batterie avec les bandes adhésives est la méthode la plus sûre, mais laissera votre batterie sans bandes adhésives. En remettant la batterie en place, utilisez un morceau de ruban adhésif double face pour la fixer. La batterie est assez bien sécurisée dans l'appareil, mais l'adhésif l'empêchera de cliqueter.
Ce dont vous avez besoin
Vidéo d'introduction
-
-
Si la vitre de votre écran est fissurée, utilisez un adhésif pour éviter de l'endommager davantage ou de vous blesser lors de la réparation.
-
Appliquez des bandes d'un ruban adhésif transparent se chevauchant sur l'écran de votre iPhone jusqu'à ce qu'il soit entièrement recouvert.
-
-
-
Éteignez votre téléphone avant de commencer le démontage.
-
Retirez les deux vis Pentalobe 3,8 mm des deux côtés du connecteur de charge Lightning.
to keep screws in order, buy some double sided tape and then affix the tape in small pieces to a sheet of paper. As you take the screws out, you can affix them to the tape (which is on the paper) and then write a description of what they are and where they go. quick, cheap and easy.
I found that these screws did not remove easily. After turning several times and feeling the threads drop back, indicating they were loose, the heads did not extend far enough to grip with my fingernails to pull out. I had to use the tweezers and then it took a bit more force than expected to remove them.
My iPhone 5c has P1 Pentalobe screws, not P2. This guide caused me to buy wrong tools so I thought I would share my experience. Perhaps they vary.
@codycraven01 These guides are created using iFixit tools, and P2 is definitely the correct driver. If you’re using tools you bought somewhere else, then yes, results may vary.
-
-
-
Serrez les poignées de l'iSclack et séparez ainsi les deux mâchoires avec les ventouses.
-
Posez la partie inférieure de votre iPhone entre les deux ventouses contre la jauge de profondeur en plastique.
-
Positionnez la ventouse supérieure juste au dessus du bouton home.
-
Ouvrez les poignées pour fermer les mâchoires de l'iSclack. Centrez les ventouses et posez-les fermement sur le dessus et le dessous le l'iPhone.
I just replaced my iPhone 5C battery today and only used the I fix it repair kit that came with the suction cup. Getting the glass screen out was not too difficult as I used a little bit of upward motion on the suction cup while at the same time prying gently with the flat end of the opening tool at the same time. If you have two people it makes it a little easier as someone can hold the phone. After getting the end open, I was able to go around the perimeter and gently pry up the edges with very little trouble.
Experienced immediate problem: there is s strap going from the home button to the screen, about 1-1/2 inch long. After removing 3-4 screws I saw no way to disconnect it from either end. My daughter came to help get the screws back (my 70 years have problems with very tiny screws). Slid a piece back and the strap came free of the home button ares. Screen could only open then 75-80 degrees. Tapr tore. Pried battery out. Replaced on original sticky tape. Restarted fine and about to recycle the charge. Thanks for the kit and all. But 6 demos and 3 inatructions never mentioned this strip! So careful opening it up, please!!
@mikamazn What you’re describing sounds like an iPhone 5s. This guide is for the 5c. Glad to hear things worked out for you.
-
-
-
Tenez bien votre iPhone et serrez les poignées de l'iSclack pour séparer les ventouses et enlever la vitre du boîtier arrière.
-
L'iSclack est conçu pour ouvrir suffisamment votre iPhone en toute sécurité, sans risquer d'endommager les nappes de l'écran.
-
Sautez les trois prochaines étapes et continuez à l'étape 8.
-
-
-
Posez une ventouse sur la vitre, juste au-dessus du bouton home.
cool i diden't now
very, very difficult to get a tight seal on tape. I removed the tape and still can't get a tight seal.
-
-
-
Tout en tenant l'iPhone avec une main, tirez sur la ventouse pour séparer légèrement l'écran du boîtier arrière.
-
A l'aide d'un outil en plastique, commencez à pousser le boîtier délicatement vers le bas tout en tirant sur la ventouse vers le haut.
Be sure not to use metal pry tools as they may crack the plastic.
-
-
-
Soulevez la partie de l'écran avec le bouton home pour pouvoir accéder aux connecteurs près de la partie supérieure de l'iPhone.
-
Ouvrez l'écran à un angle de 90° par rapport au boîtier et calez-le contre un support pendant que vous travaillez.
-
A la rigueur, une canette fermée peut vous dépanner.
-
Rajoutez un élastique pour bien maintenir l'écran lorsque vous travaillez. Ceci évite de forcer inutilement sur les nappes.
I use an old iPhone box to support the open phone. Set the box up on its end, and rubber band the screen side to the box. It works perfectly!
What do I do if it’s a little sticky and dirty inside?
-
-
-
Retirez les deux vis cruciformes #000 de 1,6 mm qui attachent le cache métallique du connecteur de la batterie à la carte mère.
These screws are very tiny and hard to manipulate. The screwdriver is magnetic; which is great to take them out, but makes it hard to put the screws back in, as the screwdriver pulls them from the hole. I solved this problem by using the pointed end of the spudger to put a tiny drop of Elmer's glue in the hole and then insert the screw. You can do this before putting the bracket in place if you want. Then the screw wont pull out by the magnetic driver and make lining up and fastening the screws much easier; at least for me!
I found that you don't need to disconnect the battery... why bother doing more fiddling with annoyingly tiny screws and obstinate cable connectors when you don't actually have to? Especially when you could only end up causing more damage. As a matter of fact, the original iFixit video didn't bother to disconnect the battery either, but they've since updated the video to include battery disconnection, I guess as a "belt and braces" approach in case the repair-hero forgets to power down the phone first?
Disconnecting the battery is a safety precaution, and yes it's worth doing. Even with the phone powered off, there is some danger of blowing the backlight filter fuse if you disconnect the display while the battery is connected. At that point you're no longer looking at a simple DIY repair. Even though it's possible to skip this step and still come out okay, my advice is not to risk it.
It’s a relatively junky phone, so if it breaks, what the heck. I’m not going to disconnect the battery.
-
-
-
A l'aide de l'extrémité plate d'une spatule (spudger), faites levier pour enlever le connecteur de batterie de la carte mère.
Instead of using a spudger, you can use your fingernails too. This is quicker and enables you to feel if you're not accidentally putting on too much pressure or lifting the connector instead of the cable.
Accidentally pulling out the logic board socket is no idle warning - exactly what I did without much effort. I think this shouldn’t be described as ‘prying’ up because it implies needing to use force - but these things actually pop off quite easily with a nudge, which you discover at later steps.
-
-
-
Retirez les vis cruciformes #000 suivantes qui attachent le cache de la nappe d'écran à la carte mère :
-
Deux vis de 1,3 mm
-
Une vis de 1,7 mm
-
Une vis de 3,25 mm
I didn't need to remove the front panel to replace the lightning connector. Just prop it up like in Step 8, then skip steps 12-16.
I always put my screws in a magnet tray and place the screws in the exact position they were taken out. The magnet tray holds the screws tight in the position I put them in. No chasing on the floor looking for small screws that you brushed off the table.
I always take a picture of the phone, print it out, then use scotch tape to tape the screws onto the picture in the location where they go. You don't lose the screws and you always know where they go for re-assembly
good tip! but instead of taking & printing a picture of your own phone, you probably could just print the color coded pic from this step (assuming everything on your phone is exactly the same).
When reassembling, the screw holder that the screws screw into came off the board. Is there a way to superglue that back in?
no, do not use super-glue. Quite some of these ‘screw-holders’ are screws themselves with e hollow tread in the head (didn’t find the correct naming for it) - just like the things you screw into a PC case and fasten the mainboard on.
did NOT remove the front entirely. its not necessary to do this to remove the battery. these are only precautionary steps in case your clumsy or you feel you might not be able to manage it without. as always, be cautious.
Agree. Step 12 is unnecessary if one is extremely careful.
*warning* … this connector assembly is very messy to re-build. Next time I change such a battery, I’ll try to get it out carefully *without* detaching the display unit. My resumée: *never* unscrew more things than necessary. These things are not M five (5 mm bolt diameter) like on a bike, these are M zero-point-five. Even for a smirf, this is tiny stuff.
Hi Ali,
You can choose to not remove those screws and still be able to take the battery out. Be very careful supporting the display, or you may tear the display cables and damage your screen.
-
-
-
A l'aide d'un outil en plastique ou de votre ongle, déconnectez le connecteur de la nappe de la caméra avant et du capteur.
You might get a more “modernised” part from eBay (for this very model, iPhone 5c) which has an ENTIRE CABLE missing… if you look closely, it’s been re-directed into the middle cable. And it all works perfectly, touch screen, and display. So it’s a optimisation.
In summary - if you get this version of the screen, you only need to deal with 2 cables, not 3. The rightmost socket will remain empty.
-
-
-
Assurez-vous que la batterie est déconnectée avant de déconnecter ou reconnecter les nappes de cette étape.
-
À l'aide d'un outil en plastique ou d'un ongle, déconnectez le connecteur de la nappe de l'écran LCD.
I replaced the broken front panel of the iPhone 5c and got the "famous white stripes" on the new screen. Reading about all kind of problems that the lcd/digitizer cable contacts may cause, I compared the cable connectors of the original Apple and the replacement part I bought online with a 35x magnifying glass. The quality difference was visible: The white description on the original part on the cable next to the connector is: 821-1784-A, while the inferior replacement part is: 821-1784-02. Check out the two numbers online and insist getting the "A" to avoid future troubles !!!
This person above is not knowledgeable. That number is a camera proxy part number, not the lcd or digitizer number. It changes with production date, both for original and aftermarket ones. A, B, D, 02, 04, 08 etc. Can all be either or.
vince -
Apple uses numerical revisions (-02) for pre-production parts, and alpha revisions (-A) for production revisions. It looks like you got a preproduction assembly, or a knock-off.
There are, in fact, three connectors in this step, not two. The front-facing camera and digitizer connector (Step 11) is really difficult to align when you put it back. Took me about 15 minutes before I succeeded.
Now I have a different problem. Everything works just dandy, EXCEPT:
Towards the bottom of the screen (in portrait) there is a horizontal line that is dead to the touch. For example, on the keyboard, I can use the spacebar, but not C V B N M, etcetera.
Three possibilities in my mind: One, when I dropped it, something else besides the glass and digitizer, etc, was damaged.
Two: I did not replace the cables correctly. This seems unlikely. They all "clicked" into place and stayed there.
Three: The digitizer supplied is faulty.
Comments? Which cable/connector could be causing this -- if it is that?
Take apart, Clean Connections, Put back together.... If same problem sounds like a fault part...
duston -
When reassembling the iPhone 5c, I used the flat end of the spudger to press on the connectors and maintain them while replacing the front panel on the body of the iPhone.
The third and "deepest" connector no longer slips out of its socket, which it did before holding the whole lot with the spudger.
If the ESD plate covering the connectors is properly re-attached to the phone, you should not have to do this. The cover holds all the connectors in place just fine.
iBroke -
I replaced the display assembly to resolve an issue with the phone not responding to any touch input. I assumed it was a bad digitizer. However, I have the same problem with the new display assembly—no touch response at all. The phone starts up fine and the screen works, I just can’t “slide to unlock”. This is also preventing me from downloading photos from the phone since I can’t enter the passcode. I have cleaned the connections and reseated the cables. Is it possible this is a problem on the logic board? If so, is there any way to get the photos off the phone since I can’t enter the passcode on the screen?
-
-
-
Enlevez le panneau frontal complet du boîtier arrière.
-
-
-
Insérez un éjecteur de carte SIM ou un trombone dans le petit trou dans le tiroir de carte SIM.
-
Appuyez pour éjecter le tiroir.
-
Ceci peut demander une certaine force.
-
-
-
Passez la pointe d'une spatule (spudger) entre la batterie et la prise jack pour déplier la languette adhésive de la batterie.
I didn't need to remove the battery to replace the lightning connector assembly. Skip past steps 17 through 25.
I agree, waste of time and you risk damaging the battery if the adhesive is too strong.
I also didn't need to remove the battery to replace the lightening cable. I'd say skip it unless you have big fingers, because it is a tight space.
The adhesive tab has a small extension tab with a hole in the end closest to the ear phone jack. If you stick the tip of your spudger through it, you can use it to lift one end and get you started.
-
-
-
Dégagez la languette adhésive de la batterie de l'iPhone.
It is a must to use a little heat. In my instance I used some hand warmers. My first attempt was with some older ones that didn’t get too hot. I then pulled out some others and using a little bit of time and several hand warmers it seemed to soften the grip of the tape underneath the battery. Using a hair dryer might have been my next step had my hand warmer trick not worked. USE HEAT!!!! It is your friend.
Removing the charging port can make accessing the pull tabs easier.
-
-
-
-
Coupez la languette adhésive noire de la batterie entre les deux bandes adhésives blanches pour les séparer.
Use heat beforehand to soften the grip of the sticky double sided tape that is used to keep the battery in place. USING HEAT IS A PREREQUISITE if you want this to go smoother. I also ended up using a little dental floss the come from underneath and then used it to saw back and forth to loosen the grip of the tape. Just take your time and use the magic of heat to loosen the grip.
-
-
-
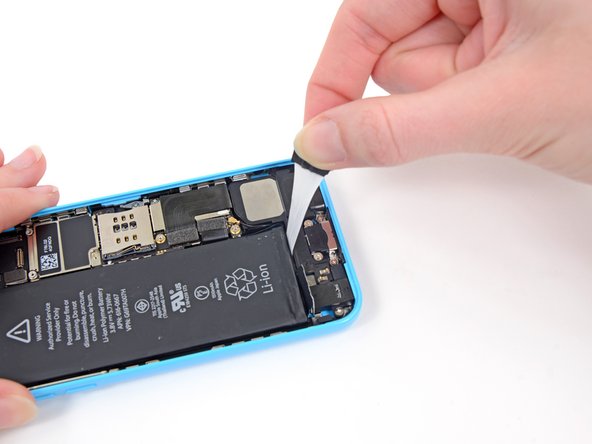
Tirez lentement une des bandes adhésives de la batterie vers le bas de l'iPhone en l'éloignant de la batterie.
-
Tirez sans interruption tout en maintenant une tension constante pendant que la bande se dégage de son emplacement entre la batterie et le boîtier arrière. L'idéal c'est de faire sortir la bande à un angle de 60° ou moins.
-
Guidez la bande soigneusement autour du coin et le long du côté de la batterie. Veillez à ce qu'elle ne s'accroche pas aux autres composants internes de l'iPhone.
I pulled the first tab straight up and it snapped. I tried to see if I could pry the battery out but couldn't without bending the battery. So I left the battery in and was able to complete this without removing it. However, I'm pretty sure I damaged the battery. Waiting on the replacement battery now to confirm. Long story short, leave the battery in for this fix!
When I tried to remove the adhesive, it snapped on both sides. Even though I was careful not to bend or twist. But now the battery is still stuck in place. What do I do now?
Keep reading; there are some additional steps you can take toward the end of the guide. The battery is much easier to remove if you keep the pull tabs intact, but they can be tricky.
My tabs broke as well, quite close to the battery's lower corners. Then I discovered a reasonably hot surface to place the phone - my quite old Apple Airport Extreme. I warmed the phone for a couple of 3 minute sessions, that didn't loosen the glue but made it more malleable. Then proceeded to carefully pull the tab on the logic board's side with tweezers, which was a success. After that I could get an old ID card under the battery and push the other tab into itself. That done, the glue basically gave out and the battery was free.
So my advice would be to use some sort of heat before pulling on the tabs, which will make them a bit easier to work with. It does take some time but result counts, right?
This is the most awful thing: removing the battery. The adhesive holds sooo strong. I ripped it off very soon. So i heated the back of the iPhone with a hair dryer up and opened the battery with scissors. Then i could draw the battery off.
5c is much better to repair then my last repaired iPhone. A 3gs :-)
Tanx ifixit. You are the best.
I don't thnk we need Steps 9 to 12 to remove the battery
Leave the display attached is you only need to replace the battery !!!
@lmusolino of course you can skip those steps (9-12) but it's risky for those digitizer to be damaged if you are careless while removing the battery.
This was more tricky than I thought. I bent the original battery quite hard to get it of, while blowing the phone with a hair dryer. I fixed two 5c's for my kids and I ordered one kit and a extra battery. I didn't understand when ordering that just one pair of adhesive strips came along, with the kit. I partial them using one strip each on the phones. Hope that it will work. Everything seems to work with the phones.
Don't pull too hard or it will break just gently apply presaure
If u do break the tabs the lift the top end of th battery and get them from that end
the adhesive is very strong and does NOT pull free. you MUST use heat (iopener) or similar to apply heat to it. go slow and when (not if) the adhesive snaps you will have to find a way to shove a spudger or an old credit card under the battery. after that, just rub your finger over the adhesive firmly and “roll” it out. this stuff is really nasty.
Whilst pulling the adhesive strips from beneath the battery, I was making sure to not pull too fast and also to keep in flat, not twisted, and it still snapped on both sides way before I even got half way… I haven’t had my battery replaced at all so the adhesive should be authentic Apple factory standards. Be SUPER careful at this stage people, I’m going to try and remove the battery with the adhesive in place :S
Both my tabs broke immediately with the gentlest tug, as if they were dry and ready to come off. So I heated the back of the phone with warm heat from a hair dryer and was able to push a thin flexible plastic piece (thinner than a credit card but strong enough to be pushed in) under the corner of the battery near its connector. It would go in only so far, so I kept reheating and pushing it in more, moving up the long side of the battery. This works because you’re pushing toward / against the frame side so you can exert enough pressure. You don’t need to pry or lift the battery up (and you shouldn’t anyway because you may damage the components along the side of the battery and/or the battery itself) until it’s mostly loose.
This part was really difficult. After reading other comments, I applied heat right away (I balanced my phone and screen (rubber-banded like in step 8) on top of the iOpener - had to be very careful to keep it balanced). The case-side strip pulled around the battery corner and snapped; the logic board-side strip snapped immediately.
I couldn’t get plastic cards or triangle wedges in far enough to get leverage; I carefully used two spudgers to pry up the bottom of the battery. From there I used tweezers to grab the edge of the logic-side adhesive. It took many tries to grab enough to continue to pull it, but once I had it, I got the whole strip out. Then my battery was loose enough to pry it up and off of the other strip with a plastic card.
It’s definitely easier to get the battery out if you can get the logic board-side strip out. The strips came out easier when I stopped pulling and grabbed the base instead of pulling from the end. I tried to keep the angle as flat as possible but there’s not much room.
Both tabs broke. I tried heat multiple times and alcohol. Based on this step the rating on this repair should be changed to difficult. It is too easy to damage other cables. I’ve damaged some cable but I don’t know which one from the videos. I would say if you get to this point and it doesn’t come up easily after applying heat, go to a professional or risk further damage to other components. It is very difficult to use the card to pry without damaging something.
Now that the phone is reassembled, I can say that what is broken is the touch sensitivity on the screen. The sensory perception is off.
Now that the phone is reassembled, I can say that what is broken is the touch sensitivity on the screen. The sensory perception is off.
THE FLOSS is where it’s at. Heat slowly and work the floss through.
When I (gently) start pulling strips, they both TORN.
After try out (unsuccessfully) different recommendations, it works out the one with (pure) ALCOHOL.
My way was in particularly like that: I take SPUDGER and wet it FLAT-HEAD with alcohol. And start to pry up battery from left side, near middle (there's some more space). Step by step, for a LITTLE bit, deeper and deeper, and EVERYTIME to wet spudger with alcohol. So all way down to bottom, and from the bottom (not from the motherboard on the right, and upper side at all). It takes couple (or more) dozens prying ups. Eventually battery came off, and leave adhesive at the case (removed with alcohol and spudger again).
-
-
-
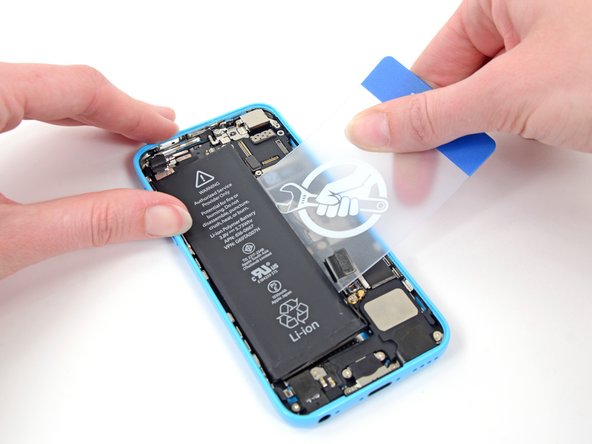
Répétez la même procédure pour la deuxième bande.
I was able to remove the first strip as the guide discusses in Step#20. When I attempted to peel the second strip, as in Step #21 above, it broke. This left the adhesive strip on half of the battery and I was unable to grip anything. I got some dental floss and threaded it underneath the already free side. I then used a slight back and forth motion to loosen the grip of the other half of the strip enough that I could "GENTLY" pry the free side of the battery up. Taking extreme care not to pry against any components of the phone. I then gently pried the battery up a little at a time along with using a sawing motion on the dental floss to eventually free the battery from the underlying adhesive strip. Takes patience and persistence. GENTLY being the operative word.
At this step, be VERY careful with the two gold-colored prongs (pins) right next to the lightening cable port. If you crush/bend/collapse these pins, they won’t make contact with the screen side when re-assemble the phone, making your Home button non-functional.
If accidentally collapsed the pin because you pushed on it, be VERY careful bending it back. You have one shot at getting this right. Over-bending leads to the pins breaking off, and then you’re really f’ed. That’s what happened to me, and I had to solder some tin onto the base to build-up to the right height; very tedious.
https://s.real.com/jnjcW3 This shows photo of what I’m talking about.
The adhesive tape snapped on me as well. Tried strong cotton to cheesewire it out, much like the dental floss, but didn’t work, kept snapping. Tried a little heat from hair drier, didn’t help! Had to prise the bottom end up enough to insert very thin metal scaper, approx. 1” wide and slowly force it up . Nerve wracking, but finally came out.
Oops, just seen the next step was to help with this problem!
I did not use the recommended tools, so it’s not the best advice.
-
-
-
Retirez la batterie de l'iPhone.
Use heat before attempting to remove adhesive strips. They will break. Heat helps tp loosen the grip and is your friend. Dental floss can also be a good helper to saw back and forth once you get it under one corner of the battery. Go slow and take your time. USE HEAT BEFOREHAND. I FOUNF THAT IT TOOK A GOOD 3-5 minutes to get everything hot enough to loosen the grip of the tape.
-
-
-
Suivez nos instructions pour chauffer l'iOpener pour dissoudre l'adhésif qui scelle votre batterie au boîtier arrière.
-
Posez l'iOpener sur l'arrière de l'iPhone à droite de la caméra. Lissez-le pour assurer un bon contact entre le dos de l'iPhone et l'iOpener.
-
Laissez-le sur l'iPhone pendant environ 90 secondes avant d'essayer d'enlever la batterie.
-
Si vous utilisez un sèche-cheveux ou un pistolet à air chaud, chauffez le dos de l'iPhone jusqu'à ce qu'il soit légèrement trop chaud pour être touché.
you can substitute a 'bed buddy' or similar microwave activated heating pack here for the iOpener. i eventually wound up working on-top-of the heading pad as at softened the adhesive. take your time and let the heat work
A hairdryer works too. Aim it at the same spot on the back of the phone, don't let it get too hot though.
Instead of using the iOpener, I opted for my “patented” “Rice in a sock” and heated the sock for 1 minute, which worked perfectly. I laid the heated sock flat and used it as a mini work bench while removing the adhesive strip! My wife uses this for when she has head aches, which caused “me to not have a headache”, when peeling back the adhesive strips!
I always have to do this because the adhesive strips never work because they can’t be pulled out at a flat enough angle. As you heat the back of the case in preparation for battery removal, also load some heat into some kind of smooth, flat metal tool to slide under one end of the battery as you pry it up. This makes for much less prying on the battery and much less chance of damaging it. It also makes for faster removal. The metal spatula tool provided in the fixit Pro Tech Toolkit, Pro Tech Toolkit, (an earlier version of which I use CONSTANTLY and is one of the most used toolkits I have) is perfect for this job.
-
-
-
Insérez soigneusement une carte en plastique sous la batterie sur le côté le plus près de la carte mère.
-
Faites glisser la carte du haut en bas de la batterie en poussant vers le côté du boîtier.
A picture of the position of the upper ribbon cable would be useful here. I have falsely thought that you only have to be careful around the top edge of the battery that is near the logic board, and have managed to cut the upper component cable with the plastic card.. :(
The third bullet of this step has a link to two photos of the cable.
I destroyed the ribbon cable that runs down the side of the case toward the headphone jack (not mentioned in the instructions!) while trying to wedge the battery out with a credit card. Am I SOL or is there a fix?
Sounds like you hit the upper component cable mentioned in red in the instructions. “Avoid prying near the top edge of the battery, or you may damage the upper component ribbon cable.” You’ll likely need to replace the cable, or use on-screen accessibility button replacements. If you’d like to post photos to our Answers Forum, you may get more specific help for your situation. Best of luck!
Wow. Good luck removing your battery by this method. The adhesive on mine was impossible to remove, finally the battery foil peeled off, the battery was totally destroyed, and I had to scrape the adhesive off the phone bit by bit. Scary to abuse a lithium battery that way… Destroyed my ribbon cable, too, so now I can spend another $30 and a bunch more time… Wow. Not recommended; impossible to accomplish as described. Battery is not removable. Those adhesive strips are from !&&*. There is no reason to use that adhesive in that location, except to deliberately make the phone non-serviceable. Once the adhesive gets old, it just snaps and heat doesn’t help. Good luck.
Well… That was interesting. I dropped my phone this morning at some weird angle and the housing bent a little. I opened the phone only to reveal a torn battery. The adhesive strips were so old they were impossible to remove even after I removed the exploded battery. Just, wow, I never thought a caseless phone drop + a hot summer day would result in this. What a scary thing to see blue-green chemical flames inside a phone! I’ve never seen this happen with a Note 7 so I thought I’d never see a burning battery, but boy was I wrong!
dental floss works great but needs lots of pressure and heat
-
-
-
Soulevez et retirez la batterie de l'iPhone.
My repair went well. However, the teeny screws were a nuisance putting the parts back. I have relatively large hands, so I used the tweezers. I finally got all of them in, save one. It popped out, and I thought I lost it. Luckily, it was stuck to my hand! The magnetic screwdriver helped, but if it was off a bit it would pull the screw out. Not bad for my first repair. Apple must use elves to assemble their products.
-
-
-
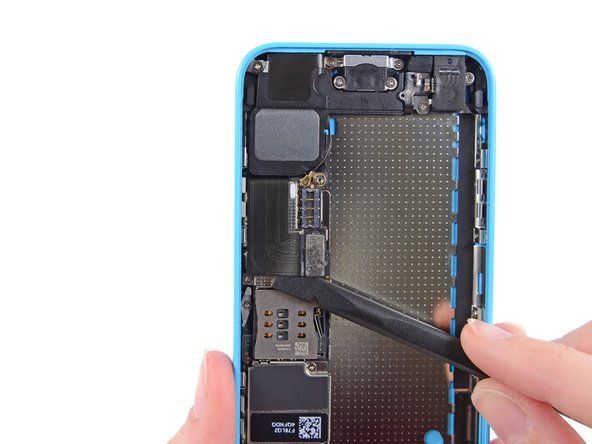
Utilisez un Spudger (spatule) pour déconnecter la nappe du connecteur Lightning de sa prise sur la carte mère.
-
Le câble du connecteur Lightning est légèrement collé sur une plaque de la carte mère. Utilisez le bout plat d'un Spudger pour décoller doucement le câble.
-
-
-
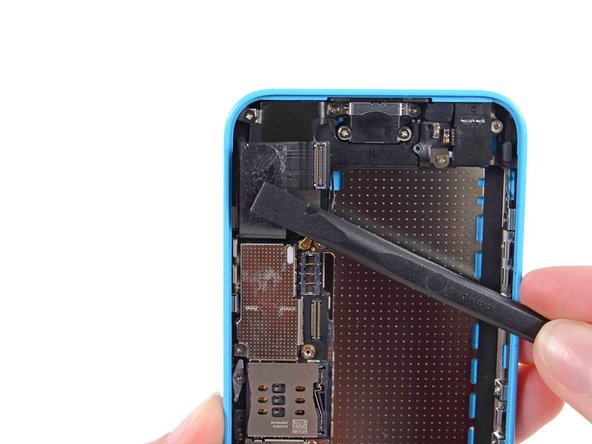
En maintenant le téléphone à niveau, soulevez l'extrémité inférieure de la carte mère juste assez pour l'agripper avec vos doigts.
-
Tirez la carte mère loin de la caméra arrière, juste assez pour exposer le capsule de contact en or en dessous de l'extrémité supérieure de la carte mère.
-
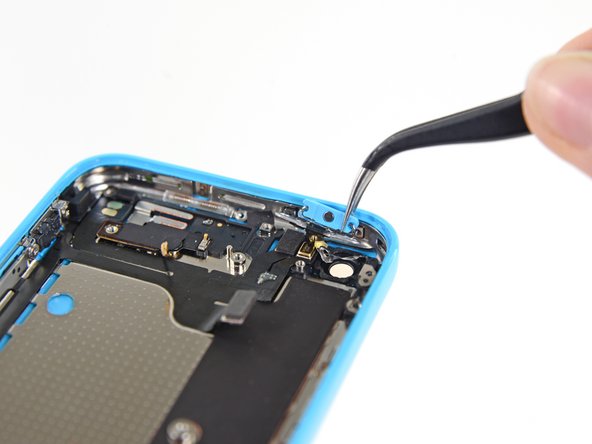
Retirez le capsule de contact doré du poste fileté dans le boîtier et mettez le de côté.
On reassembly, it was tricky for me to figure out where the gold clip went. It goes against the back case, upside down and holds the logic board grounding clip, mentioned in Step 34. The upper hole of the grounding clip goes into the gold one, with the opening of the gold one oriented to the right. The 1.2 mm Phillips #000 in the top side-wall, removed in Step 33, holds them both together.
-
-
-
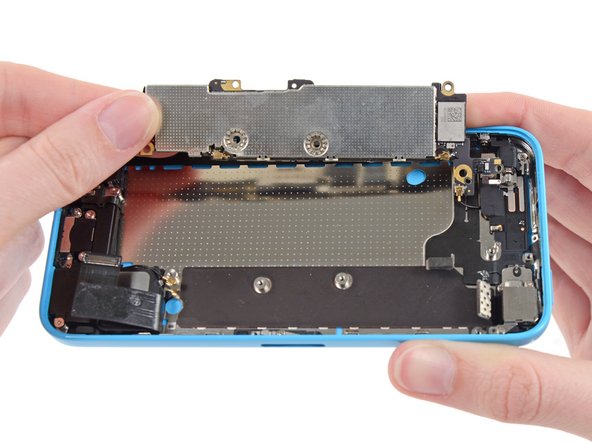
Retournez la carte mère en direction des boutons de contrôle de volume pour exposer le connecteur de l'antenne.
On this step, a small threaded barrel came off of the bottom of the housing, once I lifted off the logic board. Upon reassembly, it goes back in with the tiny threaded part down, into the silver piece near the rear facing camera. There is a little hole in the silver to receive it. When the logic board goes back down it matches up with a small silver hole and then secured to the rear case with the 2.7 mm standoff screw furthest to the left in the photo in Step 35. Take care not to put the barrel in upside down because it is very hard to get unscrewed once placed incorrectly.
-
-
-
Retirez les deux vis cruciformes #000 de 1,5 mm fixant le cache de la caméra arrière au boîtier.
Think the title was meant to say “Rear Facing Camera”, not “Audio Control and Power Button Cable.
-
-
-
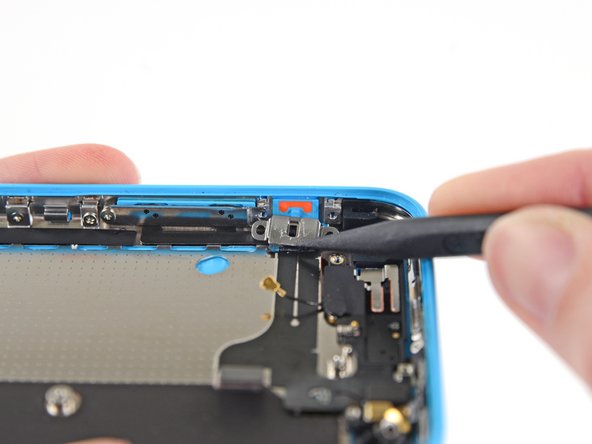
Retirez les deux vis cruciformes #000 de 1,6 mm de la fixation du bouton du silencieux.
This step totally confused me.
I call this the "Mute" button.
And of course, the photo is rotated 90 degrees from most of the phitos in steps leading up to this. (These are great photos, by the way.)
Agreed, the word choice was a bit odd! It's fixed now—"hold button switch" has been changed to "mute/silent switch." Thanks for your comments!
-
-
-
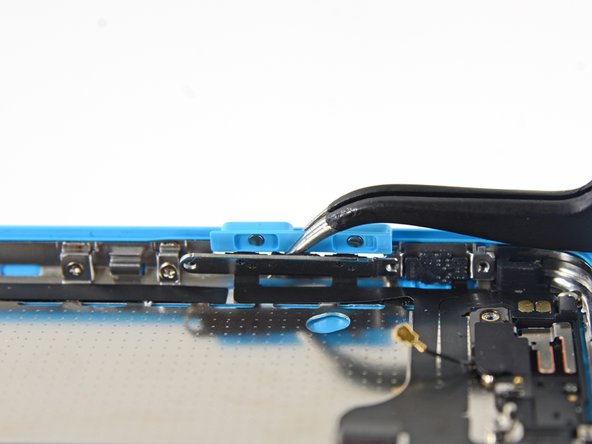
Utilisez la pointe d'un spudger pour replier le support du bouton de volume vers le bas de la paroi latérale. Retirez le bouton de volume.
whilst reassembling you have to make sure the plastic buttons are the right way around, the side with no lip should go upwards.
-
-
-
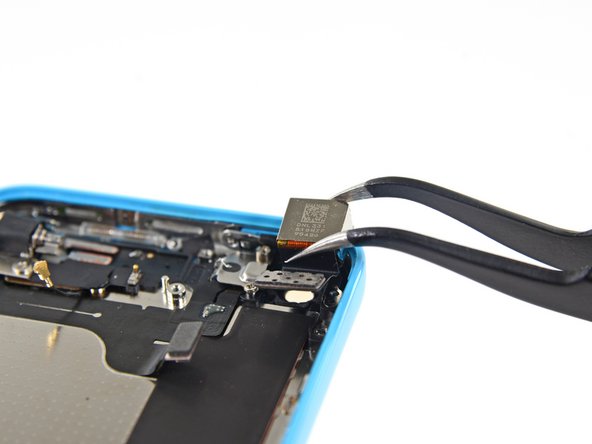
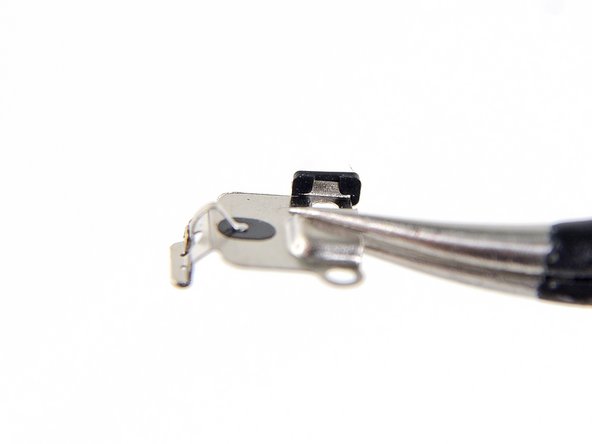
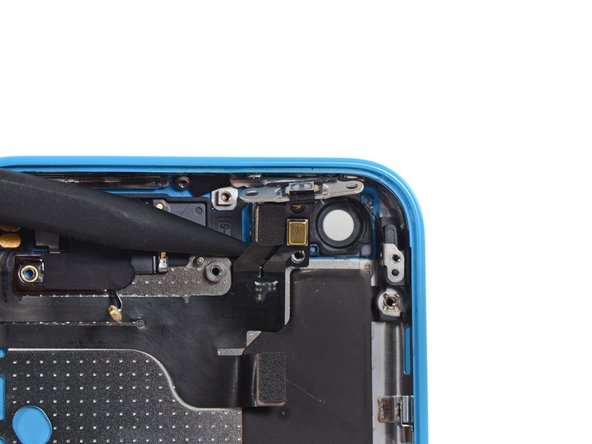
Faites délicatement passer un spudger sous la nappe de l'ensemble flash pour la décoller du téléphone.
whist reassmbling the flash wouldnt go in, i then found the little lense part of the flash was still attached to the frame, and i had to remove it so the new flash would fit, this may just be on my replacement part the lense is included but if you are having trouble getting it in, check to see if there is a lense already there or not.
-
-
Thank You edunbarr :)


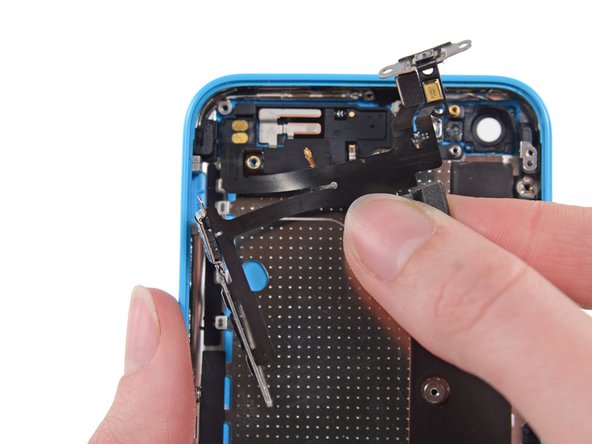

Pour remonter votre appareil, suivez les instructions dans l'ordre inverse.
Pour remonter votre appareil, suivez les instructions dans l'ordre inverse.
Annulation : je n'ai pas terminé ce tutoriel.
55 autres ont terminé cette réparation.
Merci à ces traducteurs :
95%


Ces traducteurs nous aident réparer le monde ! Vous voulez contribuer ?
Commencez à traduire ›

4 commentaires
I've replaced the cable and everything works except the volume rocker? If I tighten everything and out the phone back together the volume seems to be stuck in a permanent down position. But if I open the phone back up and loosen the screws the volume doesn't work at all
I've seen a few cases where the button action was extra sensitive to screw tightness. The "permanent down position" you describe does sound like the screws are too tight. It's a pretty subtle difference between "too tight" vs "too loose." I would suggest fine-tuning the screw tightness on each side individually until the button action feels good, then reassemble and test. If the action is good but the volume still doesn't respond, you've likely got a disconnected, damaged, or faulty cable.
Yay!!!!! I did it! I followed all the steps, keep organized with little pieces of paper inside mini muffin pans with the screws and pieces for each part and it worked!! Now my volume, silent, flashlight all work!!! Thank you for the instructions.
Completed! It was a lot of fun going through the really well described procedure, thank you.