Introduction
Ce tutoriel montre comment remplacer la pâte thermique à l'intérieur d'une PS4. La pâte thermique est une substance que vous appliquez sur un processeur pour transférer la chaleur vers un système de refroidissement. On devrait remplacer la pâte thermique de tout électronique tous les deux ans environ, car elle sèche.
Dans la PS4, la pâte thermique se trouve juste sous le dissipateur thermique et le dissipateur thermique est l'endroit où le gros de la poussière s'accumule. Nettoyer le dissipateur thermique et remplacer la pâte thermique aidera votre PS4 à fonctionner comme si elle était neuve. Ma PS4 a environ six ans, et après avoir effectué toute cette procédure, elle ne surchauffe plus et est aussi silencieuse qu'une souris. La seule compétence requise pour cette tâche est d'être capable de visser et dévisser des vis ! C'est très facile, mais c'est un processus fastidieux, alors choisissez un jour où vous êtes complètement libre si vous voulez le faire.
Ce dont vous avez besoin
Vidéo d'introduction
-
-
Saisissez la PS4 à deux mains le long de l'espace dans le couvercle supérieur.
-
Poussez le côté brillant du couvercle supérieur avec vos pouces jusqu'à ce qu'il ressorte sur le côté.
-
Soulevez le couvercle supérieur brillant vers le haut et vers l'arrière pour le retirer de la PS4.
-
-
-
Utilisez un tournevis cruciforme pour retirer la vis de 6,5 mm fixant le support du disque dur au boîtier.
-
-
-
Retirez le support du disque dur du boîtier.
-
-
-
Retournez la PS4 à l'envers avec la face arrière tournée vers vous.
-
-
-
Utilisez une pincette pour retirer les deux autocollants au milieu du dos de la PS4, découvrant deux vis du boîtier.
-
-
-
Utilisez une pincette pour retirer soigneusement les cache-vis en plastique dans chaque coin, découvrant deux autres vis du boîtier.
What If my PS4 doesn't have the two screws on the side
I should imagine that plastic cover will come off?
How did you go?
Cary B -
-
-
-
Retirez les quatre vis de sécurité Torx de 7,2 mm à l'arrière de la PS4.
I only have two screws, those in the middle of the console.
Have you removed the plastic covers mentioned in the previous step? That will expose the other two screws.
same, here. there are only the middle screws, no covers or screws on the sides. and it sits pretty tight
turns out 12XX models are different. Look at this for reference: https://www.youtube.com/watch?v=Hpr0z0ve...
This video guide is very useful, thank you. The disc drive itself is different than this ifixit guide too
Yes there is slight variations between the first models, and the second gen and on models. I have an original and only has the two screws in the middle, removal of the cover remains the same.
-
-
-
Utilisez vos pouces pour soulever le boîtier inférieur et le retirer de la PS4.
-
-
-
Utilisez une pincette pour retirer le câble d'alimentation et déconnecter le bloc d'alimentation de la carte mère.
What you need to do here is be patient. Do not pull the wires. Get some fine nosed pliers, wiggle the white connector from left to right in small movements and edge it out slowly. You can also use your nails one finger at each edge of the white connector to do this.
Its really hard but i managed it with both of the tweezers/pincers at the same time
1. Keep in mind to pull not too hard on the wires and make step 2 and 3 simultaneously!2. the straigt and wider tweezer to pull the white connector itself
(top and bottom grip)
3. the small and angled tweezer to pull the wires carefully
(as shown on the picture above)Another option, is to remove the screws holding it down, leave the cable in place and lift it out carefully, revealing the other end of the connection. The hidden side of the connection wire is easier to get a handle on.
-
-
-
Retirez les trois vis Torx inviolables de 9,7 mm.
-
Retirez les deux vis cruciformes de 41 mm et les supports.
-
-
-
Soulevez le bloc d'alimentation vers le haut et sortez-le de la PS4.
Retirar en vertical, derecho hacia arriba. Sino puedes doblar uno de los tornillos largos
-
-
-
Utilisez la pointe d'une spatule (spudger) pour déconnecter le câble d'antenne de la carte mère.
dumb question but I’m very new to this. when reconnecting the wifi antenna, does it just click back on? I'm hesitant to try this procedure if I need to solder anything since I have zero experience.
Yup! Hold it in place and press straight down on top of it with your finger or a spudger. If you have any other cable/connector questions see this guide.
-
-
-
Retirez la vis de sécurité Torx de 9,7 mm fixant l'antenne.
This does not work on the newer 12 series
Thank you! I thought I was insane. I've been trying to figure out where the hell this thing goes and the seat for it is like an inch from the corner. It's driving me mental trying to figure out how to put this back on
-
-
-
-
Retirez l'antenne Wi-Fi.
When I’m connected to wifi it does good for awhile then it disconnects from the wifi and I can’t use the controller. I have to turn the game off and disconnect power source. Do you think the wifi antenna could be the problem or doin have another situation.
I would check the antenna connection to the motherboard, if it's properly seated I don't think it's the problem.
hazelrat -
-
-
-
Utilisez votre ongle pour appuyer sur le loquet métallique de la nappe au-dessus du lecteur optique.
-
Utilisez vos doigts ou une pincette pour déconnecter la nappe en tirant sur la languette noire.
Please note that the younger generations of PS4 have a different setup of connectors to the driver, its sometimes 3 of these as presented but with different sizes and no pad to press down. However, dont be alarmed, just use the pair of tweezers and gently pull them off the connectors of the motherboard. Grab on tight on the blue area of the ribbon cable and pull gently! They tend to sit tight so take some time and patience on this.
Thank you!!!
-
-
-
Utilisez votre ongle pour appuyer sur le loquet en métal de la nappe connectée à la carte mère.
-
Utilisez vos doigts ou une pincette pour déconnecter la nappe en tirant sur la languette noire.
-
Mettez la nappe de côté pour le remontage.
bei mir ist das leider defekt Plastikteil abgebrochen wie kann ich das ersetzen
Is it possible to buy the white port for ps4? My one seems to be damaged so won't hold the ribbon cable.
This may be a difficult fix, as the white port seems to be integrated into the motherboard. You could try simply holding the ribbon cable down with electrical tape, if it's just a fitting issue?
hazelrat -
-
-
-
Retirez les quatre vis fixant le lecteur optique.
-
Trois vis Torx de 9,7 mm
-
Une vis cruciforme de 6,2 mm
-
-
-
Déconnectez la nappe du lecteur optique en appuyant sur la languette en métal et en tirant délicatement sur la nappe. Vous ne devez pas avoir besoin de forcer.
-
Déconnectez la même nappe de la carte mère; veillez à appuyer sur la languette en métal et à tirer délicatement sur la nappe.
-
-
-
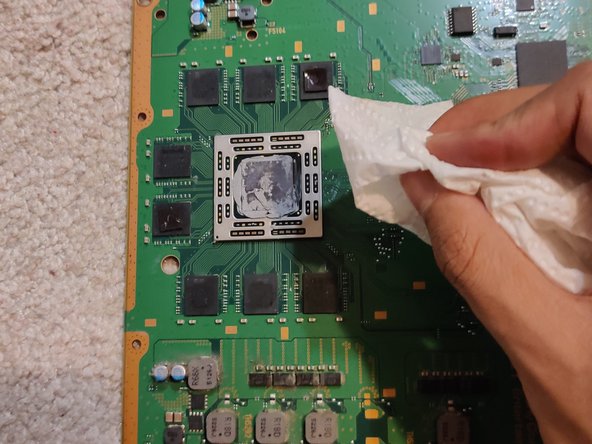
À l'aide d'un mouchoir en papier, essuyez la pâte thermique existante. Prenez la nouvelle pâte thermique et appliquez-en une petite quantité au milieu du composant.
-


Pour remonter votre appareil, suivez ces instructions dans l'ordre inverse.
Pour remonter votre appareil, suivez ces instructions dans l'ordre inverse.
Annulation : je n'ai pas terminé ce tutoriel.
144 autres ont terminé cette réparation.
Merci à ces traducteurs :
100%


Ces traducteurs nous aident réparer le monde ! Vous voulez contribuer ?
Commencez à traduire ›
Équipe

CSU Los Angeles, Team S12-G1, Harris Fall 2020 Membre de l'équipe CSU Los Angeles, Team S12-G1, Harris Fall 2020
CSULA-HARRIS-F20S12G1
1 membre
9 tutoriels rédigés
17 commentaires
Se me hizo muy buena la guia, sobre todo para no cometer algun error al trabajar en la reparacion, mi PS4 dejo de zumbar el abanico con el cambio de pasta termica y una limpieza general de polvo y pelusa.
I followed this guide step by step, including reversing the order to reassemble my unit.
My PS4 is still loud but not as loud as before, so everything worked well. Thanks for the writeup!
i might be a little late to reply, but i followed this guide aswell BUT after step 31 i took off the extra metal/aluminum plating and saw thats that where the bulk of the dust will be built up, this plate has the vents that go to the cooling fan on the opposite side of it after unscrewing. i bought an original ps4, it sounded like a jet engine taking off. The vents on my ps4 were just about covered in dust almost no airflow was able to get through, after taking the extra step and taking off the 1 extra panel (the one under the motherboard in step 31) and of course after replacing the thermal paste made my ps4 run and sound like new again,
Beau -
I cannot reply to Beau's comment.
I also went the extra step of taking that metal shroud that sits below the motherboard (step 31).
I completely recommend this step. It is then you can get access to the heat sink fins to remove dust. There are 3 screws that hold this metal shroud in place. Easy to get out.
Then you can also now remove the fan - 2 screws for this.
You can then clean out the accumulated dust from the fan and in the plastic shroud, that the fan sits in.
Holy cow, dust factory. :)
Great guide! Just did it and now the console is dead silent during gameplay of super demanding games <3 I just went a step further after Step 31 and removed the plate there so that I could properly take care of the heat sink underneath that had lots of dust on it.
“Great guide! Just did it and now the console is dead“ I just read that and was shocked for a second, you had me in the first half.
What thermal paste did yall use
I just used Arctic Silver 5, it’s for sale on iFixit’s store and works great. However, it is not a lot if you repair or build a lot of devices.
I had to replace my fan and thermal paste. My fan bearings were not gliding at all. Before fixing I would just hear a click, like the fan was trying to spin but couldn't. There was a huge blockage of dust on the heat sink too. Not sure which did the trick but now I'm playing the latest COD on PS4 and it's absolutely silent. I do have two tiny Phillips head screws leftover though. Oh well?
When I take my PS4 apart I always write down where the screws came from on a piece of paper. It helps if you're a little forgetful.
Some Guy -
What screw driver do i need?
Habe gestern die Sony PlayStation die weiße Version die Wärmeleitpaste und Kühlpad erneuert und jetzt ist sie wieder leise und nicht mehr laut
Super Anleitung!!! Meine PS4 ist vom startenden Düsenjet zu absolut nicht hörbar gerettet. Dank Dir!!!!!!
Habe auch Schritt 31 noch gemacht und der Kühler war komplett voller Staub.
Kostenpunkt der Reinigung: 8,99,- für Druckluftspray und 15,- für Wärmeleitpaste.
Nochmal großes Danke!!!
Simply remarkable. I replaced the fan and thermal paste in my PS4 and it has made the WORLD of difference. Cleaned all the dust from every part with my Dyson along the way, especially the heatsink which was absolutely clogged.
This guide is incredible. My PS4 sounded like a harrier jet taking off, now it is whisper quiet - no exaggeration. Even the wifey cannot believe it.
Really wish i had done this sooner. Whole job took around an hour with my 8 year old son helping, he had a blast.
I have a CUH-1102A version of this PS4.
Would this teardown work for it?
Cary B - Réponse