Introduction
Avec ce tutoriel remplacez les boutons sous la croix directionnelle de votre Wii U GamePad Nintendo.
Ce dont vous avez besoin
-
-
Enlevez les dix vis Tri-wing Y1 de 8,9 mm, cachées sous les autocollants carrés blancs.
-
Retirez la coque arrière.
-
-
-
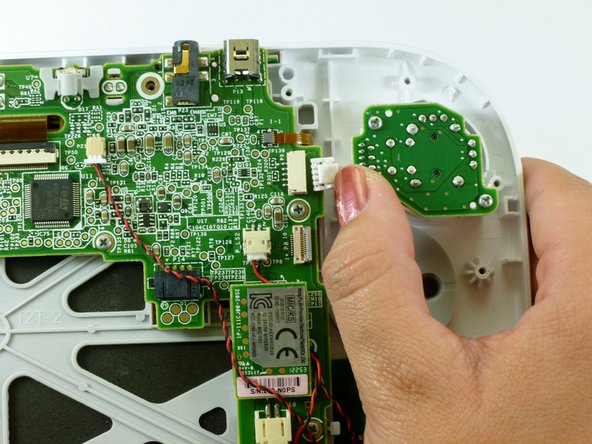
Débranchez la nappe reliant la coque arrière à la carte mère.
-
Retirez la coque arrière.
You don't have to remove just be careful
I tried to remove like at least 6 times but I wasn’t able to. Using tweezer, my nails, long nose pliers. There could be a lock but I gave up since I’m afraid if I put more force I might accidentally pull the wires. I’m able to remove the left and right analog stick with the back plate plugged, as mentioned, just be careful.
-
-
-
Ôtez les gâchettes gauche et droite dans les coins supérieurs.
-
Retirez les gâchettes ZR et ZL en les soulevant et faisant glisser vers l'extérieur.
-
-
-
-
Retirez les deux vis YO Tri-wing d 9,0 mm.
-
Enlevez le stick analogique.
Easy peasy. Thanks!
Hi there, I tried to replace the joystick following these instructions but I couldn't remove the connector cable from the old joystick as it is wired into the board. Does anyone know what the connector is called so I can buy one please!
@Spider Gin The joystick and the tiny little control board (the pcb between the red circles in the picture of step 9) are purchased together (or at least that’s how I got mine). The only thing you need to disconnect on the analog stick assembly is the connector shown at the end of the thumb in the picture on step 8. If you are trying to disconnect the stick itself from the control board you are not looking at the right instructions for that.
It seems to me that Nintendo changed the design after a while some had the wires on a connector some were soldered in. I can't find much information about this. Going to have to disassemble what I have to find out what I need
The volume slider came out when I turned the assembly upside down to retrieve a dropped screw. You need to pay attention when putting it back in to make sure you line up the groove on the slider with the tiny little square bump that fits into the groove and allows you to actually control the volume. It’s easy to get it aligned if you know that’s what you trying to do, but at first I didn’t even realize what it was.
Anyway—it worked, thank you!
-
-
-
Soulevez et retirez le cache en caoutchouc de la croix directionnelle.
-
Retirez les boutons sous la croix directionnelle.
-


Pour remonter votre appareil, suivez les étapes dans l'ordre inverse.
Pour remonter votre appareil, suivez les étapes dans l'ordre inverse.
Annulation : je n'ai pas terminé ce tutoriel.
11 autres ont terminé cette réparation.
Merci à ces traducteurs :
100%

Claire Miesch nous aide à réparer le monde ! Vous voulez contribuer ?
Commencez à traduire ›

Équipe

Cal Poly, Team 17-20, Forte Winter 2013 Membre de l'équipe Cal Poly, Team 17-20, Forte Winter 2013
CPSU-FORTE-W13S17G20
5 membres
38 tutoriels rédigés
how do i replace the whole front and back casing?
enbodylin - Réponse
bruh the ifix it screwdriver dont reach down the whole way
Michael - Réponse
I feel like it’s important to mention how deep some of these holes are. Your screwdriver might not reach. Mine sure didn’t.
greatshadowdude - Réponse
I had to shove some tissue into the screwdriver bit holder to get it to reach
Andrew Walker - Réponse