Il est possible que cette traduction ne reflète pas les dernières mises à jour du tutoriel source. Aidez à mettre à jour la traduction ou bien consultez le tutoriel source.
Introduction
Utilisez ce guide pour remplacer ou réparer les boutons du contrôleur Dualshock 4.
Ce dont vous avez besoin
-
-
À l'aide d'un tournevis Phillips #00, retirez les quatre vis de 6,0 mm qui maintiennent en place le capot arrière de la manette.
-
-
-
Commencez par la poignée gauche :
-
Serrez la poignée gauche de la manette pour créer une ouverture.
-
Insérez un outil en plastique dans l'ouverture et faites-le glisser jusqu'au joystick.
-
Appuyez sur l'outil en plastique afin d'ouvrir la coque.
-
Répétez ces étapes pour la poignée droite.
-
-
-
Pour ouvrir la manette, insérez un outil en plastique et appuyez dessus au niveau des boutons suivants :
-
Le bouton Share
-
Le bouton Options
-
Séparez les deux parties de la coque de la manette. N'oubliez pas que ces deux ensembles sont encore maintenus par les nappes de connexion des cartes électroniques!
-
2 ressorts de gâchette
-
1 extension en plastique du bouton Reset
-
-
-
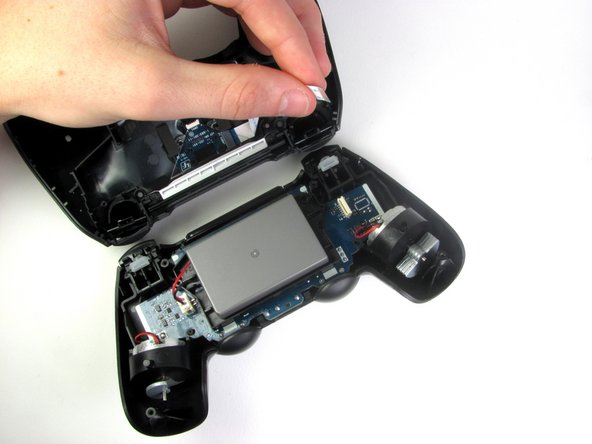
Détachez la nappe de la carte mère, qui relie les deux côtés de la manette, en la tirant vers le haut avec vos doigts.
-
Une fois les deux moitiés séparées, mettez la partie supérieure de la manette de côté.
-
-
-
-
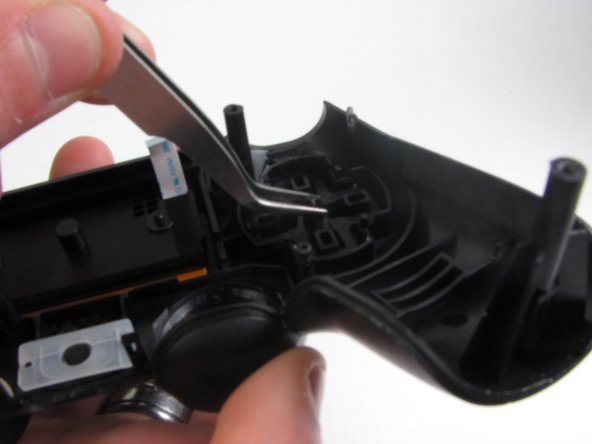
Retirez la vis cruciforme #00 6 mm qui se trouve derrière le boîtier de la batterie.
-
-
-
Détachez délicatement la nappe du pavé tactile connectée à la carte mère à l'aide d'une pincette émoussée. Cette nappe est maintenue par un clapet qui s'ouvre pour déconnecter ou raccorder la nappe. Pour reconnecter la nappe durant le remontage, vous devez retirer délicatement le support plastique de la carte mère et ouvrir le clapet.
-
-
-
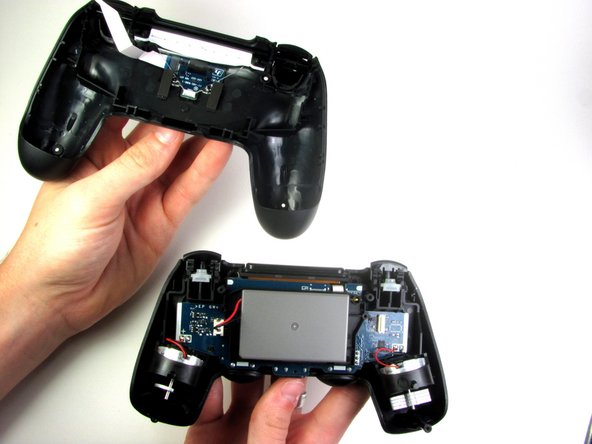
Le démontage réussi de la manette résulte en les trois parties suivantes, respectivement :
-
L'ensemble carte mère
-
La coque avant
-
La coque arrière
-
-
-
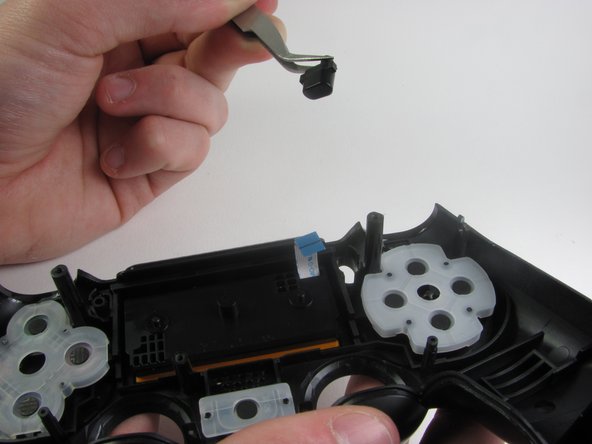
Retirez le revêtement en caoutchouc dissimulant les boutons avec vos doigts.
-
Utilisez la pince à épiler en métal pour retirer ensuite le bouton de son emplacement.
-


Pour remonter votre appareil, suivez ces instructions dans l'ordre inverse.
Pour remonter votre appareil, suivez ces instructions dans l'ordre inverse.
Annulation : je n'ai pas terminé ce tutoriel.
119 autres ont terminé cette réparation.
Merci à ces traducteurs :
10%
[deleted] nous aide à réparer le monde ! Vous voulez contribuer ?
Commencez à traduire ›

Équipe

Cal Poly, Team 6-21, Maness Winter 2014 Membre de l'équipe Cal Poly, Team 6-21, Maness Winter 2014
CPSU-MANESS-W14S6G21
4 membres
40 tutoriels rédigés
23 commentaires
I pulled out my touch pad along with the motherboard when it was still attached how can I put this back in
Pull out the ribbon the way the tutorial says and then you can place the touchpad back correctly. It needs to be put in from the inside of the controller, not the outside.
This guide could be enhanced by showing the L1/L2, R1/R2 button cluster in some photos. I needed to replace the silicone grommet underneath the buttons due to Sony's design flaw of having R2/L2 press on the silicone with a blade shaped extension.
What to do If after cleaning some buttons no longer work? I was very careful when disassembling and reassembling the remote.
You might wanna make sure that flimsy plastic lining the buttons push is in its proper place. Sometimes it moves and if it doesn't line up just right it won't work.
I took the "caveman" approach to this tutorial because I spilled soda near the controller and the circle button was sticky. It was an emergency operation done with a Phillips one size too large, a pocket knife for a spudger, and my cigar fingers for forceps. I must say, after some initial confusion, this tutorial helped me put it back together easily without breaking anything (a minor miracle all on its own). Thank for this.
My R2 button is constant being pressed. Even after I opened it and cleaned it. Please help me with this??
I connected it to pc and even removed the R2 button while checking for the buttons on pc,and button 8 (I.e R2 button on controller) shows as pressed all the time even when it's not there.
The “up" button on my d-pad has not been working recently so I followed the tutorial (helpful by the way), found no obvious problems, put it all back together, but the button still will not work. Any tips?
Are the contacts lining up right? That might be the problem.
how to clean the green circuit board because ps button is unresponsive? the true circuit button how to clean or repair it? cause mine is not responding in the motherboard assembly
My vibration motor has fallen out and the wires are disconnected, how can I fix it?
After I did this my right dpad button stopped functioning, is there a way to fix this?
This is the original model. How about an update since there have been about 3 new assemblies and a new version of the DS4?
Here is a solution to a broken R2 button. Really simple fix.
My PS4 is registering R2 button input without me pressing anything on the Dualshock 4. How can I fix it? This is only apparent when I play games… For example, when I play Spiderman where R2 is used for sprinting and web swinging, Spiderman will alternate between running and jogging, without me actually providing any kind of input via R2.
Thank you so much
As of March 14, 2023, this guide has been updated! Comments regarding step procedures may no longer be relevant.