Il est possible que cette traduction ne reflète pas les dernières mises à jour du tutoriel source. Aidez à mettre à jour la traduction ou bien consultez le tutoriel source.
Introduction
La coque de l'appareil photo est le boîtier en plastique qui constitue l'extérieur du Fujifilm Instax Mini 8; qui est destiné à cacher les fils, à protéger le film et à maintenir les composants principaux de cet appareil photo compacts. Une coque endommagée compromettra l'intégrité de l'appareil et peut entraîner un dysfonctionnement d'autres parties de l'appareil photo.
Ce dont vous avez besoin
-
-
Commencez par regarder votre appareil photo et tournez-le pour localiser toutes les vis. Il devrait y avoir huit vis en tout.
-
-
-
Appuyez sur la languette pour déverrouiller le couvercle du compartiment à film.
-
Retirez le film du compartiment (le cas échéant)
-
Retirez complètement le couvercle du compartiment.
-
Commencez par utiliser le petit tournevis cruciforme n ° 00 et tournez dans le sens antihoraire pour retirer les vis.
How do i remove the compartment cover?
With the film door closed, try inserting the opener tool into the seam between the camera front and back plates on the side closest to the film door hinge, and start working your way around the camera.
Remember there’s another screw under the small oval plate covering where the pictures pop out.
-
-
-
-
Soulevez la partie avant de la coque, en vous assurant de ne pas tirer trop fort en raison d'un ressort connecté à la coque et à l'intérieur de la caméra.
-
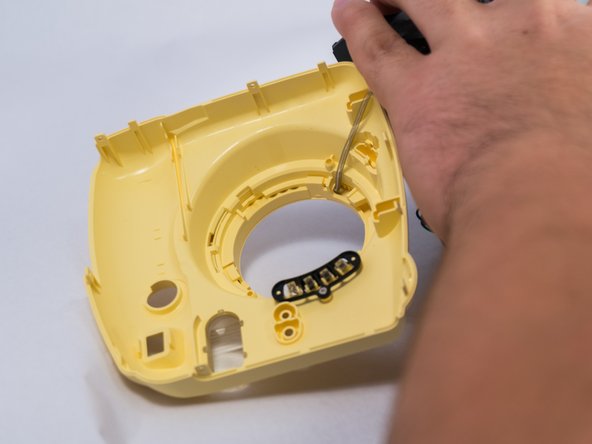
Avec précaution, à l'aide d'un petit tournevis cruciforme n ° 00, retirez le ressort du composant intérieur de l'appareil photo.
-
À ce stade, vous devez retirer complètement la coque. Toutes nos félicitations! Répétez les étapes vers l'arrière pour remettre la coque sur votre appareil photo.
-


Pour remonter votre appareil, suivez ces instructions dans l'ordre inverse.
Pour remonter votre appareil, suivez ces instructions dans l'ordre inverse.
Annulation : je n'ai pas terminé ce tutoriel.
12 autres ont terminé cette réparation.
Merci à ces traducteurs :
87%
[deleted] nous aide à réparer le monde ! Vous voulez contribuer ?
Commencez à traduire ›

Équipe

USF Tampa, Team 4-1, Meier Fall 2015 Membre de l'équipe USF Tampa, Team 4-1, Meier Fall 2015
USFT-MEIER-F15S4G1
4 membres
24 tutoriels rédigés
18 commentaires
For removing initial screws, there are 9 screws. The 9th screw is under the cover overlying the exit of the Polaroid film area. (hidden under the cover)
but where near the exit? i cannot find it
It's at the top of the camera where you get picture.
xxx -
I need the circular yellow plastic piece that goes around the lens. How can I obtain that? How do I attach?
I've drop my instax mini 8 at the airport and it looks perfectly fine at first until I realized that the film compartment has broken and it can't close its 'door', but the instax still can be use just need to press the door against the film everytime I used which is annoying. Does anyone know how to fix it?
Did you find the replacement part?
where do i find the circular plastic piece online how do i find it? what website? what shop?
pls help. battry leak. corrossion. forgot to remove. 1x use palang. what can i do?
you can use vingear and cotton buds to clean the white stuff and then wipe with alcohol; goog;e clean battery leak in youtube then you will know what to do
kit kat -
That final spring is broken on my camera. Do you know what the specs of it are so that I could get a replacement?
HI Jack, I have the same issue, where did you find the spring at the end and what are the specs?
kit kat -
A few missing parts in the assembly that might help if your camera "explodes" on opening:
- The metal flat spring goes under the shot button. As for the button, there are different diameter holes, so is easy to fit properly. Just test clicking feels
- The "black square" part goes under the strap holes, clipped between shell and chassis (you can place it after fitting the front shell)
- The long spring can "disappear" hidden in the front shell after you unclip it from the lens. No panic, you can easily find it opening from the inside of the shell, the front ring cover with the lettering (it has 3 adhesive pads, plus the tabs). With the cover out is very easy to assemble, fitting the spring first in the lens and letting it go straight into the front (youtube video "FUJIFILM instax mini9./error prob. very easy.").
Please, be very careful manipulating the motherboard. This capacitor has high voltage and keeps charge for ages, it can shock you several times and it is quite unpleasant (don't ask how I found it).
Just posting this to thank you. Could not figure out where the black square went after the camera "exploded".
Jamato -
Hello!
When removing the case, two parts fell out:
a black plasicc part and a metal part.
Has anyone an idea where to fit these?
This doesnt show it but there is a screw under a plastic "pop out" cover where the photo comes out at the top
Margaret Compton - Réponse