Il est possible que cette traduction ne reflète pas les dernières mises à jour du tutoriel source. Aidez à mettre à jour la traduction ou bien consultez le tutoriel source.
Introduction
Suivez ce tutoriel pour remplacer le bouton home d'un Samsung Galaxy S6.
Ce tutoriel inclut le retrait de la vitre arrière. Ce faisant, vous endommagerez l'adhésif la maintenant en place. Suivez ensuite ce tutoriel pour remonter la vitre arrière.
Ce dont vous avez besoin
-
-
Insérez un trombone ou un outil d'éjection de carte SIM dans le trou du tiroir de la carte SIM du côté du bouton de marche du smartphone.
-
Appuyez pour éjecter le tiroir de la carte SIM.
-
-
-
Placez l'iOpener au centre du micro-ondes.
I didn't find this to be as hard as I had built it up in my mind to be; HOWEVER, saying that I need to say years ago I was the local Nokia service center in my town. But many years ago right after they got rid of analog times. Yeah. A classic installer/repairer mistake when starting something they haven't fixed or installed before is picking up the instructions, flipping through them; maybe even reading a section that is new-then tossing the instructions over the shoulder. "I got this." This usually comes right before something major gets broke. And I can tell you when you try to do it yourself and then mess it up horribly then take it to the repair shop. Well we called that "I can do it myself" syndrome and charged extra to put back together what they brought in in the box. Now knowing all this - I can't stress this enough because I am stupid, stupid, stupid. COVER YOUR SCREEN IN CLEAR BOXING TAPE AND READ ALL THE INSTRUCTION BELOW THROUGH TO THE END BEFORE EVEN ATTEMPTING THIS FIX. Take my advise.
I didn't have an iOpener, so I used a wheat type heat bag. If you do this though, make sure you put a layer of plastic between your Mac and the bag, or you'll get condensation in places you don't want it.
I started out using the iOpener but switched to my wife's hairdryer. A heat gun or hair dryer proved to be much more convenient and is a time saviour. You can heat more and the glue becomes more fluid make the next steps with the opening picks much easier
I know this is obvious, but backup your iPad with iTunes before you start. I'd also turn off your passcode if you have one.
Ther first time you heat up the iOpener for this repair when its room temperature I had to heat it up for more than 30 seconds. I remember I had to heat it up for around 45 seconds. However, after that when you need to reheat it again during the repair 30 seconds will be enough.
I used the wheat bag in a sensor microwave heating up to 65-70 deg C (155 def F).
Get yourself a cherry pit bean bag the size of your iPad. Heat it, put the iPad on it for 3 to 5 minutes or so, reheat the cherry pit bean bag, again put your iPad on it. Then heat the iOpener and start working. The cherry pit bean bag will have to be reheated several times, but it will soften the adhesive so you have less problems with the iOpener
The heating can be done very effectively (and quickly) with 3d printer heated bed. Make sure the bed is clean. Set the temperature to 60c, (130f ) and put the ipad face down for +/- 10 minutes. Repeat as needed throughout the “gentle prying” stages.
The iOpener did not work at all for me.
I had to use a heat gun and bring the edges of the case up to ~200 degrees (used an infrared thermometer to measure) before the glue would weaken. This obviously superheated the metal frame, so I also had to wear gloves to handle the phone while prying the back off with the included picks.
The iOpener, in my opinion, is of no help. Many warnings to say “don’t warm it too much”, but the glue doesn’t melt if not warm enough. As a result, a complete waste of time and energy. In addition, too much liquid in it, so it doesn’t lay on the device on a sufficient surface. I took a hairdryer and it worked much much better.
I used an immersion bath to heat this to 180F and applied it to the device until the outside temperature of the opener read 150F with an IR thermometer. Removing the screen took very little force with this method.
My experience. I was replacing the screen which had been cracked and a little shattered in some places. The iopener is pretty much useless, so was the suction cup. The suction cup would probably be more useful if I was doing something besides the screen. Also you probably want the clean the screen before using it so it can get good suction. I used a hair dryer on high for a couple of minutes at a time (someone on this tread suggested that). I used my exacto knife and a razor blade to get into the adhesive. First the exacto to get the initial cut, then the razor blade to go a little deeper. Could have probably just used the razor blade, but the exacto has a little more finesse. I got the razor blade in and a little under the glass then I used the picks to wedge in. I didn’t want to risk anything using the razor blade too much. Used tape to keep the shattered glass together.
My experience pt2
Fortunately the shattering was mostly on the edges and most of it had adhesive on the back so it stuck together. Just take your time and work your way around following the guide to get the screen off. Have some goof off or goo be gone to clean the frame when putting the new glass on or putting the existing one back. (someone suggested that also, very good idea). Be careful of the LCD (you should know that). The cable on my LCD was pretty tight, so I propped it up while taking the cable cover off and when I put it back on I did the same thing. I just put a bottle on the battery and leaned the back of the LCD on that while attaching the cables and putting the screws back on the cover. Also be careful with the home button and the bracket on the back of it. I had enough old adhesive on left on the bracket that it stuck back to the new glass fine. So far only 12 hours in, so we will see how that holds up when the kids get at it.
Another alternative if you do not have the iopener is to use a bed time hotwater bottle. Do not over fill it though. Just put enough hot water in to support the phone while you work around the adhesive.
I use both the hot water bottle and iopener together on Samsung's. It makes life easier
I followed the directions and heated my iOpener for 30 seconds in a 1000 watt microwave, and it came out at 160 degrees F, as verified by a infrared thermometer. This allowed me to separate the last bit of the back of my Samsung S8, which was already coming off due to a swollen battery (hence the reason for the repair).
If you follow these instructions, you will crack your screen like I did. Heating the iOpener for 30 seconds, using it to melt glue, then waiting 10 minutes to reheat is useless. The iOpener can be used to maybe warm the glue on whatever side you aren’t working on. You need a hairdryer and/or a heat gun to melt the glue and separate the glass from the iPad.
Anyone want to buy an old iPad with broken glass and a dead battery?
Not everybody has a microwave. You should provide a target temperature for the iOpener and instructions for a conventional oven, or pot of warm water, or whatever. Although I will probably use a heat gun …
I support the comments about the iOpener. Everyone has a hair drier, FHS, so get a cheap IR thermometer (£18) and blow heat until the area is 60+ deg C. Still takes w while, and getting the screen off is v scary, but just add more heat if you feel resistance.
The rest of the kit is good, esp the magnetic screwdrivers.
No, everyone does not have a hairdryer. Some of us don’t even have hair. Thank goodness I already had an IR thermometer, though.
nin10doh -
#### WARNUNG WENN MINIMALSTER SPRUNG IM DISPLAY IST FUNKTIONERT DAS NICHT!!! ######
Hatte einen winzigen, minimalen Sprung im Display. Ich dachte es könnte gehen, weil der Sprung “abgeschlossen” war. Er hat in einer Ecke ein winzige Glasteil rausgeschnitten. NEIN! Geht nicht. Habe alles mit viel Geduld dem iOpener und einem Föhn erhitzt. Es ist trotzdem sofort über das komplette Display zersprungen…
I’ve started with iOpener but changed very quickly to a heatgun. That was more efficient.
I could not get the iOpener hot enough to melt the glue on my ipad 6. I heated for 45 seconds once and it was boiling and it still never worked. Thank goodness contributors mentioned using a hair dryer. Using an 1700w hair dryer on high did the trick to get the screen off. Still took some time and the case got pretty hot but be patient. It took twice as long and a lot more patience to get the battery out.
I have an Ipad with touch screen issue, if i replace this part it should be Ok?
WARNING - DO NOT MICROWAVE ON A METAL MICROWAVE RACK
The metal microwave rack can heat up and melt through the iOpener cover letting the contents leak out.
Not a big issue for me as I have a heat gun and used that instead.
I opened my iPad with the iOpener. Be patient! It may take quite a bit longer to it the iOpener in the microwave than it says in the guide. My microwave can only do 800W and I had to put the iOpener in several times (maybe a total of 90-120 seconds). I recommend that you have the transparent side up an watch the bag carefully. As long a the bag doesn't bloat up and the liquid doesn't start bubbling you should be fine. But I recommend to take the iO out from time to time to check it. (More comments in Step 6.)
iPad mini gen5. I used the iOpener. My microwave is 1200w with carousel. 30 sec got the iOpener to 155ºF. For the 2nd heating, after 10 minutes sitting, the temp was still around 125º so I only cooked it for 15 sec. Not enough increase so +5 sec more which me to 165-170ºF. This should be considered ballpark info because who knows the real output of the various microwaves and the quality of the IR tool used to determine temp.
To successfully open my iPad mini I applied the iOpener twice to the left edge and twice to bottom. & once to R edge. Using the suction cup was difficult for me (I'm in my 70's so my hands don't work too well anymore). I had trouble holding the guitar pick and slipping them in (at an downward angle). In the end, sliding my thumbnail along the edge opened it very slightly and allowed the pick to get into the gap. I marked the ends of all my picks with a sharpie pen for the recommended 2mm insertion to avoid going in too deep. To get the screen open it took me approx 1 hour.
A hairdryer or heat gun works, if heating is kept around 100 deg C (212 deg F - boiling point of water). But… heating this way is cumbersome. Using a hotplate, set to 100 deg C, measured carefully with a fairly inexpensive IR gun, is simpler and easier, if you can afford the hotplate (I used an old pancake griddle with a thermostat knob). It works great for phones, setting them face down for 2 minutes, then picking them up with insulated gloves - cheap, wool gloves work fine. This may require repeated reheating to continue the display removal, but its much simpler.
Because its almost impossible to repeatedly lay an iPad/tablet on the hot plate, I propose an alternative.
Initially lay the larger iPad/tablet, face down, for 2 min, to heat all of the adhesive surrounding the display. Lift and begin the picking process describe in your removal steps. Then lay an iOpener on the hotplate for 2 min (already set to the exact, desired temp) to bring it to working temp for the remaining operations.
For iPads in particular, it makes sense to construct a simple, aluminum window frame, laid on a hotplate (see my comment above) that only touches the edges of the display, heating only the adhesive underneath. This prevents general heating of the entire device. Four strips of aluminum, placed together as a frame, would be the simplest and allow variations for all devices - envision it as a pinwheel of strips, radiating outward. Use it for any size device.
-
-
-
Chauffez l'iOpener pendant trente secondes.
-
Comme l'iOpener refroidit au cours de la réparation, rechauffez-le à nouveau au micro-ondes, mais ne dépassez pas les trente secondes à chaque fois.
DO NOT USE IN NON ROTATING MICROWAVE! It will pop a hole. I had it in for 45 seconds the first time. It wasn't very hot inside and I saw it started to leak on the paper towel I put under it. Just a fair bit of advice. I think I will just stick with the heat gun. Loud but useful.
I heated mine up for 30 seconds, tested, then again for 30 seconds. It felt adequately hot. Leaving it on the left side, per the instruction, for a minute did not loosen the adhesive. I ended up pulling the suction cup hard enough to shadder the old screen. Moral of the story, I don't think it gets hot enough safely to have an affect.
There is a clear problem here with the heating part using the iopener things....no details are given. Whoever is testing them needs to make it clear - What temperature does it need to be? And for which phone models, because they differ in what's needed. It's only £10-15 for a laser guided temp sensor unit, and the designers/repairers should have one of those already for doing these kinds of repairs. Explaining half a repair, is worse than not explaining at all :-(
All phones/devices differ it’s unrealistic and unsafe to put a exact time/temperature needed to soften the adhesive. It’s really quite simple you warm the device evenly and in a controlled manner just enough to enable pry tools and picks to begin separating. Best tool in my opinion but again this is because I have experience is a hot plate and heat gun both of which are used at nearly the lowest settings and I can handle flat palming the plate for almost 10 seconds I leave the device to conduct heat until approx it’s about 110 at most 120 ish this will be plenty to soften all the adhesive if any problem areas I use heat gun while prying. Again you need go slowly and learn with a throw away phone
If I may suggest include your microwave wattage so people can get an idea on time for there own
I agree with this.
I ended up using a hair dryer. That iOpener thing took forever.
30 seconds sure isn’t cutting it… 45 didn’t get the screen of my iPad air 2 to budge either… even after resting on the ipad for 4 minutes.
60 seconds in the microwave, the iOpener burst.
I’ll get a new one and try once more with heating it 45 seconds and repeat that for 30 minutes like others have said here. If that doesn’t work it’ll have to be the heat gun.
K
I can’t recommend the microwave. If the the iOpener becomes too hot, it bursts. Better put the opener in cooking water. Dry it and use it. Instead of an iOpener you can use hot/cool packs as well.
Great idea with using the heat packs. I will try that next time. Thank you
Collins -
Trust the directions! I forgot and left it in the Microwave too long and after 1 minute I had Mt Vesuvius - the iOpener burst and spewed the goodies out. The problem is, the Digitizer can be damaged by a hot air gun, so I had to tough out and remove the glue the hard way. I made it … with lots of patience! Tough lesson.
I also used a hairdryer. I used it on the low setting and I cut a piece of carboard to protect the rest of the screen. The iFixit tool and method is vert tedious and very time consuming in comparison. With the hairdryer method you can literally have the display apart in a few minutes. Using your other hand nearby the area you are heating it should be very hot but not enough to burn your hand. You only have to heat metal part of case near glass edge. If you have a cellular model then you need to be very careful because the black antenna area is plastic. So less heat and work your way up in adding heat just enough to separate around the area but not so much you melt the plastic!
iOpener was the worst part of the kit. Followed directions for :30 in microwave and took 4 trips to the microwave to loosen adhesive on left side of home button. I thought I was figuring it out and it was working well… even set a timer to wait 10 minutes between heating it up. Was on the right side and was on my 12th heat up when it exploded in the microwave. My only tip is that if you set it clear side up, as soon as you see any bubbles or boiling in the liquid, STOP! If you put a pot holder over the iOpener and press slightly to make good surface contact, that seemed to help. I finished heating with a “Corn Sack” that held heat better than the provided iOpener.
Mon iopener n'a pas tenu une réparation. Je ne vous conseille pas ce produit
Bonjour,
Nous sommes désolés que votre réparation ne se soit pas déroulée comme prévu. Il se peut que le produit était défectueux. Veuillez contacter notre service client support@ifixit.com (boutique américaine) ou eustore@ifixit.com (boutique européenne) en décrivant ce qui s’est passé.
Readers looking for temperature advice might check the comments of the previous instruction, as there are more there. I used an immersion bath to heat this to 180F and applied it to the device until the outside temperature of the opener read 150F with an IR thermometer. Removing the screen took very little force with this method.
Thank you for posting some actual temperatures. I have a heat gun with a very fine self-temperature regulation setting capability.
I will set it for 150-180 F, and use that to soften the adhesive.
Get a heat gun.
I followed the directions and heated my iOpener for 30 seconds in a 1000 watt microwave, and it came out at 160 degrees F, as verified by a infrared thermometer. A second heating about 15 minutes later in the micro and it came out at 190 degrees F. Plenty hot enough to soften the adhesive for removing the back on my S8. Based on the comments above I think people just need to use more patience.
I used various time settings. It got very hot. It would soften the glue but not a whole lot. If my screen had been intact and I was replacing something that was not a digitizer, it may have worked. A broken screen makes the process significantly more difficult. I ended up breaking the home button cable. Good bye TouchID…
It appeared 30 seconds were not enough, so I heated it more, by 5 seconds at a time until I got the right temperature about 70 degrees Celsius (measured with infrared pistol) to get the screen heated up to 60 C, the best for softening the glue. But the heat was quickly dissipating by the big aluminum back cover, so the best I got in 2 minutes of applying iOpener was around 45 C, which made the procedure difficult and having risk of breaking the screen. So I eventually abandoned iOpener and user a hot air gun with precise temperature setup. I set it to 90 C, which allowed me to open my iPad quickly and safely.
I, too, ended up using a hot air gun. I’ve done earlier versions of iPad before but the adhesive used on this IPad 5 A1822 was particularly difficult to remove.
Also, while the suction cup worked great when the glass is in tact, any cracks in the glass make the suction cup useless.
You need to remember here are different sizes of microwaves. I had the same issue.
Heating on a smaller unit I used 45-60 seconds. That worked but was time comsuming
Yeah, the iOpener didn't work for me either.... ended up using a hair dryer and that worked. The iOpener was too warm to soften the glue in my case.
-
-
-
Sortez l'iOpener du micro-ondes en le tenant par l'une des deux extrémités plates, car le centre de l'outil risque d'être brûlant.
I did this repair. I used a hair dryer, I think it works better: gets very hot fast.
I did too, you get far more control and no expense on fancy equipment.
Readers looking for temperature advice might check the comments of the previous instruction, as there are more there. I used an immersion bath to heat this to 180F and applied it to the device until the outside temperature of the opener read 150F with an IR thermometer. Removing the screen took very little force with this method. I don’t know how much microwaves vary in heating consistency with these pads, but knowing how inconsistent the temperature of a bowl of plain rice gets in my microwave, I wasn’t interested in even trying to use it for this.
I vote for the hair dryer. The other methods work too but if you aren’t having any luck, switch to the hair dryer. While holding the iPad in my hand, I found that I am aiming the dryer at my finger at the same time and it gauges how hot it is. I stop when my finger can’t take it - maybe five seconds up close. Repeat as needed like I did.
If the maximum temperature for this iOpener is lower than the gadget glue minimum temperature, this device does not make sense.
I think the maximum temperature for this iOpener is below 100⁰C and most gadget glue minimum temperature is higher than 100⁰C. So the iOpener is useless for many opening steps in repair guides. But who knows because temperature range is not specified for this iOpener. -
-
-
Remplissez une casserole ou une poêle avec suffisamment d'eau pour immerger complètement un iOpener.
-
Faites chauffer l'eau jusqu'à ébullition. Puis éteignez le feu.
-
Placez un iOpener dans l'eau chaude pendant 2 à 3 minutes. Assurez-vous que l'iOpener est complètement immergé dans l'eau.
-
Utilisez des pinces pour extraire l'iOpener chauffé de l'eau chaude.
-
Séchez soigneusement l'iOpener avec une serviette.
-
Votre iOpener est prêt à être utilisé ! Si vous devez réchauffer l'iOpener, portez l'eau à ébullition, éteignez le feu et placez l'iOpener dans l'eau pendant 2 à 3 minutes.
What do I do if I don’t have a iopener?
Use a hair dryer
2 or 3 cups Rice in a sock, heat for about 2 minutes. But, I recommend the iopener.
When boiling in water you can put the iopener in a ziplock to keep it dry.
Even if you don't put in a ziplock bag, I found that the surface is mostly hydrophobic so drying it is very easy. I also didn't have tongs, but the bag is denser than water, so it sank and I attached clothes pins to the ends and was able to remove it with those.
2-3 minutes in near boiling water, then 2-3 minutes on my s10+ and it was super easy to cut the glue off.
I have a question, if I have a pan, and I have water, and a mean to boil the water, won't it be easier and cheaper to just use that.
Have you tried it? Water limits your temperature to 100℃, whereas 'pan on the stove' can easily get up to twice that. If your pan is even slightly warped, you'll have a few hot spots of direct conduction with convection everywhere else, heating things unevenly. Assuming you get the device up to temperature, how will you get it out without scratching it or burning yourself? After you're finished, do you really want to prepare food in the pan you warmed up adhesives and trace manufacturing substances in?
.
Boiling something form fitting to heat your device with is a lot more foolproof, and not being foolish is easier and cheaper. Direct pan heating can work, but you are leaving yourself open to a lot more problems than just taking the safe route.
-
-
-
Posez l'iOpener chauffé sur le panneau pendant environ deux minutes afin de ramollir l'adhésif autour du bord de la vitre.
-
Déplacez l'iOpener pour chauffer la partie restante du panneau pendant deux autres minutes.
the way we do it at Get it fixed cellphone repair calgary is with a heat gun, wich is way easier than this, make sure to wear some gloves and dont worry to use to much heat as long as you point just to the back of the phone, (the back panel is thick enough to protect the logic board from over heat) instead of the usual blue plastic piece i sugest to use the thinnest metal razor knife and a business card so you can insert the business card and move it all around the frame, those blue plastic things are way too thick that will break the glass panel if you apply to much pressure
After did that with my own heat pad, the white paint got ripped off but luckily glass back cover did not break. So I scratched all white part of the back cover and now its all transparent.
haha, the same happened for me after using a hair dryer. While still hot, the paint peeled of very easily. (too bad the mid-frame visually blocks most of the circuits…)
Michael -
I gave up on the hot bag after 4 heat and apply cycles. I was only getting the back up to 60c using an infrared thermometer. I switched to a harbor freight 1500w heat gun set to Low, moving constantly around the back, until the back read 95c. The back came off easily at that point.
I found another site that said temps of 203F/95C were required to soften the glues. Once I started using those temps with my heat gun, as well as a tool I made by just cutting the flat front/back panel from a package of screws (any plastic package that has a flat panel will work) , I had the back off in no time. Had I continued to use the plastic pick shown in the instructions, I really doubt I would have gotten the back off since I couldn’t get enough force on the back from my suction cup. The thin package plastic acted almost like a knife as I moved it around the outside edge. WARNING: If you have to reheat the back, REMOVE THE PACKAGE PLASTIC!! It will start to melt from the heat of a heat gun. Good Luck!!
I had a pristine s6 edge I’m replacing the battery in. I can agree with many others about the amount of heart needed and need to where gloves. I had to heat several times using a heat gun. After several attempts phone broke free from suction cup went flying and now I have a phone with broken screen. Oh well, glad it’s not my primary phone. After getting it above 100c, the back glass finally started to separate. You need another person to be ready with a pick. Once you get one pick in, the rest is .
To get an even heat distribution at just the right temperature to easily pry the back off I used a steam iron, dry, set between wool and cotton. To hold down the phone I clamped it at the long edges with 2 strips of 1/4” furniture grade plywood cut at 7 degrees, screwed to 2’ 2x6; and then clamped the 2x6 to my work table. This made it much easier to persuade to back off without any oops!
I used a hot and cold gel pad usually intended for injuries. It needed about 4 cycles of warming the phone but then worked like a charm.
-
-
-
Une fois que la vitre arrière est chaude au toucher, posez une ventouse sur la partie inférieure de la vitre.
-
Soulevez la ventouse pour ouvrir un léger interstice sous la vitre arrière et insérez-y un médiator.
If the rear screen is cracked/smashed, you will not be able to use a suction cup to remove it. The suction could would not seal because of the cracks. I tried masking tape, 3M shiny HVAC tape, and others, and the suction could would not seal to those surfaces either.
I ended up using the sharp point of the smudger to remove some shards of glass to get underneath the cover to leverage it up and out. Definitely use gloves and safety glasses if you have to do this.
Thank you for your comment. I needed to see this particular instance of what to do when the back cover was cracked. I was going to try to suction it with tape covering it. This saved me some heartache. You're an angel!!
I think it is just about impossible to do this without at least removing some paint on the edges. Order a new back before you attempt this. It has the adhesive already on it and costs less than $10 on eBay.
In order to get in more easily, I normally use the iFlex (the metal one) which is thin enough to create a little space, and then i insert a thinner plastic sheet, just like the default screen protector you might find on some huawei or xiaomi phones. That plus half a drop of alcohol should do the trick. Use caution and be very patient.
Ridiculous. I put a heat gun on mine for 30 seconds, 3 times, couldn’t get the screen to move AT ALL while pulling very hard with suction cups.
Enough of this ‘you don’t get to mess with the battery’ nonsense. Quit screwing people over. Also, I love my ifixit kit. I had to make the post less negative.
Really struggling removing the screen. It’s not budging at all.
-
-
-
Faites glisser le médiator le long du côté inférieur du téléphone pour couper l'adhésif qui fixe la vitre arrière.
Be careful that the bottom of the phone is well heated, and add a drop or so of isopropyl alcohol. When I removed the back glass of my S6, some of the black coating on the glass stayed stuck to the adhesive, so to return my phone to its original appearance, I’ll have to get a new back glass.
-
-
-
Répétez la procédure précédente pour les trois autres côtés du téléphone.
-
Laissez un médiator inséré de chaque côté quand vous continuez avec le suivant, dans le but d'empêcher l'adhésif de recoller.
At this stage I didn’t use a plastic pick as I think they are too thick and will crack a screen that’s not already cracked. I used a stainless steel
I sesame blade which does a much better job of cutting through the adhesive. Just be careful not to insert it in too far. I sometimes put a mark on my blade to ensure it doesn’t go in too far.
-
-
-
Faites céder l'adhésif restant à l'aide d'un médiator.
-
Ôtez la vitre arrière.
The rear glass is very fragile. I cracked mine across the camera opening while cleaning off the old sealant. Next time ( I will have to order one and do it again…doh) I’ll place it on a flat surface while cleaning it.
This is also a really good time to remove the SIM tray
-
-
-
Utilisez une pincette pour décoller les restes d'adhésif du châssis interne du téléphone.
-
Nettoyez les zones d'adhérence avec de l'alcool isopropylique (concentré à au moins 90 %) et un chiffon non-pelucheux. Essuyez dans une seule direction, sans faire de mouvements de va-et-vient. Cela préparera la surface pour la nouvelle couche d'adhésif.
-
Décollez le film de protection de la nouvelle vitre arrière. Alignez soigneusement un bord de l'écran contre le châssis du téléphone, et appuyez fermement sur la vitre pour l'encastrer dans le téléphone.
When I did my battery, the adhesive stayed almost 100% on the back glass and was still in good shape. What didn’t remain attached only lifted slightly and I was able to coax it back to its original location with tweezers. I didn’t bother to remove and replace the adhesive layer because mine was still good. I set the glass out of the way where it wouldn’t get dirt on the adhesive while I finished the battery swap. I added some additional heat (hair dryer) after reattaching the glass to make sure the adhesive made the best seal.
-
-
-
Retirez les treize vis Phillips #00 de 3,5 mm fixant le châssis au téléphone.
Make sure you do not mix up these thirteen screws with a hidden 14th screw under the mid-frame chassis, on the left side of the headphone port, on daughter-board. This 14th screw is shorter than the other screws, so make sure you do not replace it with one of the longer screws. It will push up against the front glass and lift it away from the adhesive.
Some of the female threads are soft plastic and will strip out easily (especially those near the bottom). I was pressing down too hard when removing these screws, and several of them stripped out. The frame still screwed together, but I couldn’t get them very tight.
-
-
-
Saisissez fermement le bord du châssis.
-
Soulevez le châssis tout en poussant la batterie vers le bas pour séparer le châssis du reste du téléphone.
-
En soulevant le châssis, faites attention à ne pas rester accroché à la prise jack ou la prise de chargement.
-
Une fois le châssis partiellement séparé, passez précautionneusement un médiator autour des angles du reste du téléphone pour séparer la partie supérieure du châssis.
-
Pour éviter d'endommager la prise jack, enlevez d'abord la partie supérieure du châssis puis poussez le châssis vers le bas pour désengager la prise jack.
-
Vous devrez peut-être chauffer et appliquer un iOpener sur les bords de l'écran pour ramollir l'adhésif si la séparation du châssis est difficile.
FIRMLY GRASP IT! - Patrick
%#*@ coulda told me sooner
i suggest to apply heat on the corners of the front screen to lose the adhesive a lil bit and push from the bottom back of the phone right where the wireless charger is because of the charging port
When grabbing from the bottom, you fun the risk of damaging the charging port and headphone jack. I would suggest starting from the top. This is because the two ports at the bottom slide down into the frame. There is also adhesive that will give you a little resistance.
Step 18 is not correct, you have to start from the top. You can damage the charge port
On mine the adhesive actually tore away part of the colored film on the back of the screen glass rather than separating from it. I’m guessing applying heat to the screen corners first would help avoid this (I didn’t). https://imgur.com/a/V7vZQ
Don’t stick a pick into the screen side of the frame. You will almost certainly start to separate the digitizer and LCD. Plus there is hardly anything to pry against anyway.
-
-
-
Soulevez le châssis pour le séparer du reste du téléphone.
Achtung! Bei meiner Reperatur, besonders bei Schritt 14, Auf gar keinen Fall versuchen den Kleber mit einem der Plektren zu lösen. Dort kann man schnell zwischen Displayrahmen und Glas rutschen und so das Display beschädigen!!!
-
-
-
-
Utilisez l'extrémité plate du spudger pour débrancher le connecteur de la batterie de sa prise sur la carte mère.
-
-
-
Insérez un médiator en plastique entre le boîtier et la batterie.
-
Poussez davantage le médiator pour séparer la batterie du téléphone.
-
Ou bien appliquez de l'alcool à 90° sous chaque coin de la batterie et laissez le pénétrer quelques minutes pour que l'adhésif ramollisse mieux.
I used a trick from a different phone tear down, but it really helps, slip a length of dental floss under the top edge of the battery, then with a back and forth action of the floss, you can slice through the adhesive and easily remove the battery, worked great on this phone.
Dude that's awesome, wish someone would have mentioned this a long time ago. Battery removal can be a pain. Defiantly going to try that sometime soon!
Best tip ever!
vbgagnon -
Awesome. Thanks!!!
For me, the battery removal was probably as difficult. maybe more so than removing the back or mid-frame. The adhesive on the left side woudn’t let go and the plastic pick couldn’t reach the left-side adhesive to release it. I finally got it through perseverance though.
I heated the battery area for two minutes. Pried slowly with a plastic pic on the outside edge and around the top. Got the center top corner up slightly and used the dental floss trick. Worked well!
IFixit makes a tool about 5 inches long with a black plastic handle and a flat metal blade that is great for this. It’s a perfect prying tool. It’s about 4 inches of thicker plastic handle and 1 inch of steel blade. I would think if it was a sharp blade, it would be ideal for slicing through this type of adhesive. Like the dental floss idea also. Will try that on the next one.
The steel blade tool is also great for removing the battery adhesive and back adhesive. Use like a dull chisel scraping up small chunks until done.
Hi Rex,
I think the tool you are thinking of is the Jimmy! It is indeed a versatile tool for many opening purposes. However, we do not recommend it for battery removal, as the dull metal blade can still slice through the battery pouch.
-
-
-
Retirez la batterie du téléphone.
Yes the UK version is very well glued in. I recommend using a flat metal spudger and pushing it in from the bottom right side and then continue doing the same working up. This method seems to be the safest and only takes a minute or two
There is a significant chance that you may have damaged the battery during the removal process, which can result in an internal short and fire hazard in the future. We strongly advise not to re-use the battery once you have removed it.
It is ok if you flatten the battery if it is bent
Yanny 57 -
Note that the power button won’t work until the screws are tightened back into the midframe. I tried to turn it on before inserting the screws to the midframe and was worried that I broke something when it wouldn’t turn on. Tightening the screws fixed the issue.
Also, attaching the battery cable before placing the battery on the new adhesive makes sure that it is in the correct position.
-
-
-
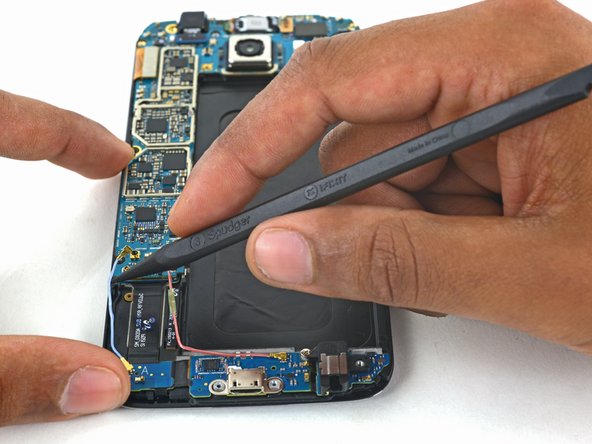
Utilisez la pointe d'une spatule (spudger) pour déconnecter les connecteurs des câbles de l'antenne Bluetooth et Wi-Fi de leurs prises sur la carte mère.
This portion of the repair caused me problems after phone was closed up. The bluetooth cable on the left of the phone was not placed back into its cable track and was pinched off by screen once frame was placed in metal housing.
-
-
-
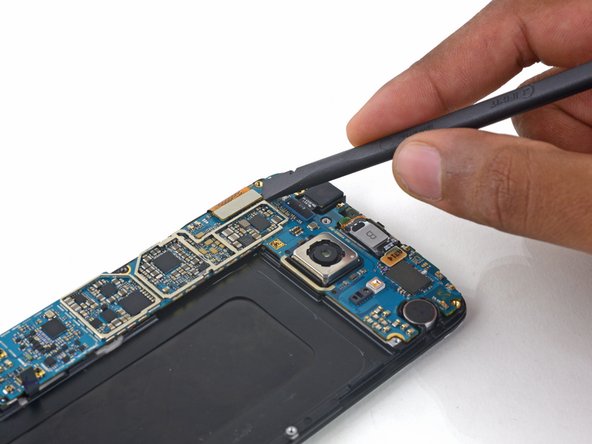
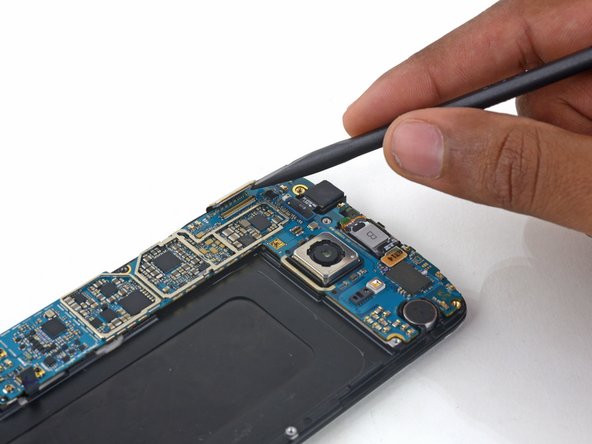
Avec l'extrémité plate d'une spatule, déconnectez le câble de l'écran de la carte mère.
No, after disconnecting the battery there’s no way for info to be moved from the memory, until it’s connected to a power source again.
-
-
-
Si votre vitre est méchamment fissurée, appliquez du ruban adhésif sur la vitre afin de maintenir les éclats de verre et de faciliter le retrait.
-
Faites chauffer l'iOpener.
-
Posez l'iOpener sur l'écran du S6. Après deux minutes, faites glisser l'iOpener sur l'autre moitié de l'écran.
-
-
-
Insérez un médiator dans le bord du téléphone du côté de la batterie, entre le châssis et l'écran, en l'orientant vers le haut.
in my own opinion, a better/easier method is to actually remove the battery after disconnecting all of the connections from the daughter/logic board, and if you slide a pick inbetween the plastic to where its visible where the battery originally was, you’re doing it correctly. if you can see it through the glass screen as if you were looking at your phone, you’re going between the LCD/Digitizer Assembly, and the Protective Glass Screen Overlay. If you’re removing the LCD/Digitizer/Glass Screen as a Whole, being able to see the pick through the battery compartment is a great, and easy way to know youre okay. This is a Great repair guide, but Repairs Universe on YT did an extremely thorough job on walking me through the replacement procedure and LCD&Digitzer removal.
Hi Josh,
I agree that having that visual cue is a very handy option. If you are also replacing the battery, this is a great option!
We opted not to suggest battery removal because of safety reasons. We recommend against re-installing used batteries. Any prying action or bend could have compromised the battery even if you can’t see it, and cause problems in the long term.
-
-
-
Faites glisser le médiator vers le bas, le long du bord de l'écran pour décoller l'adhésif en dessous.
-
Arrêtez lorsque que vous atteignez la carte fille pour éviter les boutons menu fragiles sous l'écran.
-
Après avoir séparé l'adhésif, laissez le médiator dans le bord de l'écran pour empêcher l'adhésif de ré-adhérer au châssis.
-
-
-
Insérez un médiator à environ 12mm en dessous du coin inférieur de l'écran, près de la prise jack.
-
Laissez le médiator sous l'écran afin d'éviter que le bouton ré-adhère à l'écran.
-
Si vous cassez les nappes ou les boutons menu, vous pouvez remplacer l'ensemble carte fille qui inclut de nouveaux boutons menu.
-
-
-
Utilisez un médiator pour écarter délicatement le côté batterie du châssis et l'écran.
-
Si l'écran et le châssis ne se séparent pas facilement, utilisez un médiator pour couper l'adhésif restant. Si vous avez du mal à couper l'adhésif, faites-le chauffer à l'aide d'un iOpener.
This should really be pointed out more than it is. I've gone through a few phones by destroying the IC. Of course if you're doing the repair without instructions it's no ones fault but your own. (guilty) But... This warning should be in BOLD and CAPPED with blinking lights and arrows.
-
-
-
Après avoir enlevé toutes les traces de colle et de verre du châssis, nettoyez les zones d'adhérence avec de l'alcool isopropylique à 90 % (ou plus) et un chiffon non pelucheux ou un filtre à café. Balayez dans une seule direction, pas dans les deux sens.
C'etait extrêmement difficile pour ma part.
It was extremely difficult for me.
-
-
-
Dévissez la seule vis cruciforme #00 de 3 mm fixant la carte fille au châssis de l'écran.
-
-
-
Insérez l'extrémité pointue de la spatule dans la rainure juste à côté de la nappe du bouton LED de droite.
-
Soulevez délicatement la nappe LED hors du châssis de l'écran.
I was transferring the daughterboard to a different frame. Flipped up the led cables and realized that the LEDs remained in the recessed area on the old frame. I thought these LEDs would peel off as a unit with the cables. It did not. Is this normal?
-
-
-
Avec l'extrémité pointue de la spatule, séparez la nappe du bouton home, du châssis de l'écran.
-


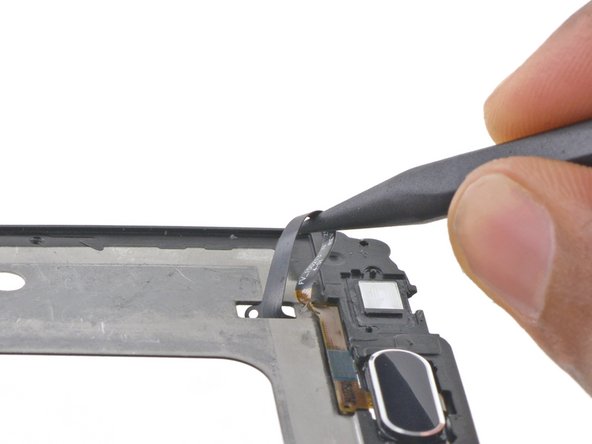
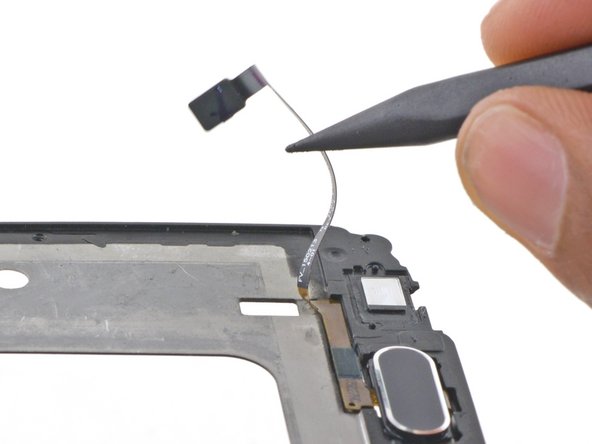


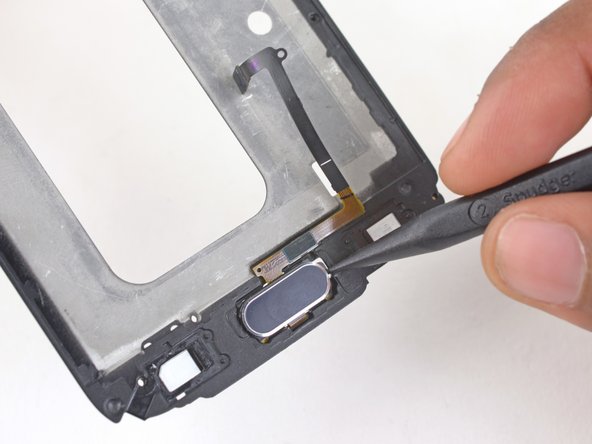


Pour remonter votre appareil, suivez ces instructions en sens inverse. Au moment de reposer la coque arrière, référez-vous au tutoriel de remplacement des bandes adhésives de la vitre arrière.
Pour remonter votre appareil, suivez ces instructions en sens inverse. Au moment de reposer la coque arrière, référez-vous au tutoriel de remplacement des bandes adhésives de la vitre arrière.
Annulation : je n'ai pas terminé ce tutoriel.
23 autres ont terminé cette réparation.
Merci à ces traducteurs :
90%

Claire Miesch nous aide à réparer le monde ! Vous voulez contribuer ?
Commencez à traduire ›

6 commentaires
So it's literally the last thing you remove on the entire stinking thing /facepalm
You forgot to mention how to enable the fingerprint sensor when you replace the home button. When you replace the home button the fingerprint sensor wont work. Not sure what Samsung does but it has to be a software flash to allow the new part to marry to the mother board. There are lots of how to articles and videos that are half assed and just give enough info to get you into trouble. Though I wouldnt pay Samsung $100 to replace a button, these facts should be included in the repair article. Im really surprised no one has the fix for this in the form of an APK. Ive seen lots of screen replacement videos and all are half assed that show you the wrong way to remove the screen digitizer. I ripped my home button and back buttons circuit because of idiots that post how to videos that skip these important steps. I wish I would have paid the extra $$ and had the local shop do my repair from the start. He told me that the sensor wont work after repair and so far he is correct.
I broke my display doing this :( I suggest you not to do it if you are not 100 % sure of yours skills.
These instructions are downright incorrect and dangerous! Going from the outside in with a pick like that is guaranteed to damage the LCD and separate it from the digitizer due to the way they are assembled. You should be using that little window in the plastic frame underneath where the battery was to start removing the plastic frame, and once that’s lifted up it’s safe to continue working around the outside.
It really needs to be stated at the outset that if doing this repair to replace the daughterboard, there is a high likelihood that the display will be destroyed (even if you don’t break the display, the foil backing on it will likely be destroyed rendering it unusable). The PDF version of this guide states this at the beginning, but this online version does not.
David White - Réponse
Done. Thanks for the tip!
Minor editor -