Introduction
Grâce à ce guide, vous pourrez retirer le clavier du Chromebook du boîtier arrière et exposer la batterie et la carte mère en dessous. Il peut être nécessaire de remplacer le clavier si plusieurs touches ne répondent pas, si le clavier dans son ensemble ne répond pas ou si la souris / le pavé tactile ne répond pas.
Ce dont vous avez besoin
-
-
Retournez le Chromebook de sorte que le bas soit orienté vers le haut.
-
Utilisez un tournevis cruciforme n ° 1 pour retirer les six vis de 6,6 mm en bas.
-
Utilisez un spudger pour retirer chacun des 4 pieds en caoutchouc.
-
Utilisez un tournevis cruciforme n ° 1 pour retirer les quatre vis supplémentaires sous les pieds en caoutchouc.
-
-
-
Retournez le Chromebook et ouvrez l'écran.
-
Calez l'outil d'ouverture en plastique entre le clavier et le bas du Chromebook.
-
Exécutez l'outil d'ouverture en plastique le long de la couture entre le clavier et le bas du Chromebook jusqu'à ce que le clavier se déplace librement. Plusieurs onglets apparaîtront.
-
-
-
-
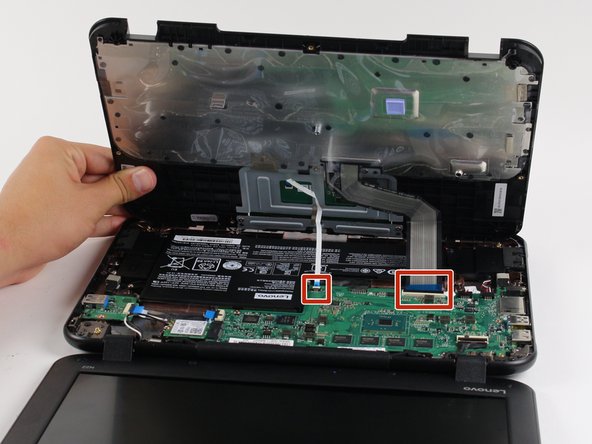
Soulevez le clavier et retirez-le du panneau arrière, exposant la carte mère et la batterie.
Hmmm. So I found that once I had got the keyboard section off the motherboard/battery section that there was a metal plate which was holding the keyboard in place. I found a YouTube video, White Angel I think, and showed how you could get the plate off to be able to replace the keyboard.
There are screws under the rubber pads on the bottom that need to be taken out as well. I fix these as a school where we literally have hundreds of these. There is no metal plate as described in the comment above. Rubber pads have letters and are not interchangeable with the other corners.
Ed, he's talking about the metal plate fastened to the keyboard once you remove the palm rest assembly. You’re referring to removing the initial external bottom screws.
White Angel shows us how to replace the keyboard in the assembly, which saves you about $20 in parts vs. buying another full palm rest assembly.
The only issue is that she pops the plastic tabs largely holding the metal plate in place- and never repairs them. So the keyboard looks nonfastened and gerry-rigged.
Might be worth spending the extra $20 for the full assembly in the long run.
Cheers
-


Pour remonter votre appareil, suivez ces instructions dans l'ordre inverse.
Pour remonter votre appareil, suivez ces instructions dans l'ordre inverse.
Annulation : je n'ai pas terminé ce tutoriel.
8 autres ont terminé cette réparation.
Merci à ces traducteurs :
100%
[deleted] nous aide à réparer le monde ! Vous voulez contribuer ?
Commencez à traduire ›
Équipe

Cal Poly, Team S21-G1, Livingston Spring 2017 Membre de l'équipe Cal Poly, Team S21-G1, Livingston Spring 2017
CPSU-LIVINGSTON-S17S21G1
4 membres
14 tutoriels rédigés
6 commentaires
I have this laptop. The top right corner of the keyboard has popped out. How do I fix this?
Try removing the rubber foot under the popped corner, remove the screw, push down on the corner and replace the screw while holding the corner down.
Just a note: the little rubber feet are all lettered (A-D) and you do need to match them to their proper corners when re-assembling.
I have several keys that have stopped working. Replace the keyboard or is there a fix?
This happen when the ribbon cable that connects the keyboard gets squashed too hard.
See [1] below for a decription and fix.
Jan -
Does this also work for the Lenovo n22 80S6?
There is also a screw under each of the 4 rubber feet that must be removed.
Aaron Kurtz - Réponse
Thank you for that little bit of important information. I almost torn apart the keyboard using too much force :)
Anthony Hillier -
@Aaron Kurtz, I just updated the guide. I’ll see if I can add any pictures later.
John Gillen - Réponse
I feel like i’m doing something wrong. It’s hard to get the new keyboard pushed in. Im afraid i’m going to break it.
Jenna Bowman - Réponse
I feel like I am doing something wrong. I got the keyboard off no problem. Put the replacement on and I feel like it’s going to break when I try to push it back in the frame.
Jenna Bowman - Réponse
You should update the guide. As Aaron Kurtz told long time ago there are screews under the feet. It is said in the comments, but not in the guide. I’m afraid somebody may break the keyboard…
Andreu Rigo Gost - Réponse