Introduction
Suivez ce tutoriel pour remplacer le disque dur de votre Xbox One X modèle 1787. Vous devrez réaliser ce remplacement si votre disque dur a cessé de fonctionner.
Éteignez puis débranchez votre console avant de commencer ce tutoriel. Veillez à suivre les recommandations anti-décharge électrostatique (ESD) pour réparer votre console.
Ces étapes décrivent seulement comment remplacer le disque dur. Vous pourriez avoir besoin de logiciel et outils additionnel pour que le disque dur fonctionne.
Ce dont vous avez besoin
Vidéo d'introduction
-
-
Utilisez une pincettes pour retirer l'autocollant dissimulant la vis située sur le côté droit de la face arrière de la console.
-
-
-
Utilisez un tournevis Torx T10 pour enlever les deux vis de 12,6 mm situées à l'arrière de la console.
-
-
-
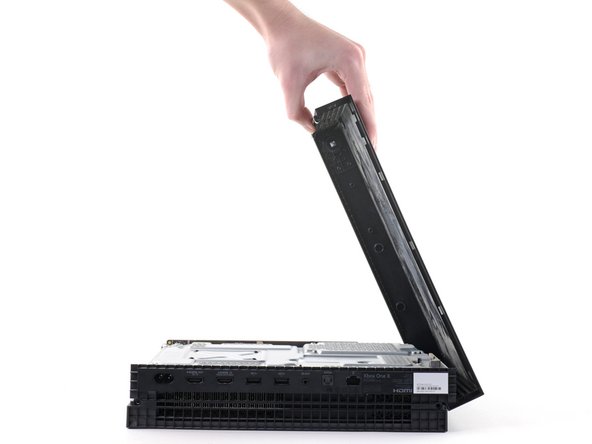
Retournez votre console de 90°.
-
Tirez sur l'avant du boîtier supérieur, horizontalement, vers la face avant de la console jusqu'à ce qu'il s'arrête. Cela fait coulisser les clips hors de leurs logements sur le boîtier plastique supérieur.
-
-
-
Faites pivoter votre console de 90° pour que l'arrière de la console soit face à vous.
-
Soulevez le côté gauche du boîtier supérieur (depuis l'arrière de votre console) en arrêtant quand le capot ne se lève pas plus.
-
-
-
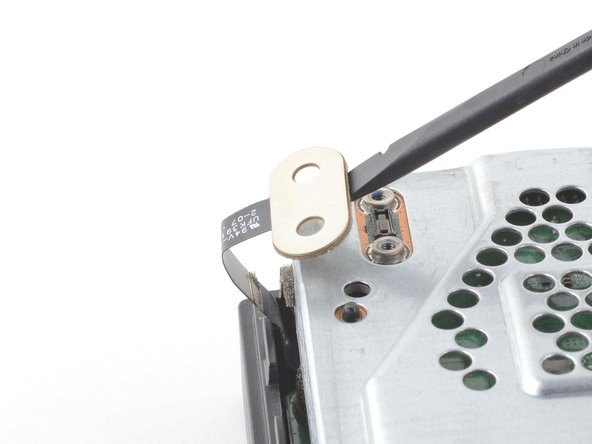
Avec le bout pointu d'une spatule, un outil pour ouvrir ou un ongle, basculez le petit loquet de verrouillage du connecteur ZIF, sur le circuit imprimé frontal.
-
-
-
Utilisez une pincette arrondie pour tirer la nappe vers le bas, hors de son connecteur.
What happens if I broke the connector to the ribbon cable ?
If you broke the cable, then one Wifi module would be broken.
Why we dont remove at first the 3 screws and lift the board a little bit, before removing the cable completely?
-
-
-
-
Avec un tournevis torx T8, retirez les trois vis de 13,3 mm qui fixent le circuit imprimé frontal au boîtier métallique supérieur.
How crucial and important is this step? I ovwrlooked it when doing this. Will this mess it all up?
-
-
-
Tirez le circuit imprimé frontal tout droit vers vous pour le détacher du boîtier métallique et laissez-le de côté.
During the reassembly process, I highly recommend that you reattach and lock the ribbon cable (steps 7 and 8) before you attach the circuit board. There is plenty of ribbon to work with, and once the circuit board is attached it is nearly impossible to get the ribbon flat and aligned and pushed up into the guide. Obviously be careful you don’t yank the ribbon as you maneuver the circuit board into place, but who’s not being careful while they are doing this?
-
-
-
Avec un tournevis torx T10, retirez les six vis de 47,7 mm qui maintiennent ensemble le boîtier métallique supérieur et le boîtier plastique inférieur.
-
Avec un tournevis torx T8, retirez les deux vis de 7,5 mm qui fixent le connecteur à emboîter au boîtier métallique.
Must remove power supply screws as well
Hi, this step only includes the screws needed to remove the lower metal case. Guides that require removing the power supply screws will have a step later on with instructions on which screws to remove.
Why we dont't remove the hard drive screws in this step, please?
-
-
-
Insérez le bout plat d'une spatule sous le connecteur à emboîter, du côté opposé à la nappe.
-
À l'aide de la spatule, soulevez le connecteur pour l'éloigner du boîtier métallique.
I need to know what it calls and I will purchase the one like press connector on the upper metal case.
-
-
-
Retournez la console.
-
Soulevez le boîtier plastique et mettez-le de côté.
I had a hard time getting the bottom case back on by trying to slide it over the console. It was easier for me to place the case on the table and guide the hardware into it. There are four holes just above the disc drive that are tricky to line up if you try to slip the case back on.
-
-
-
Retirez les deux vis Torx T10 qui maintiennent le boîtier métallique inférieur :
-
Une vis de 7,7 mm
-
Une vis de 11,4 mm
bei mir waren beide Schrauben identisch konnte sie auch komplett versenken
Evtl. fand vor mir schon ein Austausch statt
-
-
-
Soulevez le boîtier métallique inférieur pour le séparer du boîtier métallique supérieur et des composants internes.
-
Mettez de côté le boîtier métallique inférieur.
-
-
-
Retournez la console.
-
Utilisez un tournevis Torx T10 pour enlever les 4 vis de 11,4 mm, qui fixent le disque dur au châssis métallique de la console.
-
Puis, retournez une nouvelle fois votre console.
-
-
-
Soulever le lecteur de disque jusqu'à ce que la languette en métal se décroche du bloc d'alimentation.
-
Retournez le lecteur de disque et posez-le sur le bloc d'alimentation. Il devrait faire face aux côté opposé de son emplacement précédent.
-
-
-
Débranchez le faisceau de câbles qui relie le disque dur à la carte mère en le tirant vers le haut.
-
-
-
Débranchez le câble SATA qui relie le disque dur à la carte mère en le tirant vers le haut.
-
-
-
Soulevez le module du disque dur hors du boîtier métallique.
-
-
-
Retournez le disque dur pour que le support en plastique soit face vers le haut.
-
Utilisez un tournevis Torx T10 pour enlever les 4 vis de 8,6 mm qui fixent le support au disque dur.
-
-
-
Débranchez le connecteur du disque dur en le tirant parallèlement au côté long du disque dur.
-


Pour remonter votre appareil, suivez ces instructions dans l’ordre inverse.
Déposez vos déchets électroniques dans un centre de recyclage certifié.
La réparation ne s’est pas déroulée comme prévu ? Consultez nos conseils basiques de diagnostic ou la section Xbox One XForum pour obtenir de l’aide.
Pour remonter votre appareil, suivez ces instructions dans l’ordre inverse.
Déposez vos déchets électroniques dans un centre de recyclage certifié.
La réparation ne s’est pas déroulée comme prévu ? Consultez nos conseils basiques de diagnostic ou la section Xbox One XForum pour obtenir de l’aide.
Annulation : je n'ai pas terminé ce tutoriel.
100 autres ont terminé cette réparation.
Merci à ces traducteurs :
100%

Ces traducteurs nous aident réparer le monde ! Vous voulez contribuer ?
Commencez à traduire ›

20 commentaires
If I buy a new hard drive off of amazon, how do I install the Xbox OS back on? The offline usb?
The only way I found was to clone the disc sector-by-sector. I read online that you can expand it by making the “user content” partition larger.
Do an offline update for xbox one x. I posted a link in another comment.
Check out this video. It has a great step by step for putting the console into troubleshooting mode and downloading the correct software.
metric -
I read a post somewhere saying that if Microsoft detect non-standard hardware in your system you could be banned. Has anyone had any experience with this?
That was the case for the Xbox 360, these were very picky and only accepted certain models of Western Digital Hard Drives (if you didn't modify them with RGH/JTAG but then you would get banned if you tried to connect to Xbox Live).
The Xbox One is totally fine with other hard drives, I replaced my One X's HDD two years ago with a 2 TB Samsung 860 Evo SSD and had no problems, some people rather recommend using the SSD externally but IMHO it's worth the effort, because it also accelerates the Operating System drastically like in every PC/Mac (I don't want to use systems with the OS on an HDD anymore except some retro computers up to mid-2000s).
I didn’t remove the fragile connectors, that ribbon cable I just opened the lock and slowly slid out the ribbon cable, I finally just put it all back together it took me a day, I done it very slowly, I have a SSD in there, it’s blazing fast. After doing all that download OSU1, extract it and format your USB to NTFS, copy $systemupdate to the root of your NTFS formatted USB, the update will auto partition and script the hard drive, download OSU1 from Microsoft, specifically search for offline Xbox update, then good luck putting your Xbox back together. No need to run third part scripts anymore.
I have had no luck finding the xbox one x os im not sure if its general for all xbox ones or if there’s a specific one for each? Also I’ve had not luck finding a source for a link to the code to reformat the drive that I trust (except for the ifixit youtube video but that link is dead.) in summary I was wondering if there is a good source someone could lead me to?
This is the link for One X and One S models: https://support.xbox.com/en-US/help/hard...
The article says something about a different file for regular Xbox One. Idk what or where it is. But it’s on their site somewhere.
A couple of questions posted on installing the OS:
https://support.xbox.com/en-CA/help/hard...
*The download file is there too and you can see the link but you must right-click and save as. Regular left-click will not work.
This was exactly right. New Hard drive in, the trouble shooter auto-ran when the xbox was turned on. I installed the update from a formatted Flashdrive and it’s all up and running.
(Running a 2018 Xbox One X)
Good guide, thanks. There’s no need to unplug the sata cables from the main board, though, as there is enough play to reach the four screws holding the hdd to the plastic bracket.
Reinstalling the last part of the case can be tricky, the key is to locate the plastic lugs down one side of the base in their respective slots on the case. Once they’re in it all falls into place.
I purchased a 1 TB Samsung 870 QVO for my Xbox One X, I did not perform any formatting to the HDD prior to the install, it went straight from the packaging it came in and was installed in the console. I didn’t use any scripts or OSU files. I simply plugged the ethernet cable in and booted it up using the manual recovery button method. The Xbox immediately recognized the new SSD and automatically formatted and installed the OS. No special tools or hacks. The console is just like it was before just loads games a bit faster, I can play online, it updates when it needs to without hassle. Not sure why everyone is having such a hard time with finding so called software for the new hdd.
I had to download the software to a usb drive and install it manually. Not sure how yours automatically installed the new software.
metric -
I like to use the Powershell script from XFiX on this YouTube channel to do hard drive maintenance (format, partition, etc.) on the XBox Hard Drive. He also has some other helpful videos too.
Did you not read the last comment before yours? You don't need any of the formatting tools. Just stick the new drive in connect to the internet with Ethernet and when it boots up it will do all the work for you.
Honestly I am desperate, I tried to change with another SSD for my Xbox One X Scorpio Edition, which the original HDD is dead.
I purchased Kingston 480GB and another one Crucial 1TB, they didn't work and didn't start. Xbox One X is very weird, it don't want another any kind of SSD/HDD! Anyone experienced same way? Thanks in advance
The drive I ordered wasn't anything too special.
I followed the guide here and then the OS restore here.
XBox One X SSD Upgrade - LFC#268 - YouTube
Worked like a charm.
metric -
As much as I would want a faster SSD on mine, I'm not doing this one, if there's a risk of getting banned.