Introduction
Le module sans fil est un composant de la connectivité sans fil de la Wii U avec la manette de jeu. Ce guide vous montrera comment remplacer ce composant important de la Wii U.
Ce dont vous avez besoin
-
-
Le bas de la console tourné vers vous, retirez les 6 vis suivantes, cachées sous les autocollants carrés blancs:
-
Trois vis cruciformes Phillips #000 de 5,1 mm
-
Deux vis Tri-wing YO de 6,1 mm
-
Une vis Tri-Wing Y1 de 13,2 mm
-
-
-
Tournez la console de 180° de sorte que le dispositif de ventilation est en face de vous.
-
Retirez les deux vis cruciformes Phillips #00 de 7,1 mm.
Both screws are not “7.1mm” in length, only the one to the right is (center of the console’s side). The left one (towards the front of the console) is 5.1mm.
There’s a third screw to remove bottom-left corner of this picture. On step 9 it’s already been removed, and you need it to be removed in order to remove the metal casing in step 13.
-
-
-
A l'arrière de la console, soulevez et enlevez la coque supérieure.
The front portion of the side of the cover with the vents was kind of stuck on mine. There’s a little rubber piece in there that was the cause of this. But that same rubber piece also makes up the little handle-shaped nub that sticks out of the side there. (There’s also one at the back of the same side, but that one didn’t stick for me.) Lifting also using the little handle made it easy to remove the cover.
-
-
-
-
Tournez la console de sorte que la partie avant est en face de vous.
-
De chaque côté de la console, retirez la vis cruciforme #0 de 3,5 mm fixant le lecteur DVD à la façade avant.
My screw won't come out, and I feel as if my screw was screwed in too tight when they made the wii u, or the 3.5 #0 is too big. I have tried other screws and I think the screw might be done for because the metal is coming off of the top and deforming the shape. I am very lost and if anyone could help me, that would be amazing.
Those #0 screws might be tight and they’re easy to strip. Put some force on the screwdriver to make sure you start unscrewing them and not stripping them.
One of the screws started to deform instead of unscrewing. I used a bigger Philips screwdriver (size 1), added a rubberband between it and the screw and used more force to avoid stripping it more and make sure it would start unscrewing. It worked hopefully ! But I wasn’t sure it would.
-
-
-
Tournez la console de sorte que la façade avant est sur votre droite et que la nappe est visible.
-
La nappe est connectée au système par un loquet qui maintient la languette bleue. Relevez ce loquet pour le déverrouiller.
-
Soulevez la languette bleue pour débloquer la nappe.
There is a step to do before to "lift up on the blue tab in order to release the ribbon cable". We must lift up the connector who maintain the ribbon cable. By default, his position his locked and in order to unlock it, must put it in his top position.
-
-
-
Retirez les deux vis de montage cruciformes #0 de 4,6 mm de chaque côté du lecteur DVD.
-
-
-
Tournez la console de sorte que la fente DVD est visible.
-
Soulevez le lecteur DVD hors de la console et tournez-le vers la droite de façon à ce qu'il soit ouvert comme un livre.
-
Utilisez une spatule (spudger) pour déconnecter la nappe.
This step is not entirely clear on how to remove the ribbon cable with the spudger. It seems you need to pry up the black part.
-
-
-
Retirez le lecteur DVD.
-
-
-
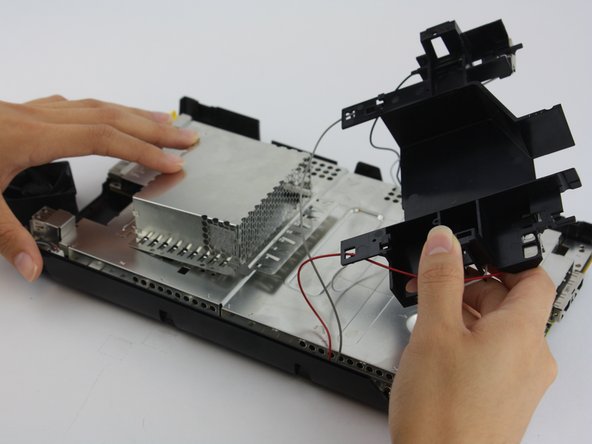
Retirez le blindage en plastique noir en dévissant les vis de connexion avec un tournevis cruciforme.
It would be nice to add indications on the location of those screws.
I agree with Pascal. I figured it out by taking my own pictures as I tore my unit apart. as I took each screw out I laid it beside the hole and took a picture when I was done. I also noticed that on the top shield look for arrows (put a screw here) and X (don’t put a screw here). It gets a little weird around those 4 standoffs that hold the disc drive. And by the way that standoff in the wrong place in the lower left in that first picture.
If the black plastic shielding is not coming off once all the screws holding it down have been removed, try pushing it in the direction of the ports, and then try pulling up once the shielding has moved.
-
-
-
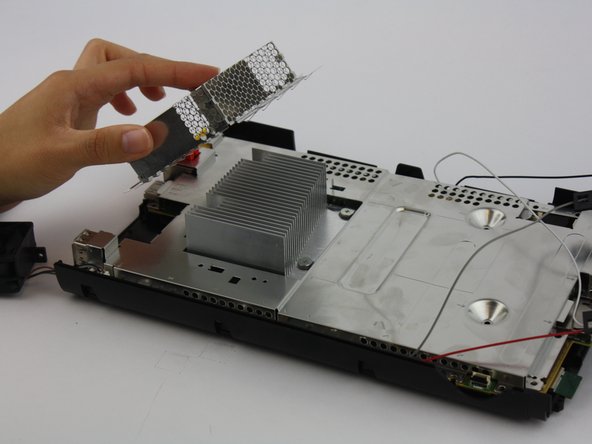
Le capuchon métallique ne nécessite pas de dévissage et doit se soulever facilement.
-
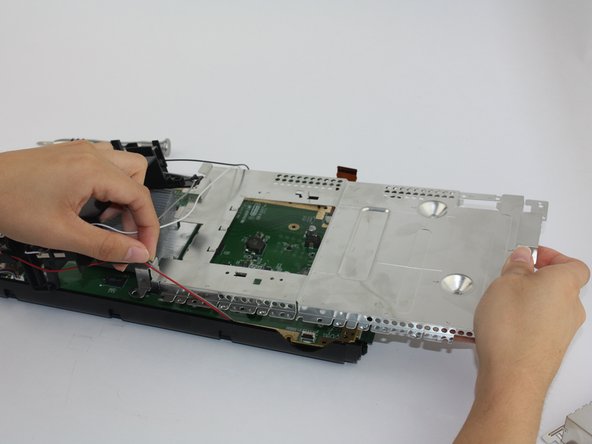
Dévissez toutes les vis qui délimitent le périmètre de la carte à l'aide d'un tournevis cruciforme (PH1).
-
Retirez la plaque de blindage argentée une fois toutes les vis retirées. Soyez prudent lorsque vous le tirez sous les câbles d'antenne fixés.
This omits the step of undoing the 4 screws around the heatsink. That has to be done or the bottom shielding won’t come off.
Yup, This step is pretty critical. If you don't have the solid base of it in the plastic makes it hard to keep control of the heat sink when you take it off outside. ended up slicing something off my mainboard. Not sure why this critical step is left out. Rip me I guess.
-
-
-
À ce stade, la carte mère devrait facilement se séparer du plateau inférieur.
From step 13 to 14, you also need to unscrew the 2 screws in the hollow areas in the middle of the metalicboard and the 4 screws around the metallic square that was under the metal cap. Otherwise the motherboard will stay stuck with the metal layer underneath. You might also need to remove the black plastic pieces around the motherboard and the metal layer to separate them.
-
-
-
Retournez la carte mère pour voir le dessous où se trouvent les modules sans fil de la Wii U. Le module Bluetooth est entouré en rouge.
-
Ce module est fixé avec un adhésif puissant, donc pour le retirer, vous devrez le remuer avec une légère force pendant quelques minutes.
-


Pour remonter votre appareil, suivez ces instructions dans l'ordre inverse.
Pour remonter votre appareil, suivez ces instructions dans l'ordre inverse.
Annulation : je n'ai pas terminé ce tutoriel.
4 autres ont terminé cette réparation.
Merci à ces traducteurs :
100%
[deleted] nous aide à réparer le monde ! Vous voulez contribuer ?
Commencez à traduire ›
Équipe

USF Tampa, Team 1-2, Leahy Spring 2016 Membre de l'équipe USF Tampa, Team 1-2, Leahy Spring 2016
USFT-LEAHY-S16S1G2
3 membres
12 tutoriels rédigés
14 commentaires
Where would be able to buy this replacement part? Anyone know?
I found on aliexpress
I actually just bought a secondary Wii U just to be sure I don't get a cheap part, it was like $65 with a credit on eBay
Which one of these is for the module for control pad?:
Broadcom BCM43237KMLG Wireless LAN module
Broadcom BCM43362KUB6 802.11n Wireless Module—the same one used in the Roku 2 XS
Broadcom BCM20702 Bluetooth 4.0
bcm43362kub6
Ok guys, I have a solution, after taking it to Nintendo (and them rejecting it just for having the Homebrew channel on the Wii emulator of my Wii U) and UbreakIfix (whom failed at fixing the Wii U even after I thought they should of been able to), I decided to take matters into my own hands, so I decided to repair it myself. I was not sure of the part and no one really states how they fixed it but I just want to share to all of you how I actually managed to fix it and what part it was because I was in those shoes beforehand. So before I started the repair I was about 95% sure the issue was the wireless 5ghz module because this site clearly stated on the replacement page for the 5ghz module that it was a component for wireless connectivity with the gamepad (Remplacement du module sans fil 5 Ghz du Nintendo Wii U), so once I took it to the UbreakIfix store they told me they could not repair it.
(continued below)
I thought they had not fixed this card because they just told me that they switched out the "Bluetooth" card and no other info, that lead me to believe that all they did was change out the 2.4ghz or Bluetooth module like the guide on this site (Remplacement du Module sans fil 2,4 GHz et module Bluetooth de la Nintendo Wii U). Since my console connected to normal controllers I was almost sure that was not the issue, so I was lost, nobody else could fix it, and all hope was gone, until I decided to repair it myself because, again, I almost knew it was the 5ghz card. So just because the parts are so hard to find and since I didn't want a cheap part, I just bought just a console alone off of ebay with a coupon I had (which was only $65 which is really cheap for a fully functional console) because my gamepad was fine.
so after getting the console the first thing I did was strip the part I needed the 5ghz card, but also grabbed the 2ghz module (the one with the Red and Grey wires connected to it) and took it out also just to keep it for later, so once the 5ghz was replaced, I noticed the console got the same error after pressing sync twice, I had nearly given up then. Just fooling around I tried the 2ghz card, and to my surprise, the issue was fixed! I couldn't believe it, the card that I never expected to be the issue, was the issue, not sure if many confuse the 2 for what purpose the serve in the console but I do know that it worked for me and will post it everywhere possible so everyone will know how to fix it. I'll even try to take pics but I hope this helps some of you!
Whoops wrong place, was trying to answer the guys question! lol
GamePad module is model: MIC-B2 (5GHz) (BCM43237KMLG).
WiFi module is model: WIN-A2 (2.4GHz) (BCM43362KUBG).
Bluetooth module is model: WIN-B2 (BCM20702).
WiFi module is model: MIC-B2 (2.4GHz) (BCM43237KMLG).
GamePad module is model: WIN-A2 (5GHz) (BCM43362KUBG).
Bluetooth module is model: WIN-B2 (BCM20702).
this guide was useful but it is wrong. The wifi card circled in this guide is not the 5ghz one . Salvador Mora is right but for the wrong reason , he believed he replaced the 2.4 ghz but in fact it was the 5ghz. The right one is the top one beside the bluetooth card with the red and gray antenna wires. If you are unsure you can verify the FCC ID of the components and check them on the FCC ID website . For example my 5ghz wifi card FCC ID number was EW4DWMW052 and if you check it on the FCC ID website https://fccid.io/EW4DWMW052 you can clearly see that it is a 5ghz wifi module . I just replaced mine and its fully working now ;) Just so you know The one circled in this guide is the 2.4ghz wifi module wich is for internet connection , the one i am talking about is the 5ghz wifi module wich is for the connection between the gamepad and the console and the one next to it , the one without any antenna is the bluetooth module and is for any bluetooth connection ex: pro controller
Al final que hizo cambió el mudulo de un control o solo cambio de posición
Sorry folks I got lost. What is the part number for the piece with the red and gray antenna wires??? Also IS this part on the game pad or the base console. Thanks for the help, I have a 10 year old daughter mourning the loss of her game pad, (and having to stand next to the console to get it to communicate. ) oh - where is the best place to purchase this component??
Buba Wyldemun.