Introduction
Faites des économies en remplaçant juste le panneau LCD au lieu de l'écran complet.
Ce dont vous avez besoin
-
-
Poussez avec les doigts les deux loquets de déverrouillage de la batterie et retirez celle-ci de l'ordinateur.
-
-
-
Retirez les trois vis identiques Phillips de 2 mm du capot de la mémoire.
-
Soulevez le capot suffisamment pour le saisir et retirez-le en le faisant glisser vers vous.
These screws are different from the rest, they should be kept separate from the others.
Concur, my screws were Phillips #0 as
-
-
-
Retirez les deux vis Phillips 2,8 mm situées près du loquet, dans le compartiment de la batterie.
These screws are different from the rest, they should be kept separate from the others.
Keep these two Philips screws separate. The screws are approximately 0.5mm shorter in length. When using one or two of the other longer screws in the battery compartment when reassembling, the lid will not open because the screw(s) do yam the lid button.
I had a logic board replaced by Apple (bad nVidia GPU), and believe it or not the Apple tech mixed up the screws. My latch did not work as good until I discovered and swapped the misplaced screws.
No believe it or not about it! I had same board replacement job done, and a screw was angled and crossthreaded, and the memory cover was hacked into place with insulating sheet lifted and crumpled.
I removed the memory here as you would normally if you were changing it.
-
-
-
Retirez les quatre vis Pillips 3,2 mm situées du même côté que les ports de l'ordinateur.
If you are using a muffin pan to keep removed parts separate (a method I recommend highly), note that Steps 5, 6, and 7 involve removing the same size screw—and thus you can put them all in the same pile. This is unlike just about every other part you will remove during this procedure.
Using shot glasses!
If you are a mac newbie like me take care when you reassemble not to insert a screw in the DVI display port screw holes (shame). I cannot manage to get it out anymore.
I did the same thing once, and eventually got it out. Try tweezers, a screwdriver, magnets, holding the MBP on its side so gravity is working with you, etc. Eventually the little bugger will come out, you just have to keep working at it.
RE: Misplaced Screws in the DVI port, I was upgrading an early 2008 MacBook Pro with an SSD to get some more life out it, and sure enough, misplaced one of these small screws into the DVI port upon reassembly. Screwdrivers, shaking, gravity... nothing worked. UNTIL I went to my dad's house and his super-comprehensive workbench, where he found a small, high-pull magnet and the little bugger flew right out. Refrigerator magnets won't cut it, you will need a more powerful magnet, such as these: http://www.kjmagnetics.com/products.asp?...
Hope this helps someone... it was an easy solution to a frustrating problem
-
-
-
Soulevez l'arrière du boîtier et à l'aide de vos doigts, libérez progressivement le boîtier par les côtés en allant de l'arrière vers l'avant. Une fois les côtés du boîtier libérés, vous devrez peut-être bouger le boîtier de bas en haut pour libérer la partie avant.
-
Quatre clips en plastique sont disposés au-dessus du logement du DVD et un autre au-dessus, à gauche du capteur infrarouge. Ces clips peuvent être très difficiles à désengager sans mouvement de levier. Ils peuvent également être difficiles à ré-engager lors du remontage.
The clips above the DVD slot (below the deck palm rest) are an absolute bear. They're hard to get released, and even harder to get back locked when you reassemble. (I've read to tilt the deck toward you when reassembling, inserting the front edge first, and press about an inch back from the edge to get all the front clips locked first before lowering the rest (back) of the deck.) No success for me yet, best of luck.
I thought these two videos did an excellent job of showing the technique of removing and replacing the drive.
MacBook Pro/PowerBook Keyboard Replacement (Part 1 of 3):
http://www.youtube.com/watch?v=jUonF9OSv...
MacBook Pro/PowerBook Keyboard Replacement (Part 3 of 3):
http://www.youtube.com/watch?v=JWeFXWXpp...
After watching that, I had the keyboard replaced in 2 minutes.
Chris -
the technique you describe of putting the front down first, is exactly what I did and it worked well
Those clips on the front edge are very challenging. I have a set of nylon pry tools that are for taking apart car dashboards without scratching the vinyl or plastic. I was able to get a long one in from the side and twist it which freed the clips without damaging the plastic on the upper case or the aluminum on the lower case.
Putting it back together presented another challenge. When I first re-assembled it I think I pushed too hard over the DVD slot and accidentally bent the metal down. I was able to bend it back up using a thicker part of those same nylon pry tools, and then i was able to get it snapped back down successfully. Had I known this would happen, I would have just put the nylon tool in the slot to reinforce the metal as I was snapping the case back down.
As everyone has said, the front clips by the DVD can be really tight. Use the spudger to pry the top and bottom halves apart. Slow work it in from one side to separate the top and bottom.
When reassembling the case, work the front clips by the DVD drive back in first. Once you slide them back in, the rest of the case fits easily.
I had a lot of trouble with getting those clips to lock in place again when reassembling. The way I eventually did it was to wedge something into the front of the CD/DVD slot so that I wouldn't warp the laptop casing. I used the end of a pen; when wedged in the tip of the pen was the right height to not support the casing above and below the CD/DVD slot and not allow it to warp.
I simply ensured the pen was aligned with one particular clip, lifted the laptop slightly, and squeezed the top and bottom edge of the laptop casing very firmly at that point. Each clip clicked in quite easily doing it this way. Just remember to move the pen (or whatever you are using) along to whichever clip you are clicking in.
You're on the right track David. But what works really good is something that gets more surface area contact than the pen--I carefully insert a stack of 3" square post-it notes about 3/8" into the slot. And because they're stacked, you can easily add/subtract post-its to get as tight a fit as possible. Then, assuming you have everything lined up, use quite a bit of downward pressure. You should hear a few snaps as the clips reseat.
Citation de David :
I had a lot of trouble with getting those clips to lock in place again when reassembling. The way I eventually did it was to wedge something into the front of the CD/DVD slot so that I wouldn't warp the laptop casing. I used the end of a pen; when wedged in the tip of the pen was the right height to not support the casing above and below the CD/DVD slot and not allow it to warp.
I simply ensured the pen was aligned with one particular clip, lifted the laptop slightly, and squeezed the top and bottom edge of the laptop casing very firmly at that point. Each clip clicked in quite easily doing it this way. Just remember to move the pen (or whatever you are using) along to whichever clip you are clicking in.
I would agree with everyone that the clips above the DVD drive are very temperamental. They came off easily for me but were a pain getting to clip back in place correctly.
Make sure you have the front clipped on securely before screwing the case back together otherwise the lid will not close properly.
I have taken apart quite a few laptops but this is my first Mac. This confirms my statements, to anyone that will listen, that these are the most "exquisite" machines ever produced. I just performed these HDD Replacement steps and with appropriate fear and trepidation popped the clips off. It would have been very helpful if someone had mentioned that they come straight up. I wasn't sure so I wiggled and (carefully) pried with the spudger until one of them went "POP". The credit card idea was helpful but my card was pretty soft so I didn't dare use it with too much force. When I got the top cover loose I just leaned it back against the screen so as not to take a chance on damaging the cable. Reassembly was according to the notes, but again the spudger was perfect if inserted into the drive slot (careful on the felt!) to support the base of the clips. Thanks to all for the notes. BTW; Prayer helps!
There is a fifth plastic clip between the IR sensor and the screw hole. (ie. 1 cm left of the IR sensor)
On the top of the case mark the center of each of the four clips that are over the CD slot and the one clip to the left of the latch with a pencil. When re-installing the top case apply pressure over the clip to the left of the latch until you hear a snap. For the four clips over the CD slot, upend the entire case. Then insert the flat end of the spudger into the CD slot under the center of each clip. Apply pressure from the top of the case while providing support with the spudger in the CD slot until the clip snaps in. This will minimize the chances of bending the CD slot which would prevent CDs from ejecting.
Take care reassembling new the DVD drive. It's easy to bend the top piece of metal down (the one that engages the clips) and your DVD can get stuck occasional ejecting. Very annoying. Maybe give it a little prophylactic bend upward. I placed a blunt letter opener in the slot and torqued it, while applying downward pressure from the top deck... This allowed the clips to engage nicely without bending this piece down.
i've used both of my inch nails, it works fine as well. no trouble to report.
i used a pry tool i had left over from replacing the screen on my iphone, any flat stiff item, like a credit card would work. watch the youtube video linked above, http://www.youtube.com/watch?v=jUonF9OSv..., skip ahead in the video to 4:57 where you see her use a pry tool. I had no problem separating and reassembling this section. Only issue i had was the two screws in the battery area. Only one of them would grab, so I left the other one out.
Here is an additional video showing how to remove the cables for both the left and right fans. At time 2:00 in the video he starts to work on the left fan. This video will help prevent you from attempting to detach the cables incorrectly.
I've opened these up many, many times, and by far the easiest method I have found to disengage the front clips is as follows:
Lift up the top case by the rear corners near the hinge, keep lifting so the top case is tilting towards you. You will feel some resistance, but keep lifting and you will hear the clips disengage with a 'snap'. Doing it this way should not bend the top case metal or loosen the spacing between the top case metal and plastic trim. The clips will not break, they will still engage when you put the top case back on.
It basically takes me 5 or 10 seconds to take off the top case now, and the case goes back on nice and tight as before.
YMMV and all that, but that's my experience.
Thank you for all the advance warnings, I had no issues with replacing the case. It just snapped into place with a little help from the spudger.
You're welcome! I was the one who added the spudger tips, as I had a devil of a time making the DVD drive clips snap back into place without one when I followed this guide.
Hello,
I didn't have much problems reassembling the MacBook. Thanks a lot!
For the hard reassembly part with the clips: I pushed quite hard with both thumbs directly over the place where the clips are. You need to figure out exactly where they are, but it worked well.
I repeat it to make it clear: I pushed from the top on the location under which the clip sat, with two thumbs after having checked that the lid was well in place.
My tools were one spudger and a basic tech toolkit from iFixit.
Thanks a lot!
-
-
-
Déconnectez la nappe pavé tactile/clavier de la carte mère, en enlevant la bande adhésive si nécessaire.
-
Retirez le boîtier supérieur.
If you does not have the spudger, use the Dremel to file a wooden piece
(Chinese stick maybe) to transform in a spatula. Works fine for me
Where can I get the cable from step 9 above?
just broke it!
That cable is attached to the upper case. It can be found here for the A1226 and here for the A1260.
To unplug the cable, pull the black connector straight up from the logic board.
I didn`t need to unplugged the cable to change the right fan. As Karen wrote above, it is for a fan to change not necessary.
I didn't look well before the plug connecting top case to motherboard (see my note in step 8). When it came time for assembly it took a while for me to figure out when the plug connected in the motherboard. Take care on step 8 so that YOU have to make the disconnection in step 9. Then reassembly on this step will be much easier.
Step 9, 2007 Mac Book Pro right fan replacement. It’s not necessary to disengage the keyboard ribbon, you can just tilt the upper shell back and support it against the screen. Be sure not to put tension on the ribbon and to check that the ribbon “plug” is seated securely on the base before reinstalling the top shell.
These instructions were really great. For $15 I got a used fan off eBay and a Torx T6 driver and Phillips 00 driver from the hardware store. Thanks also for the comment about marking where the plastic clips are by the DVD and IR slot with pencil. When reassembling I slotted a piece of wood (kebab skewer) into the DVD slot and pressed down on the pencil mark with the eraser end of the pencil.
My 10 year old MacBook Pro is going strong. Thanks for these very much. It was fun to do as well.
-
-
-
Déconnectez les deux ou trois câbles d'antennes attachés à la carte Airport Extreme. Selon votre modèle, un des trois câbles n'est pas utilisé et est recouvert d'une gaine isolante noire.
-
-
-
-
Maintenez l'écran d'une main pendant que vous dévissez les vis suivantes :
-
Une vis Torx T6 argentée de 9,5 mm, filetée sur seulement 3 mm de la tige, à l'intérieur des charnières de l'écran.
-
Une vis Torx T6 argentée de 9,5 mm, filetée sur toute la tige, à l'extérieur de la charnière gauche.
-
Une vis Torx T6 de 9,2 mm, entièrement filetée et fixant la boucle de terre de la nappe iSight au ventilateur.
For some reason I am having trouble removing the inside Torx screws on both display hinges (One 9.5 mm silver T6 Torx screw with threads on only 3 mm of the shaft on the inside of the display hinges). The screws are both loose and turn easily but they won't come out of the hinges. I've tried pulling on the display while rotating my Torx screwdriver counterclockwise but that won't work.
Has anybody else experienced this problem?
-
-
-
Dévissez les vis cruciformes de 4,5 mm aux coins inférieurs gauche et droit de l'écran (deux vis au total). La tête de ces vis est épaisse de 0,8 mm.
-
-
-
Insérez l'extrémité plate d'une spatule (spudger) entre la bande en plastique fixée à la coque arrière et le cache avant, perpendiculairement à la surface de l'écran.
-
La spatule étant toujours insérée, faites-la pivoter en l'éloignant de l'écran pour séparer la coque arrière et le cache avant.
-
Progressez le long du côté droit de l'écran jusqu'à ce que la coque arrière soit séparée du cache avant de façon uniforme.
-
-
-
Insérez l'extrémité plate d'une spatule dans l'intervalle entre la coque arrière de l'écran et le cache-charnière.
-
Faites pivoter la spatule pour séparer le bord inférieur de la coque arrière de l'écran et le cache charnière.
-
Progressez le long du bord inférieur de la coque arrière jusqu'à ce qu'il soit séparé du cache charnière de façon uniforme.
-
-
-
Soulevez légèrement le bord inférieur de l'écran et ôtez-le de la coque arrière de l'écran.
-
Vous trouverez le tutoriel pour continuer à remplacer l'écran ici : Remplacement du panneau LCD des MacBook Pro 15" Core 2 Duo modèles A1226 et A1260.
-
-
-
Décollez le grand morceau de bande adhésive noire, fixé sur l'écran LCD à côté loquets sur le bord supérieur de l'écran.
-
-
-
Veillez à ne pas endommager le clapet de retenue ZIF quand vous l'ouvrez avec la pointe d'un outil en plastique.
-
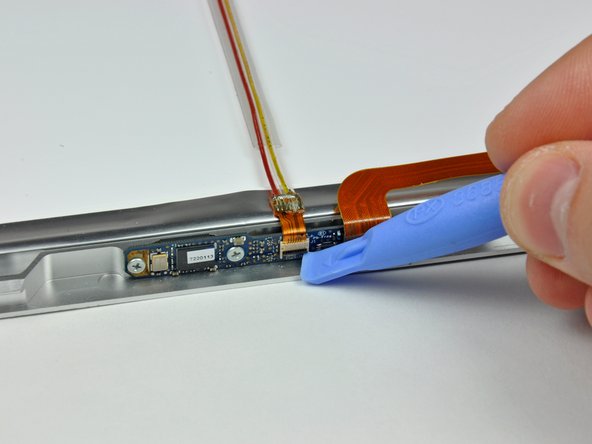
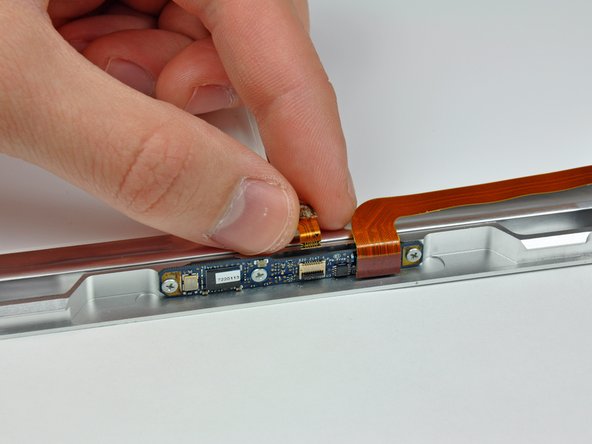
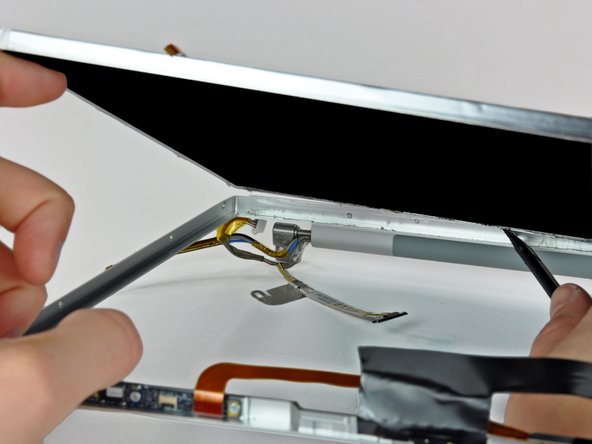
Tirez la nappe iSight hors de sa prise sur la carte caméra.
You are better off not unplugging the I sight ribbon cable but unscrew the remote board. unplug the cable that goes to the camera which is the cable next to it. The Isight cable is tough to get back in.
-
-
-
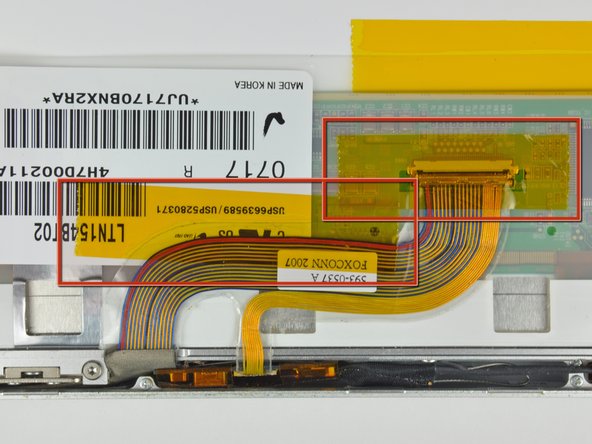
Une fois que vous avez fini avec le bord supérieur, éloignez délicatement l'écran LCD du cache avant. Vous devez avoir suffisamment de place pour faire levier sur la bande en acier le long du bord inférieur du LCD afin de l'enlever du cache avant.
-
Progressez le long du bord inférieur de l'écran LCD jusqu'à ce que la colle soit enlevée du cache avant.
-
Evitez d'écarter le bord du panneau LCD de l'écran. Veillez à insérez votre outil entre le métal du cache et le métal de l'écran LCD. Si la colle est très forte, passez plusieurs fois le long du bord inférieur pour éviter de faire trop pression.
Be warned: Indeed, very ""slightly"" lift the LCD out of the front bezel for just ""enough"" room to pry the steel strip along the lower edge of the LCD away from the front bezel. If you lift too much there is a chance you might bend and crack the fragile aluminum bezel sides close to the lower edge. It happened to me, the glue in the lower edge was strong enough to bend the sides. I was easily able to find an inexpensive replacement bezel, but had to impatiently wait almost 1 month to get it... so be careful... and tank's for these guides.
-
-
-
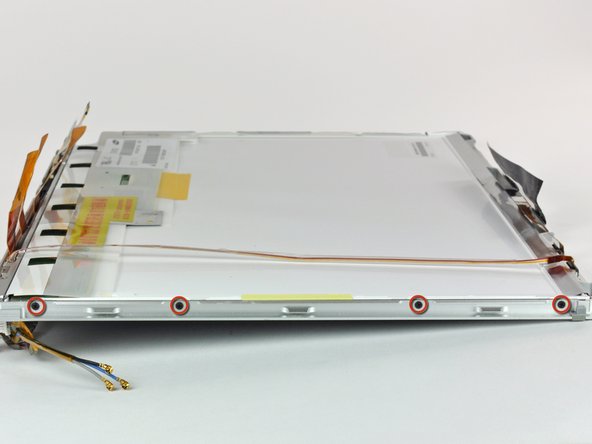
Ôtez l'écran LCD du cache avant en évitant que les nappes restent accrochées.
Warning, there is small magnet on right side of LCD. Do not forget to place it back with new LCD.
I accidentally removed it with old LCD, it sticked to it, and now MacBook do not sleep when closing lid. I need to reassemble it again.
Yes very important if it were not for his post the same fate would have been mine. This was a lot easier than I thought!
Citation de Vladimir Silantyev :
Warning, there is small magnet on right side of LCD. Do not forget to place it back with new LCD.
I accidentally removed it with old LCD, it sticked to it, and now MacBook do not sleep when closing lid. I need to reassemble it again.
I do not see the magnet, a photo would be nice.
Citation de Vladimir Silantyev :
Warning, there is small magnet on right side of LCD. Do not forget to place it back with new LCD.
I accidentally removed it with old LCD, it sticked to it, and now MacBook do not sleep when closing lid. I need to reassemble it again.
Citation de amccombs :
I do not see the magnet, a photo would be nice.
I was looking for a black magnet, but it is a small silver (like aluminium) piece that fits in the aluminium rim. long shaped and rounded.
My magnet was stuck in the frame. The longest step of this was 15 minutes looking under all the tape on the old LCD trying to find this mythical magnet stuck somewhere that I had no idea what it looked like.
I tried editing the wiki to add that the magnet was silver and oblong, and that it could be stuck in the frame. Does this require an admin of some sort to edit?
Very nice guide besides that, thanks!
Goodness, like many readers my longest step was looking for that unicorn magnet. I finally found it... In a perfectly shaped hole for it on the right side of the BEZEL. Not of the LCD. Ugh. Check there.
I also tried to edit in a sub-bullet and a photo that I snapped of my magnet to no avail.
It looks like my photo was eventually added! Hopefully that is/will be helpful to future users.
BeckyG -
Bonjour j'aimerai juste changer la nappe de l'écran comment faire ? Faut il enlever l'écran complet pour pour enlever la nappe je suis géné par la charnière et son cache. Merci pour votre réponse
-


Pour remonter votre ordinateur, suivez ces instructions en sens inverse.
Pour remonter votre ordinateur, suivez ces instructions en sens inverse.
Annulation : je n'ai pas terminé ce tutoriel.
139 autres ont terminé cette réparation.
Merci à ces traducteurs :
100%


Ces traducteurs nous aident réparer le monde ! Vous voulez contribuer ?
Commencez à traduire ›

7 commentaires
I didn't have any trouble getting this apart - I used a small screwdriver from a jewelry repair kit (the set of six super small screwdrivers). I slide it in on the left front where it was open and slid it towards the IR thing. After that clip opened up I just slid it over towards the DVD drive... presto. Will update when I put this back together in a couple days. This guide should warn in the beginning to keep the screws identified in some way or you'll have a %*^! of time putting it back together.
I didn't have a spudger handy, but I got by just fine using an old credit card. Don't use a current one, as I dented up the edges pretty good in the process.
I've disassembled many a pc laptop without instructions, but macs are special ;) it was very helpful to have all the details spelled out for me. Thanks!
Be very carefull and bee patience. It´s very helpfull to have something like the ifixit magnetic project mat to keep the screws in order, otherwise you will have a hard time to put the parts together.
I've had a strange problem putting the screen back into the computer. I was swapping out a damaged screen from another macbook pro and had tested both screens, cables, etc. and screen was coming on when machine was fired up. However, as I was also replacing the front screen bezel I also had to remove the front hinge clutch. Each time something happened when putting the screen clutch back on and firing up the computer. Every time I did this, with different cables, different combinations, I was left with a black screen. I would take it all apart again, switch cables, test the screen (working now) then put the cables back in, boot up and black screen again. I can't figure out what I have done wrong. Could I be triggering some current and shorting something when doing this? Dave
This is an easier repair if you buy a full lid assembly (they’re readily available on that popular auction site) rather than just the LCD panel. It’s not much more expensive, and you get to skip all of the nasty dealing with adhesives and the like. You only have to go to step 18, then swap in the new lid and go in reverse. In my case the lid of my MBP was badly damaged (not only was the screen broken but the entire lid was bent out of shape) so replacing the entire assembly was the obvious choice.
Before start, make a clone of your old HD into the new one, if you don't want to initiate a fresh copy. (Carbon Copy software is good).
ColmillodeChile - Réponse
Besides using WD 500GB models, are the WD 640GB and WD 750GB (the 9.5mm thickness model) good to go for? I am still considering as I have heard from other websites on the computer does not draw enough power to power up the 640 and 750 as it has the clicking sound and the rainbow keeps appearing. Anyone has install one before yet?
Please advice. Appreciated! Thanks a million to all the Mac gurus out there!
Danny Lim -
What is this about removing the PRAM battery causing a reinitialization of the HDD? For serious?
Adrian - Réponse
No, that's nonsense
max damage -
Wait, I misunderstood you. I thought the comment was directed at the PRAM battery removal page. Silly me.
Nevermind. Yes, it is always a good idea to backup one's data before doing stuff like this. I never do, and have never had any problems, but it's still a good idea.
Adrian - Réponse
The two screws removed in step 3 should not be mixed with screws in steps 5 through 7. Though similar, they are actually slightly shorter and have a bigger head. If you put the longer screws back in here when reassembling, the button to unlatch the top will not work properly.
Doug - Réponse
I think you may have commented on the wrong page. This page only has 3 steps, and the screws are removed in step 2, not 3.
(Remplacement de la RAM des MacBook Pro 15" Core 2 Duo, modèles A1226 et A1260)
Don - Réponse
I'm not sure how the user notes get attached to the various procedures here, but my comment does seem to show up properly when viewing the steps for Hard Drive Replacement. However, the number of the step may be off if viewed as part of another procedure.
Doug - Réponse