Introduction
Utilisez ce tutoriel pour remplacer l'ensemble vitre avant et vitre tactile sur un iPad 6.
Le capteur Touch ID du bouton home est couplé à la carte mère. Afin de conserver la fonctionnalité Touch ID, vous devez transférer le bouton home d'origine sur le nouveau panneau frontal.
Attention : soyez très attentifs lorsque vous isolez la batterie avec un bloqueur. Les contacts de la batterie sont fragiles et les abîmer peut entraîner des dommages irréversibles. Si vous choisissez de compléter le tutoriel sans isoler la batterie, évitez d'utiliser des outils métalliques sauf en cas de nécessité absolue (comme pour enlever des vis) pour éviter de court-circuiter la batterie et d'endommager les composants fragiles.
Ce dont vous avez besoin
-
-
Remplissez une casserole ou une poêle avec suffisamment d'eau pour immerger complètement un iOpener.
-
Faites chauffer l'eau jusqu'à ébullition. Puis éteignez le feu.
-
Placez un iOpener dans l'eau chaude pendant 2 à 3 minutes. Assurez-vous que l'iOpener est complètement immergé dans l'eau.
-
Utilisez des pinces pour extraire l'iOpener chauffé de l'eau chaude.
-
Séchez soigneusement l'iOpener avec une serviette.
-
Votre iOpener est prêt à être utilisé ! Si vous devez réchauffer l'iOpener, portez l'eau à ébullition, éteignez le feu et placez l'iOpener dans l'eau pendant 2 à 3 minutes.
-
-
-
Si la vitre de votre appareil est fêlée, pour éviter toute autre casse et de vous blesser, il est préférable de scotcher la vitre.
-
Utilisez du ruban adhésif transparent et appliquez-le sur la surface totale de l'écran de votre iPad.
-
Faites votre nécessaire pour suivre au mieux la suite du guide de démontage. Cependant, si la vitre est cassée, cela va s'empirer avec le démontage et il sera peut-être nécessaire d'utiliser un outil en métal pour faire levier et retirer complètement la vitre de l'iPad.
-
-
-
Tirez la poignée bleue vers l'arrière pour débloquer les bras de l'Anti-Clamp.
-
Posez votre iPad sur un objet, afin qu'il soit au même niveau que les ventouses.
-
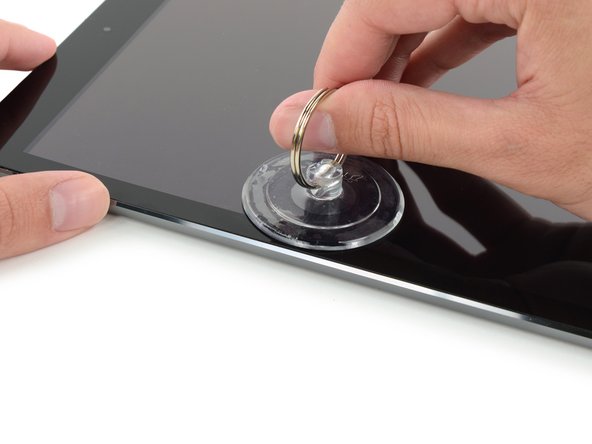
Positionnez les ventouses au milieu du côté gauche de l'iPad – une dessus, une dessous.
-
Tenez fermement le bas de l'Anti-Clamp et appuyez sur la ventouse supérieure pour que les deux adhèrent.
-
-
-
Tirez la poignée bleue vers l'avant pour bloquer les bras.
-
Tournez la poignée dans le sens des aiguilles d'une montre, de 360 degrés ou jusqu'à ce que les ventouses commencent à s'étirer.
-
Vérifiez que les ventouses restent bien alignées entre elles. Si elles commencent à se décaler, détachez-les pour les réaligner.
-
-
-
Attendez une minute pour que l'adhésif ait le temps de se détendre et d'ouvrir un espace.
-
Si votre écran iPad n'est plus assez chaud, vous pouvez réchauffer le bord gauche avec un sèche-cheveux.
-
Insérez un médiator sous l'écran lorsque l'Anti-Clamp a créé un espace suffisamment grand.
-
Sautez les deux étapes suivantes.
-
-
-
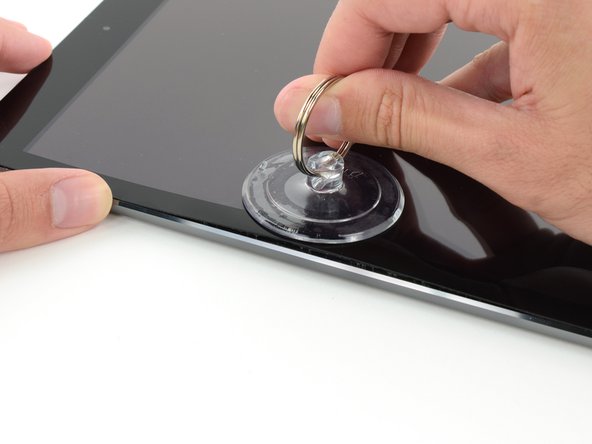
Placez soigneusement une ventouse au milieu de la partie chauffée.
-
Assurez-vous que la ventouse est bien à plat pour avoir la meilleure prise.
-
Tout en maintenant fermement l'iPad contre votre surface de travail, tirez progressivement sur la ventouse pour séparer le panneau frontal de la coque arrière.
-
-
-
Reprenez le premier médiator que vous aviez précédemment inséré et glissez-le vers le coin en haut de votre iPad.
-
Si vous pouvez voir le bout de votre médiator à travers le verre, pas de panique !! Tirez-le légèrement vers l'arrière. Normalement cela ne devrait pas avoir de conséquences, mais évitez autant que possible, car cela peut déposer de la colle sur l'écran LCD, qui sera difficile à enlever par la suite.
-
-
-
-
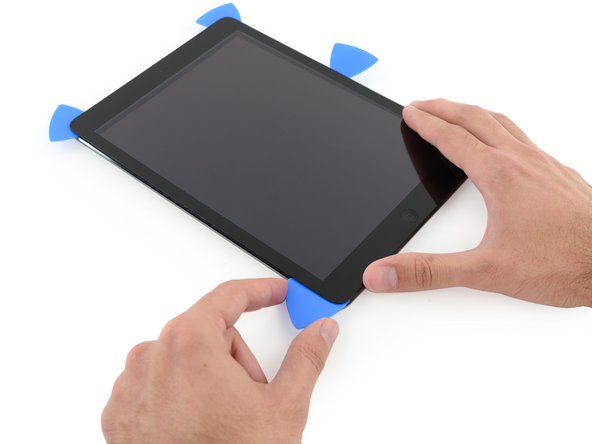
Déplacez le médiator situé en bas, à gauche, vers le coin de l'iPad, pour détacher l'adhésif.
-
Laissez le médiator en place, sur le coin. N'allez pas plus loin et ne le retirez pas.
-
Les prochaines étapes donneront les directives précises afin d'éviter d'endommager les composants. Ne chauffez et faites levier qu'aux endroits expressément indiqués.
-
-
-
Retirez les trois vis cruciformes #00 de 4,3 mm qui fixent l'écran LCD.
Both of the iPad 6th gen models i have seen so for (note they were cellular also) had the LCD secured with a grey silicone kind of adhesive in each corner under the screws. So you can’t just lift the LCD as you normally would after removing screws, it would break. I found you could pick at the corner closest to the rear camera easiest, slightly lift that corner and gently separate the other side next to the headphone jack. Then while supporting the LCD , lever the other end free with a up-and-down motion making slight progress each time.
On my iPad 6, there were small rubber tabs covering the two screws on the front camera side. I carefully held them out of place with tweezers while unscrewing the screws.
-
-
-
Utilisez la partie plate d'une spatule (spudger) pour soulever l'écran LCD hors de son emplacement juste assez pour que vous puissiez le saisir avec vos doigts. Il peut y avoir de la colle autour des trous de vis, qu'il faudra couper avec un couteau.
-
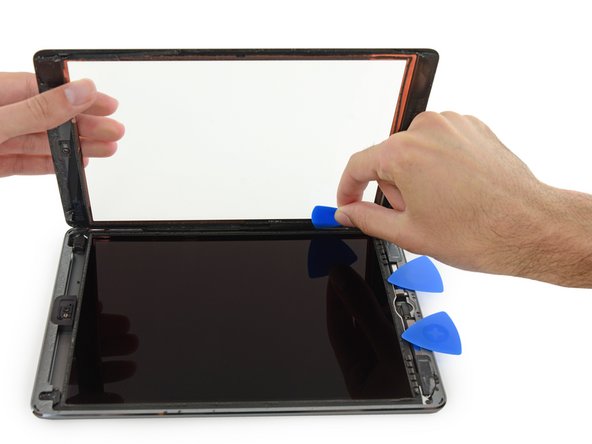
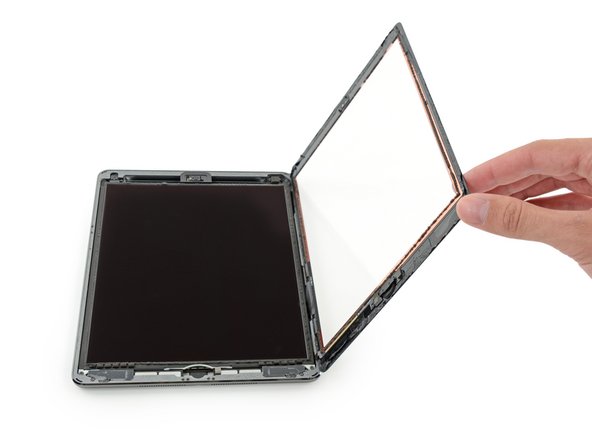
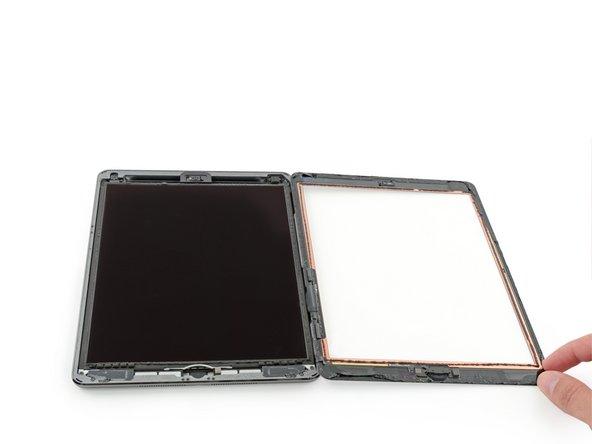
Retournez l'écran LCD comme la page d'un livre, en le soulevant au niveau de la caméra, puis en le faisant pivoter autour de l'axe du côté bouton home de la coque arrière.
-
Posez l'écran LCD sur sa face avant pour avoir accès à ses nappes.
When you replace the LCD be sure to make sure it is screwed in fully. It is easy not, especially on the cornet where the digitizer cables are. The LCD is very sensitive and if you bend it then it can stop working. I was just pressing the digitized in place at the end of a repair and the screen was covered in white lines.
I have no idea of what the logic board looks like !!!
-
-
-
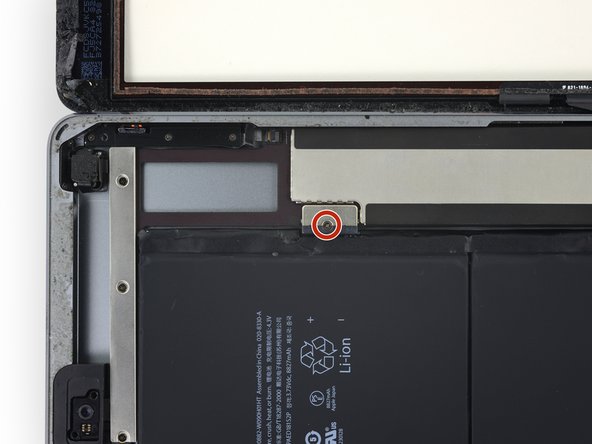
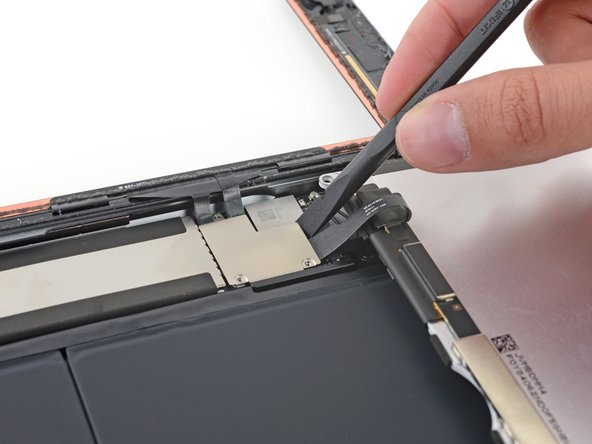
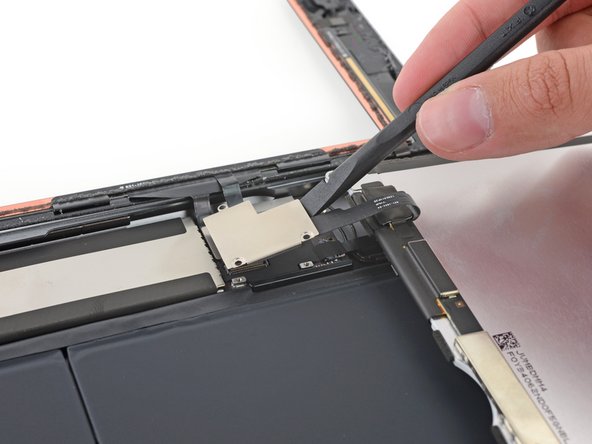
Retirez la vis cruciforme #000 de 2,3 mm qui fixe le connecteur de la batterie à la carte mère.
-
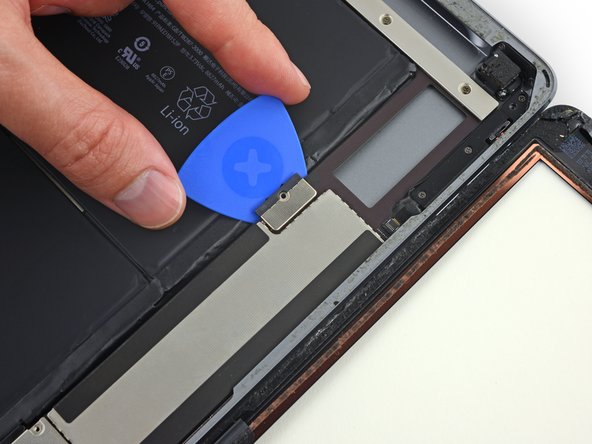
Faites glisser le médiator pour isoler la batterie sous le connecteur de la batterie de la carte mère, en l’inclinant à un angle de 35 degrés.
-
Laissez-le en place pendant que vous continuez votre réparation iPad.
If you insert a regular pick without a gap then you can damage this connector and will need a new motherboard. If in doubt just insert into the left corner enough to raise it a tiny bit. Arguably, if you are not sure, then it is safer just power off and don’t power back on until everything is fully connected. A photo of how this connector looks with its cover off would really help for people that have not seen this type of battery connector before. You just need to get it to lift a tiny bit, Do not try to slide anything under the contacts….
I bumped this darn thing several times, it was twisted and skewed making me freak out but the iPad still works. I am thinking you should pull it out and put the screw back in right after the LCD is removed. Then use it again just before putting the LCD screen back in. The pick is sticking out there waitng to be be bumped.
Hi Robin,
Unfortunately, there is no easy way to pull the battery connector out of the logic board. If you try to pry this connector off, you will irreparably damage it. The easiest solution is to insert the battery blocker in-between to cut the power.
The battery isolation pick or battery blocker is an outdated way of isolating the battery, as you risk damaging the battery pins underneath the logic board.
So what is the new method?
This is my question as well. Seems like this phrase contradicts the instructions. Confusing. Any reply?
We are currently working on a better isolation procedure! In the meantime, I’ve updated the warning to hopefully clarify the issue.
Why do you need to “To reduce the risk of a short”? There does not seem to by any risk of a “short” in this process. I can see other reasons for disconnecting the battery. I am an electrical engineer so I would appreciate a professional grade answer to this question.
I’ll give it a shot!
When you remove the screw, it doesn’t disconnect the battery, as the connector uses spring contacts to touch the battery pads.
If you leave the battery connected, it leaves the logic board energized. As there are many exposed traces and SMT components on the logic board, there is a chance that you accidentally bridge a trace with a metal tool, resulting damage. In addition, the display connector contains tiny pins, and the pinout is such that if you pry the connector from an energized logic board, there is a chance that a voltage rail pin may accidentally touch something it shouldn’t, blowing out the backlight circuitry.
My battery was dead when i did the repair. Did not really need to perform this step
Take a waterproof playing card, cut out the shape of the battery blocker and slide that under. Battery blocked and pins not at risk of damage. Got that from a YouTube video made by a microsolder repair tech fixing the damage caused by jamming a blocker in between the contacts.
Thanks for the tip Melody! I’ve updated the instructions to include the playing card method.
I could not for the life of me get the playing card in there, but my iPad was turned off, so I decided to ‘risk’ a short, instead of potentially damaging the battery connectors by jamming the card in there as hard as possible. My repair went fine, no short, however I realized AFTER closing everything up that I forgot to put the battery screw back in. Really hoping this doesn’t become an issue long term, because I don’t want to pry this brand new screen off just to put the battery in.
Let us know! I wasn't able to use the screw again after removing the battery blocker. Now my iPad turns off and on every so many minutes and when it restarts it's 1% and then shows actual charge.
When you come to screw this back together, do not overestimate how little force it takes to strip the thread on this #000 screw. I did, and I now I can't screw this back down and have the problem where the iPad restarts every 3 mins 20 sec after you turn it on due to a poor connection here. I've used card to pack this out so the LCD puts a little clamping force on the terminal once you screw it back in, but it's not really enough so the iPad still suddenly restarts occasionally.
I use a small screwdriver and pry underneath that brown bracket from the top edge by the camera (with the elongated metal cover removed of course) all the way before the battery, then lift up just enough for me to unhinged the battery out of the secure post. I don't know why Apple has to go through ALL THIS just to connect the battery since there is a small screw AND ADHESIVE securing it anyway. Nonetheless the whole job (replacing the lcd screen and battery was a major pain in the neck!
-
-
-
Retirez les trois vis cruciformes #000 de 1,4 mm du cache de la nappe de l'écran.
I believe these are also Phillips #00, not Phillips #000.
I lost a 1.4mm screw where can I buy these small screws and how big are they? 1.4mm x? flared or flat head
-
-
-
Enlevez l'adhésif qui recouvre le connecteur de la nappe du bouton home.
-
-
-
Utilisez le bout plat d'une spatule (spudger) pour lever le connecteur ZIF de la nappe du bouton home.
-
Retirez avec précaution la nappe du bouton home du connecteur ZIF.
I'm confused about the home flex cable connector required for the 6th generation iPad. It was my understanding that this model required an 18 pin connector. But these excellent pictures clearly show a 14 pin connector, just like the one for the first generation iPad Air AKA the iPad 5. I know this is not the primary focus of this guide, but can anyone clarify this for me?
I did the whole repair but this part is the problem HELP !!! I unlocked it but it took me 1 hour to carefully pull out the HOME BUTTON RIBBON CABLE. It finally came out with tweezers but now I CAN'T GET IT BACK IN and as a result my touch I.D. won't activate. It seems there was a tiny bit of black tape overlapping the connector on the ribbon which I carefully cut off exposing only the connector on the ribbon itself but how the heck does it slide in before you lock it. It seems easy on Youtube videos but mine just doesn't slide in with hand or with tweezers. OR in fact is there another connector that controls the TOUCH I.D. ???
Failed this step- broke the connector. If I try this again, I'd be inclined try to remove the home button from the front panel without unplugging it. Everything else seems to work fine.
-
-
-
Utilisez le bout plat de votre spatule ou bien votre ongle pour détacher avec précaution les connecteurs des deux nappes de la vitre tactile de leurs prises.
Where can I get a good used motherboard for a A1954 iPad 6 gen everywhere I look, there sold out ?...
-
-
-
Retirez avec précaution la nappe du bouton home de l'adhésif qui la fixe à la coque arrière.
If you can make sure to not pull on the home button side, i would leave out this step. i replaced two displays so far, on the first i removed it, but left it connected on the second attempt. worked like a charm
-
-
-
Enlevez le panneau frontal.
-
Si vous rencontrez des soucis d'appuis "fantômes" sur l'écran, ceci peut être résolu en ajoutant une fine couche de ruban adhésif isolant, comme de la bande polymide, sur les parties en rouge derrière du panneau. Les pièces iFixit sont initialement équipés d'une bande protectrice et ne requièrent pas de couche d'adhésif supplémentaire.
-
-
-
Commencez à décoller délicatement la nappe du bouton home à l'arrière du panneau frontal.
-
Continuez à décoller jusqu'à ce que vous atteigniez la protection métallique sur la nappe.
START using extreme caution at this point. This ribbon IS VERY FRAGILE, especially after the silver rectangle/shield. That gold piece is attached to the cable.
-
-
-
Décollez délicatement le contact métallique du support du bouton home.
So what exactly does this metal contact do? Can the HB work without that single gold contact?
Can anyone answer this question? The gold metal rectangle contact ripped off even horizontally with the rest of the home button cable. Do I need to order a whole new home button with cable? Or will I at least get functionality from the home button, only missing that little gold rectangle ?
PC Ops -
I ripped mine. Reattached the metal contact to the cable with some tape as best as I could. The button and touch ID work, so not sure if the metal contact is absolutely needed…? If it’s just for grounding?
EXTREME CAUTION!!! The little metal contact is very fragile. I ripped mine off. Well, when I say ripped I mean I breathed on it.
I would suggest maybe warming that part up before pulling and don’t just pull up from the main ribbon. Work it slowly.
CAUTION!!! that little gold contact got me too!! Please update the instructions to include this.
Did you find out if the home button still works without the rectangular gold contact?
PC Ops -
-
-
-
Utilisez un outil d'ouverture en plastique pour retirer le support du bouton home à l'arrière du panneau frontal.
-
Une fois que vous avez séparé un côté du support du bouton home, saisissez fermement le support et enlevez-le du panneau frontal.
I'd recommend using something stronger than double sided tape. I completed this whole repair without too much lasting trouble, but the biggest issue was I didn’t get the home bracket secured firmly enough. A few weeks after the repair, the home button got pressed in and lodged under the hole cut for it, so I can’t unlock my iPad at all (the home button can’t be “pressed” in its current state). So I’m ordering a second screen and have to go through everything again. This time I’m using super glue to get that thing welded on there. If anything breaks in the future, I’m just getting a new iPad.
I don’t see why iFixit does not simply sell an optional iPad screen with a new home button pre-installed - other competing companies do it, and with iFixit’s pro reputation, having a pre-installed option would certainly be an excellent sales option. My 2¢ worth.
The home button that came with your iPad is the only one that will allow touchID to function. This is why this must be migrated from the old to the new screen. Of course, if your iPad does not have touchID, this is not a concern.
Robert -
TIP FOR HOME BUTTON REMOVAL
I found it to be simpler by using the same pry tool shown in the image and pry the tab furthest from the flex cable. Its an easy start knowing that if you damage the cable you can loose Touch ID permanently.
My steps were basically as follows in this specific order:
1. Using a guitar pick, release the cable from the adhesive and SLOWLY lift up the cable and the components with it
2. Once you reach the tabs that hold the home button in place, pry the tab furthest from the flex cable (this requires a little more force)
3. Once the tab furthest from the home button is lifted away, you can hold on to the metal piece (The whole tab) and lift it away safely.
4. Using your finger, press in the home button to release it from the glass and your done.
After replacement m home button works fine, but it’s very loose in the housing. I can tip it around by moving my fingers to the edges. Any ideas what I did wrong?
I had to use far more pressure to remove the bracket than I was comfortable with and when it came loose it went flying. Re-attaching is easy, but I used some hobby glue to secure it in place, so if the screen breaks again, that part is NOT coming off again. I’m guessing because I did this I don’t have the “depressed” issues that others have described, it seems to be like new at this point.
I agree, the bracket needs glueing when refitting. Replaced the glass on my iPad and after a couple of days the home button came loose and stopped working. Now i just broke the glass when opening the iPad to fix the home button bracket. I love my life! :-)
I used a piece of the rectangular section of an adhesive strip cut to the exact size of the home button bracket feet to reattach it to the digitizer for reassembly. It is very strong and worked better than double sided tape or glue.
agree. I did same. Also do not forget to remove protective film from the inner side of the new digitizer. Do it before you start reassembly.
-
-
-
Appuyez sur le bouton home depuis le côté extérieur de la vitre tactile pour faire céder l'adhésif le tenant en place.
Are these last several steps necessary in just replacing the front glass panel that is cracked? my ipad is a wi-fi only
Yes, even if you’re only replacing the front glass panel, you still have to transfer your original home button from the old panel to the replacement. Even if the new panel comes with a new home button, Touch ID will only work with the original home button.
Buy an extra home button adhesive gasket. The adhesive from the original will not be reusable
I second this advice. I skipped it the first time, and the home button was too wiggly (although it worked). Now that I’ve replaced the screen a 2nd time (ugh), this time adding a new gasket, it’s a bit more firm, but still more wiggly than originally. If you don’t mind the button being lose, you probably can reuse the gasket, but if I have to do this again, I’ll probably get another gasket.
Yep, tore mine even as delicate as could be. I would highly recommend hitting the home button with a heat gun prior to attempting to remove. On the plus side, the replacement gaskets are cheap and easy enough to replace.
My screen was damaged in such a way that removing the old gasket didn't tell me how to install the new one.
I completed the reassembly of my digitizer. the process was pretty simple. After reviewing all the feedback and issues mentioned by others, I made sure to properly attach the home button/touch ID to my new screen by carefully installing it and ensuring the gasket was firmly in place. I used a small amount of liquid glue to secure the bracket as well. While everything is working correctly, I did notice that my repair kit came with a new bracket and home button gasket (with adhesive on the parts I used glue- I assume) lol. I clearly didn't utilize that… do you think I’ll be okay? I just hope I won't need to redo the whole process again just for the home button. 🤦🏻♀️ I don’t know how I missed that little baggie…
-
-
-
Retirez l'ensemble bouton home.
Nicely done!
Be very careful !!!!
Given the delicacy of this stage, I believe it behooves iFixit to offer a panel replacement option with a new Home button pre-installed.
Others do; with iFixit’s reputation, such a purchase option would be a welcome, stellar addition to its inventory. Yes, you would have to cancel your Touch-ID setting prior to repair, but that’s a small inconvenience to having to negotiate such a procedure. My 2¢ worth.
Thanks, iFixit, for the excellent instructions
I second this - tore the home button cable during disassembly and ordered another home button assembly just to figure out that I need the gasket and holder as well as it was not included. -
Yes - the metal contact on the home button tore… now I have to figure out how to do another repair. Also, my replacement screen comes with plastic on both sides and multiple tabs in different colors. Now I’m too scared to remove those for fear of ripping something.. you should have glass replace directions here too.
Hi sir
Iam try replace ditigizer on iPad 6th gen
Will my home button and finger print if I replace the home to another the home button will if I buy it from you guys
replaced the display with new home button assembly, new gasket, and holder - button works but fingerprint sensor not anymore - It would be great to have detailed instructions for the complete the home button assembly with all the different parts, not only the teardown for reference. - i.e. it seems you need to push the button through the gasket before assembly so the cable leaves inside and the order is glass-button-gasket-holder.
The article explicitly states that the Home Button and the Motherboard are a BONDED PAIR. If you replace one without the other, Touch ID will stop working. This is why the instruction say you have to retain the button.
While I’m a fairly tech savvy person, telling people to reverse the steps is ridiculous—you need to show people what to expect. Second, include the home button on the new screen sale. I’m in the middle of the repair at this point, I’ve given you $100 and this seriously frustrating, especially when the home button you sell (which I had to buy after the screen, because I inadvertently tore off a bit) DOESN”T include the proper adhesive. PS—trying to get the adhesive on the new button is a practice in torture.
I had to notch out the glass adhesive just slightly where bottom right corner of the home button bracket sits against it. It is curved and needed to be squared off to match the bracket. I held the ribbon cable, button and bracket in place with tape before I glued the bracket. I also used a flashlight behind the bracket and button gap to see that the bump on the bracket was lined up with the button’s switch.
I'm quite disappointed the fact that this is a replacement guide but does not include re-assembly steps.
We ordered a new home button and gasket for an iPad 5, which works with the iPad 6 home button as well.
Neither guide has re-assembly instructions for the home button.
My customer service is important and I would like to see better guides that include disassembly and reassembly steps.
I need to know how to properly apply a home button gasket to the home button.
If I am missing something, please let me know.
PS. It's not good practice to use metal tools so close to the main board. An insolated pair would be more ideal.
The small black dot on the home button microswitch comes off no matter how careful you are. Home button will not work properly if you loose the black dot. I have done 5-6 repairs and on 4 of them the black dot just fell off. I have been successful using a small piece of Kapton tape and reinstalling the black dot in the center of the home button microswitch.
I also removed a metal ring that sits between the gasket and the glass. It has the same shape of the gasket, and it’s glued to the glass after removing the home button assembly. Used a thin double-sided tape with strong glue when reassembling; maybe B7000 glue would be easier.
It's so frustrating seeing these guides that just say “follow these steps in the reverse order" when I'm really searching for a technique and guidance on replacing the rubber gasket and and proper placement of the bracket so it clicks as it should and doesn't sink in.
Agree with previous comments. Would be helpful to go over replacing the button gasket, and the actual reassembly instead of just ‘reverse order’.
it would be nice to see how to re assemble when to pull backing off glue, how to add grommet, how to bend new wires in place to seat correctly
Would I be able to use the new replacement home button as to go back to home page? Or is it just going to he for the decoration?
I needed 6 hours for
1) removing the cracked display glass with a scalpell,
2) to remove the glue with glue remover,
3) to install a new home button (because I cutted the homebutten flex-cable) and
4) to glue the touchdisplay (digitizer) with T7000 diplay glue!!!. The delivered glueband on the digitizer shouldn't be used, because it is to weak.
There is a HowTo missing to install a new home button. I also didn't found a new homebutton from iFixit. So I had to buy it somewere else.
-
Pour remonter votre appareil, suivez ces instructions dans l'ordre inverse.
Pour remonter votre appareil, suivez ces instructions dans l'ordre inverse.
Annulation : je n'ai pas terminé ce tutoriel.
180 autres ont terminé cette réparation.
Merci à ces traducteurs :
100%
Ces traducteurs nous aident réparer le monde ! Vous voulez contribuer ?
Commencez à traduire ›
46 commentaires
does the front panel of the ipad5 fit here?
The display connectors on the iPad 5 and iPad 6 are at different angles and not directly compatible with each other. We have not yet tried to force the connectors from an iPad 6 display onto an iPad 5 and vice versa to see what happened.
Hi ,
thank you very much for this howto.
i have one issue when I replaced the digitizer.
Everything is working fine but as soon as I put on the glass to the body I can hear some „brrrrrr“-Sound when i put my ear on the upper side towards the camera.
Maybe some contact issue with ground ?
Do anybody know what this could be or what i can double check?
thank you very much!
Will the ipad 6th gen still work with the apple pen after replacing the assembly?
The Apple pen should still work with a replacement assembly.
My biggest comment would be to double check the iPad glass to ensure there isn’t a backing film on it. I got mine all assembled to find out that there was a near invisible film on the inside of mine. Also it is important to note the importance of not touching the LCD screen and to use something like a camera lens cleaner/blower to touch this up right before you seal the iPad up. The packing tape/duct tape trick didn’t do much for me and pretty much made the suction cup unusable. Other than that, you had a very great guide! Thanks for the help!
Does the ipad air 2 front panel fit here?
Thanks for the guide. I was able to replace my wife’s shattered digitizer on her iPad 6th gen!
I tried using the heat pad that came with the tool kit. It was taking to long to heat the adhesive. So I got out my heat gun. That worked much better. The directions were very helpful.
Thanks..
The walkthrough was great, just wish there was an ending to walk through the reassembly. I was able to figure it out by back tracking the original instructions and had no issues. But would have been nice to have some straight forward steps. Thank you again!
Yes! I made it, probably one of the hardest renovations but this walk-through helped a lot!
Great guide. Thanks. Plan on spending a lot more time if your screen is shattered - took me many hours just to remove all the little shards. Covering it with packing tape definitely helped. It took a lot of reheating the iOpener (and I frequently reheated it at 15 seconds every few minutes without any problems).
My iOpener was not strong enough to open the screen but after reading about people using heatguns (which I had one lying around) I was able to open the case. - My screen was severely cracked which did not allow for a smooth working on the edges. - I finally got the screen off but damaged the home-button cable in the process - ordered a new one so repair is on hold until part arrives.
Has anyone had an issue with sections of the screen not responding to touch? I replaced the glass and everything seems to be working in terms of turning off and on; home button is fine; and most of the screen is functioning normally. But there are two bands that run through the screen (horizontally) where the touch screen won’t work. They just stay blank when you try and draw using an app. I haven’t been able to see anyone else having this issue and I’m not sure where/how to address it
Hi Adriane,
I think the dead bands are the result of the screen digitizer touching something conductive and shorting. Try this step and seeing if that helps.
the two long black strips with adhesive that touch the digitzer’s connection cables to the copper border of the digitizer needs to be stretched out to completely cover the portion of the digitizer that it is meant to cover. If you can see any exposed wire marking from this area you need to pull it out further to cover them.
I also found the iOpener ineffective: the aluminium frame of the iPad conducts the heat away too quickly.
Mine had super-strong adhesive. I used a larger-than-regulation suction cup, and when I pulled hard enough to separate the warmed-with-a-heat-gun adhesive, the digitiser shattered.
At this point I would have been better off, I think, abandoning the guide and just tearing off the digitiser in shards, working from the center outwards, and keeping just enough at the right edge to hinge up at step 30. By following the guide, I let sugar-grain sized shards onto the LCD, and wherever I slid a pick across them, I scratched the LCD. Once you get to an edge of the shattered digitiser, the adhesive tape is strong enough to pull up with pliers, with the glass shattering as you go.
Step 34: “There may be glue around the screw holes” — Hold your knife vertically. It’s all 4 screws, not just the top 2. In all cases, you need to cut 90 degrees or so worth of glue, on the sides of the screw closest to the edge of the iPad.
Completed after 10-15 reassemblies. I’d not have done it again. Problems I had include: 1. Ghosting. 2. Home button lose twice. 3. Home button failure. 4. Screen not setting properly. Advice A. Get the following: A1. Tape 3M for attaching screen properly, A2. Non conducting tape apply all copper sides on the digitalizer, I used a utility knife and a plastic ruler to cut it to size after applying. A3. Get the jewelry glue and secure home button bracket or reinforce, it will come lose easily.
I FIXED IT!!! But in all seriousness, the directions do need some modifications. Removing the home button cable—proceed with EXTREME CAUTION. And there needs to be some guidance (not 40+ steps) for going back and replacing the home button and the screen. I seriously felt like I was hung out to dry at that point.
I did NOT FixIt. I tried. I really tried. I managed to get a VERY cracked screen taken apart. But the reassembly should be better than, “Drop that baby in reverse!” I did get it back together and it looks clean and neat but it doesn’t work. The home button works but the digitizer itself does not allow input. I can’t input password nor can I shut off and restart. I took it apart again and made sure everything was connected and all the plastic peel offs were removed and still nothing. Very frustrating.
I should add that the guide and comments are excellent for disassembly.
Hi Aaron,
It is indeed terrible feeling when the repair does not go as planned. Does the screen work and light up? I would suggest looking carefully at the two digitizer connectors and their cables shown in this step. Even slight amounts of dirt/grease can cause problems. You may also have a short on the digitizer edge. Look over the perimeter shown in this step and make sure nothing is exposed.
That was crap. I want my money back. Taking apart the screen/home button’ was fine, but the lack of instructions for reinstalling the screen, caused me to crack the new screen due to the ribbon not sitting flush when closing it back up. Following the steps in reverse is grossly inadequate for this repair.
Hi James,
I’m sorry to hear of your experience! I’ll add an additional note in the step to look out for the connector. If you bought the part from us, please contact our customer support and we will work something out!
The guide is very complete and I was able to change the digitizer of the ipad. Only a couple of comments, first, the iopener did not help me, it cost me a lot to loosen the glue and I lost a lot of time, in the end I ended up using a hair dryer, it was more effective and practical. On the other hand, a part would be missing explaining how to start working with the new part, in my case with so much adhesive film I did not know where to start and I had to look for other videos on YouTube to know what to do.
After front panel removal (which is the hardest step…because a broken panel…is borken in thousands pieces and can’t be removed as easily as shown in this tutorial) all steps are really easy and clearly explained. Thank you for this tutorial which saved my iPad.
It is important also to take time to clean screen surface before closing / gluing front panel. I forgot this obvious step and dust is stucked between the two layers.
I purchased some very thin plastic credit card size pieces and trimmed them down to use for the shield from the logic board to battery.
This may work better for others as well, I used to use the trimmed guitar pic until a piece broke off and lodged under the logic board.
This turned an hour screen replacement into a 2 hour tear down and it increased the chances blowing fuses, ect.
Thank you for the valuable guide.
Paul
Of course, my screen break would be on that top-left-hand corner. Thankfully with some extra prying, I was able to get the left edge pried up and the glued-down glass dust pulled out without too much blood loss. The replacement screen had some weird insulating film on the flex cables and its own home button, but after removing all that and swapping in the old button, it slapped back together without any hassle!
My own retrospective thoughts - having recently pulled apart my old Samsung Galaxy S7 to do a motherboard swap and battery replacement, I thought I knew what to expect. This bad boy was NOT as simple or straightforward as all that. It’s a very good thing I followed EVERY WORD of this tutorial (including taking the extra care around the charging port, going off the left-hand edge first, working on opposite sides of the camera, investing in the microwavable heating pad and extra picks and tools…).
Hi my iPad 6th gen touchscreen has stopped working, I have done a factory reset, held power button and home button down and nothing has worked.the iPad starts up, home and volume buttons work, but not the touchscreen. If I replace the screen, and the digitiser will this solve the problem?
Unfortunately, I could not fix my Ipad 6. The heating pad took more like 10 minutes to soften the glue on the screen edges, not 1 minute, so it is a slow process. Using the razor blade to get things started worked very well. I then switched to the plastic tips. After removing the screen, I simply tightened the screws to the charging port, but after replacing the screen, the touchscreen no longer worked. It would be nice to have a video showing how to replace the adhesive strips and the screen. Since I had to guess, I assume I did something wrong for the touchscreen not to work. The tools are nice. I did use them successfully for a screen replacement on an HP laptop.
I placed the new button on the new screen but I not able to make it click how it should. What should I do?
Hi David!
The home button presses against the home button bracket in order to click. If your home button isn’t clicking, it may be that the bracket is slightly misaligned. Check the bracket alignment and try again. Another potential issue is that the adhesive you used to reattach the bracket is too thick and it’s bumping the bracket out of reach of the back of the button.
Why don’t you have the iPad 6 digitizer for sale in Australia?
Step44:
Does anyone have a tip for me how to get the touchscreen cables onto the front glass so that when I close it the full touch is still working? Because it seems to have an issue with the aluminium part that's a bit longer when I close the glass onto the tablet, and half the touch stops working.
Thank you!
The Guide is perfect, but i had some dificulty in the part of taking out the old front panel assembly. I don't know if it was because of the IOpener not heating enough, or the fact that the screen suction cup, didn't had enough grip, In the end i just destroy the front panel assembly carefully to not damage anything important, and clean the little screen parts that spread everywhere. Now that i instaled the new front Panel assembly, everything works fine, just the glue that hold the screen in th right bottom corner, sometimes just unglue it self, and the screen gets a bit outside of the case, but for that i solved by using a full cover case (with screen protector) .
Today I fixed the IPad6 front panel of my daughter successful. That was really hard as the glass was totally shattered! It took more than two hours to get rid of all glass item. Even the home button is working but I have a problem mounting the new front panel on the frame. On the right side where the data cable goes into the Ipad the Front glass still comes up. The tape isn't enought or the is some cable tension. Do you have some idea?
Thx.
Be careful with the protecting films - on both sides of the digitizer - and ribbon cable. You can use a hair dryer instead of a heat gun or iOpener.
I forget to remove the digitizer's ribbon cable-protecting sticker. It would be nice to have a brief instruction about the assembly.
sorry I'm repairing ipad 6 at step 45 of the guide you see a foamy adhesive in the red boxes I would like to know what type it is and where I can find it
thx
My screen was shattered in such a way that removing all of it was a huge project. Transferring the home button needed a little more direction than to put it back together the way it came apart. In the end I broke the connector so the home button doesn't work but everything else seems fine.
Hi, I have followed all the instructions in this guide with the correct iFixit tool and new digitizer and the IPad won't turn on or charge. I have tried recovery mode and left it to charge for a while. I didn't have any trouble with any of the steps, I used the battery blocker and the new digitizer fits perfectly with the home button. So everything has gone to plan - except that it won't turn on. Any recommendations on troubleshooting here?
I took it apart and put it back together again and it works now. Thanks so much for this guide!
Thank you!!! Repair worked perfectly, you guys rock! #righttorepair


