Introduction
Si votre trackpad est cassé ou que vous devez le démonter pour accéder plus facilement à la batterie, suivez ces étapes.
Pour votre sécurité, laissez la batterie de votre MacBook Pro se vider en dessous de 25 % avant de vous lancer. Une batterie lithium-ion chargée peut déclencher un incendie dangereux et incontrôlable si on la perce accidentellement.
Ce dont vous avez besoin
-
-
Allumez votre Mac et lancez Terminal.
-
Copiez-collez ou tapez la commande suivante dans Terminal :
-
sudo nvram AutoBoot=%00
-
Cliquez sur la touche [return]. Si nécessaire, saisissez votre mot de passe d'admin et cliquez sur la touche [return]. Remarque : il est possible que cette touche porte le symbole ⏎ ou l'inscription "enter".
-
sudo nvram AutoBoot=%03
-
-
-
Prenez un tournevis Pentalobe P5 pour dévisser les six vis qui fixent le boîtier inférieur :
-
Deux vis de 6,2 mm
-
Quatre vis de 3,4 mm
-
-
-
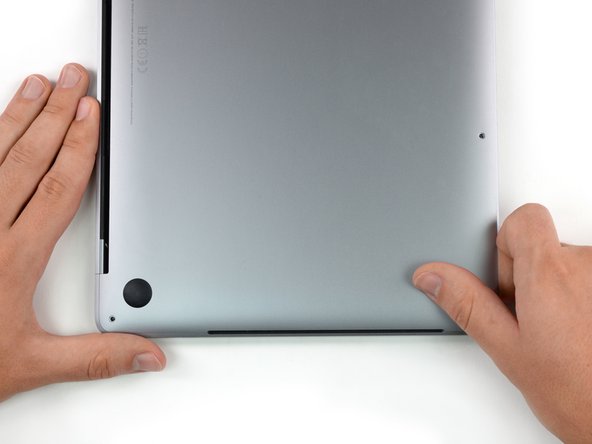
Posez une ventouse sur le boîtier inférieur, au milieu du bord avant du MacBook Pro.
-
Soulevez la ventouse pour ouvrir un léger interstice entre le boîtier inférieur et le châssis.
-
-
-
Insérez le coin d'un médiator dans l'interstice créé entre le boîtier inférieur et le châssis.
-
Faites glisser l'outil le long du coin le plus proche, puis continuez jusqu'au milieu du côté du boîtier.
-
-
-
Répétez l'étape précédente du côté opposé : faites glisser votre médiator sous le boîtier, puis remontez le long du côté pour détacher le deuxième clip.
Recommend being very careful on this step and the following step when using any opening tool to always keep the “pointy end” up when prying, especially about 40mm up the side, to avoid completely destroying the speaker diaphragms.
-
-
-
Insérez votre médiator encore une fois sous le bord avant du boîtier inférieur, à côté d'un des trous de vis du milieu.
-
D'un mouvement ferme, faites pivoter le médiator pour ouvrir le troisième clip qui fixe le boîtier inférieur au châssis.
-
Répétez la procédure pour détacher le quatrième clip à côté de l'autre trou de vis du milieu.
-
-
-
Tirez fermement le boîtier inférieur vers l'avant du MacBook (éloignez-le de la charnière) afin d'ouvrir le dernier des clips.
-
Tirez d'abord d'un côté, puis de l'autre.
-
-
-
Retirez le boîtier inférieur.
-
Posez-le à sa place et alignez les clips coulissants du côté de la charnière. Appuyez et faites glisser le boîtier vers la charnière. Quand les clips s'enclenchent, vous ne pouvez plus aller au-delà.
-
Si ces clips sont bien accrochés et que le boîtier inférieur semble aligné correctement, appuyez fermement dessus pour enclencher les quatre clips cachés en dessous. Vous devriez sentir et entendre le clic des clips qui s'enclenchent.
-
-
-
-
Décollez soigneusement le gros morceau de ruban adhésif qui recouvre le connecteur de la batterie, du côté de la carte mère le plus proche de la batterie.
-
Ôtez le ruban adhésif.
-
-
-
Prenez la pointe d'une spatule (spudger) pour retourner le petit clapet qui maintient la nappe dans sa prise.
Be very careful here. It is easy to break the whole connector off the battery board, which is what I did. Luckily the connector is part of the replacement battery, so you just need to remove the connector from the cable. The pictures here should provide more detail so you can see better what is going on.
thanks a lot !!!!! great help :)
-
-
-
Débranchez la nappe de données de la puce de la batterie en la faisant glisser hors de sa prise.
-
Tirez dessus parallèlement à la carte mère, dans la direction de la nappe.
As simple as this step might seem, the golden leads will disapper the moment you remove it as it has some adhesive under the black strip that covers it. Ensure you peel it back enough to display the golden leads after swapping the batteries out.
Your battery may come with this ribbon cable. In that case, disconnect the other end.
-
-
-
Repliez la nappe de données de la puce de la batterie de côté.
-
-
-
Avec une spatule, soulevez délicatement le connecteur d'alimentation de la batterie pour débrancher celle-ci.
-
Soulevez le connecteur suffisamment haut pour qu'il reste séparé de sa prise. S'il faisait accidentellement contact lors de votre réparation, cela pourrait endommager votre MacBook Pro.
To completely avoid accidental contacts I recommend to wrap this connector in a piece of paper and hold it in place with tape.
Do not put tape directly on the contact underside, as that may leave some glue that would affect the contact conductivity.
I put a piece of tape on the underside of the connector (sticky side up) to insure against accidental battery contact. If you put tape on the logic board side of the connection, some insulating padding material might accidentally stick to the tape when the tape is removed during reassembly.
-
-
-
Prenez un tournevis Torx T3 pour dévisser les deux vis de 1,8 mm qui fixent le cache du connecteur de la nappe du trackpad.
-
-
-
Faites délicatement levier avec une spatule sur la nappe du trackpad pour la débrancher de sa prise sur la carte mère.
-
-
-
Préparez un iOpener et posez-le sur la nappe du pavé tactile pendant environ une minute, afin de ramollir l'adhésif qui la fixe à la batterie.
-
Si vous n'avez pas d'iOpener, prenez un sèche-cheveux pour faire chauffer la nappe. Celle-ci doit être chaude, mais pas brûlante au toucher. Faites attention à ne pas surchauffer la batterie.
-
-
-
Décollez soigneusement la nappe du pavé tactile de la batterie et repliez-la de côté.
-
-
-
Servez-vous d'un tournevis Torx T5 pour détacher les dix vis qui fixent le bloc trackpad :
-
Deux vis de 4,3 mm
-
Huit vis de 5,8 mm
Heating the wrist-pad area and carefully using a plastic card to separate the adhesive allowed me to remove the battery without needing to use the solvent or removing the track-pad. No need for taping the speakers.
I attempted as well the shortcut with no solvent and no track-pad removal. Also, I didn't apply heating. Everything was totally fine yet a bit risky. In such conditions it is very hard not using the spudger flat tip to lift the battery packs. Well, I highly recommend NOT using the spudger on the two central packs. In fact, it would be extremely easy to destroy surface mounted components on the track-pad board which would be accessible through the metal frame holes under the packs (see pics along this guide). Plastic cards are always fine. Next time, I would probably avoid spudger and introduce floss as shown in Picture 34 below.
bc_ -
-
-
-
Ôtez le bloc trackpad.
-
Assurez-vous de ne pas perdre les six petites rondelles (deux rondes et quatre rectangulaires) qui se trouvent sous le trackpad.
Should include instruction to wedge thin paper one every side of the trackpad to keep it aligned during reinstallation. Without the wedges, the trackpad would come out misaligned, which might damage it from excessive friction. Kapton tape might also work, didn't try it though.
These instructions were standard for Unibody models in the past, don't know why it wasn't included here.
-


Comparez votre pièce de remplacement à la pièce d'origine. Il vous faudra peut-être transférer d'éventuels composants restants ou retirer des films adhésifs de la nouvelle pièce avant de commencer le remontage.
Pour remonter votre appareil, suivez ces instructions en sens inverse.
Déposez vos déchets électroniques dans un centre de recyclage certifié.
La réparation ne s’est pas déroulée comme prévu ? Consultez nos conseils basiques de diagnostic ou notre Forum pour obtenir de l’aide.
Annulation : je n'ai pas terminé ce tutoriel.
4 autres ont terminé cette réparation.
Merci à ces traducteurs :
100%


Ces traducteurs nous aident réparer le monde ! Vous voulez contribuer ?
Commencez à traduire ›

2 commentaires
How is the trackpad cable removed? is it simply adhesive or solder?
Is this step necessary? I can’t perform this step as I am attempting to repair water damage and need to remove logic board & most likely replace the battery.
Macrepair SF - Réponse
@mac_medic You definitely don’t want the power coming on while the board is wet. In your case, I think powering on the machine to disable Auto Boot would do more damage than it prevents. I agree, skip this step and be prepared to disconnect the battery quickly if the laptop automatically powers on. Good luck!
Jeff Suovanen -
Thats right! You don't want power running while working on your logic board.
Dan -
This did not work when running High Sierra.
Kyle B - Réponse
Tried this on a 2018 MBP 13” Touchbar (there’s no iFixit guide for this model yet). Need to replace a broken screen.
Luckily I managed to connect to an external screen (Cmd-Down Brightness to switch displays) and enter above command. Seems to work, but there’s another problem with this model - it powers up as soon as any key is pressed……. ffs <gnashes teeth>
Cool_Breeze - Réponse
I unscrew the battery first and wrap electrical tape over the logic board battery connector before attempting any repairs to the board. Haven’t had any problems yet and I’ve worked on about 10 of these models already. Also when you open the bottom case use a suction cup at the bottom and pull up then run a plastic spudger along the edges to disconnect the clips. Also only use a plastic spudger on the board. Saw a youtube video from a repair shop and he did not disconnect the power and used all metal tools during the entire process of removing the board. His last step was to disconnect the battery terminal.
Brian - Réponse
Is this step necessary if my mac can turn on? Battery fully dead(
Nursat b - Réponse
BEFORE YOU START: The included torx head stripped off before I was done (and you might need an additional T4) so stop now and go buy a good one. Also they fail to warn you above to get some blue threadlocker ahead of time.
Jason Sherron - Réponse
This command did not work for me and I read that sometime in later 2020 Apple stopped this command from working…any ideas on a work around?
Patrick Machacek - Réponse
Not able to do that with damaged screen
richardjgreen - Réponse
If you have a damaged screen you can still use a converter from thunderbolt (USB 3) to HDMI and plug your Macbook Pro to your TV as monitor display. Just make sure to chose the right Source (HDMI IN) in your TV. I did it and to make it work I unplug and plug again in my Macbook and so I could disable the Auto boot
Roberto Sanchez Bustos -
Hi. This does not work on 2018 13” MacBook Pro with Touch Bar. I did exactly this to disable auto boot. But when I check by using nvram -p it says: auto-boot true. Am I doing something incorrectly? I did everything step by step. Copied and pasted the sudo command, pressed enter and then entered my password. I have Big Sur 11.1 installed. Is there any other way since I need to replace the screen. Thank you. Adrian
Adrian Vizik - Réponse
Hi everyone. This is also a little pointless if you can’t see anything on the screen, and you don’t have a display adapter to USB C to display it. I agree with Brian about removing the back and disconnecting the battery cable before you even think about opening the lid of the MacBook. Applying the insulation tape is also a handy little tip that just makes sure there is no way to discharge from either the board or battery.
Roberto Enrieu - Réponse
running `nvram -p | grep 'AutoBoot'` in terminal verifies that it was accepted
result: `AutoBoot %00`
Marek Polák - Réponse
Running Big Sur 11.6.7 on a 2019 16" MBP, it's "auto-boot". So it's:
nvram -p | grep 'auto-boot'to display the current state, the default istrue- and then to change it,sudo nvram auto-boot=falsewhich turns it off.Ed Mechem -
This step is completely unnecessary if you follow the guide to disconnect the battery properly. Just put some tape between the battery and logic board connection to prevent it from accidentally touching and therefore powering on the laptop.
Grant Ormsby - Réponse
It took me a few tries to make this command work, as I was able to copy and paste the command into Terminal, but could not type in my laptop’s password. I finally typed my password into a text document, copied it (command C), and then pasted it into Terminal and it worked.
tommy404 - Réponse
I didn’t do this. Mine never auto-booted before I replaced the battery. Now it does.
hatuxka - Réponse
BEFORE YOU DO ANYTHING - CHECK THE BATTERY!
I-fixit sent me a bad battery, which I didn’t realize until it was already install. They sent me a new one, but I wasted hours uninstalling and reinstalled.
Get a volt meter and measure the voltage on the output of the battery pack. If it reads 0 V, SEND IT BACK. It should read over 2 V.
bcardanha - Réponse
I've just received my replacement battery and it reads 0,042V between the two main connectors. Do you think it's dead?
peter sussex -
When I did this from Terminal.app within Recovery Mode, the “sudo” was not recognized but I could invoke it without the sudo part. It seems to have been accepted when looking at “nvram -p”
johann beda - Réponse
When in Recovery Mode, you already have superuser powers. So you don't need to prefix commands with the sudo command to invoke them with root privileges; you already have them. Do a
pwd(print working directory) after opening Terminal in Recovery Mode, and you'll see that you're in the root user's directory.Ed Mechem -
I received the battery kit for my 2018 MacBook Pro and as per the above comment from bcardanha - Oct 12, 2021, I checked the voltage on the pads marked + and - . It was zero volts so I panicked a bit.
I sent a message on the iFixiT Facebook page and I got no reply. I finally found the customer service email for Ifixit Europe and sent them an email voicing my concern as I was not keen to work for couple of hours just to discover that the battery is faulty. I had an almost instant reply on the email (kudos to them) and they adviced me to go ahead and install the new battery as the voltage measured when battery is not connected is not relevant.
I took a leap of faith and after two hours… the new battery showed 50% charge and everything seems to be working just fine. I am happy it worked.
Mircea Comanici - Réponse
After removing the old battery and installing the new battery I powered up the MBP before screwing the bottom on. I discovered the my keyboard would not function. It took a few hours of investigation and frustration that I discovered the track pad power ribbon had become partially dislodged from the trackpad. I was able to see that this through the little machined slot where the battery sat. I had to remove the trackpad to reinsert the power ribbon back into the connector in the trackpad. after reassembling and reinstalling the battery etc the keyboard worked. Just food for thought if your run into the keyboard issue.
Ed Mease - Réponse
This should be the default. IMO I tell you to power on - not the lid.
G Sena - Réponse
Est ce que cela fonctionne sur un macbook pro 2017 sans touchbar ?
maël muzelet - Réponse
Bonjour Maël, oui, ce tutoriel concerne "les MacBook Pro 2016 (et plus récents) et les MacBook Retina 12" 2017 (et plus récents)"
Claire Miesch -
Excellent instructions. I was able to follow and install the new screen. I recommend that you get a good set of tools before you begin. I started with an inexpensive repair kit bought online. The Penta and torx bits failed. I bought an IFIXIT kit with quality bits and I was able to do everything I needed.
Tom Markham - Réponse
If you're not running an admin account the sudo command won't work (which honestly, you should not be running admin). Rather than logging in to your admin amount via the OS, in the terminal type "login [admin username]," then the password and you'll be able to do the sudo command as described above. Once you're complete, type "logout [admin username]" and you'll be good to go. Obviously replace [admin username] with whatever the account name for your admin user is.
arichard2401 - Réponse
For those unable to complete this step because the screen is too damaged I recommend leaving your macbook on until the battery dies.
Nicholas R Licato - Réponse
Just replaced my 2018 15" MBP battery. Running Sonoma.
I found no way to disable AutoBoot (The status can be checked in the Power section of system report).
Anyway, i left my battery completely drain before opening the MBP, and had no issues during the process.
Cédric Bontems - Réponse
After sending this command in terminal when I checked what happens if I now open the lid, instead the screen lit slightly up (still black) then a battery symbol showing the charging state showed up.
Now, after replacement of the battery, this is all I get to see.
No reset of NVRAM nor PRAM helped.
Currently the new battery charges (58% atm) and it feels like it‘s mocking me.
webrockers - Réponse
I suspected the keyboard or TouchID sensor wouldn’t work, so I went on and checked every connector.
I missed connecting the left TouchID sensor from step 31.
webrockers -