Introduction
Le ventilateur de cet appareil n’est fixé que par quelques vis, mais il faut reconnaître que lors de son retrait, quelques fils sont enroulés derrière d’autres composants. Veillez à ne pas tirer ou tirer trop fort sur les fils et à les écarter plutôt que derrière les autres composants avant de retirer complètement le ventilateur. Aussi, gardez une trace de vos vis et de l'endroit où elles ont été placées dans l'appareil car il y a une vis qui est différente des autres. Cela permettra un processus inversé beaucoup moins frustrant!
Ce dont vous avez besoin
-
-
Couchez l'écran avec l'écran vers le haut.
-
Placez les deux ventouses des deux côtés du haut de l’écran et assurez-vous de les verrouiller.
-
L'écran en verre à relier au reste de l'affichage par de petits aimants. Soulevez lentement et l'écran va se détacher.
-
-
-
Dévissez les 12 vis autour des bords latéraux et du haut de l’écran LCD avec le tournevis TR 10.
The screws marked in orange don't need to be removed, all they do is hold the magnets on the LCD.
Yes “orange screws” does not need to be removed.
You do not need a TR10 screwdriver as written in the text a T10 will suffice (more common and also correctly mentioned in the list of tools).
A TR10 screwdriver is compatible with the T10, but not the other way around
Any info on if an older 2011 imac screen could just be plugged into this to replace the current lcd?
-
-
-
Soulevez lentement l’écran LCD de son emplacement et inclinez-le vers le haut.
Add the note that it should be lifted from the bottom edge. It is also important not to twist the display by levering up from one corner.
Before lifting the monitor, you should be prepared to start collecting screws and have your TR 10 ready.
-
-
-
Pour le premier des quatre fils (le plus éloigné du fil retenu par une vis), saisissez le connecteur et tirez doucement.
Note: be sure to pull away but not hard. Wiggle and pull slowly. These are delicate especially due to age.
Overall this is a moderate repair. Follow step by step and you are good.
Also, use tape and/or labels to mark which cables go where per the MLB and other parts. Resulting in easier reassembly.
-
-
-
-
Pour le connecteur suivant, juste à côté du fil précédent, un morceau de ruban adhésif est attaché à une barre de métal.
-
Retournez la barre de métal en utilisant le ruban comme poignée.
-
Ensuite, saisissez le connecteur et retirez-le lentement de la prise de la carte mère.
What is this connector for?
I imagine this connector is going to be for display data (i.e. LCD data).
I pretty much mangled this cable trying to put it back into the slot. Is this something I can order a replacement for?
Thunderbolt Display 27" LVDS Cable
As other’s have said, this cable is super delicate.
When you replace it, make sure that the small metal handle it firmly reattached to the other side of the port. I thought I’d got it right first time, but had no video signal (thunderbolt detected display, and power was fed to the Macbook Pro).
I had to reinsert this one again, and one in, firmly press the connector home, then latch the handle over the other side. I also gave it a test pull to ensure it was secure. Then all was well!
Can anyone provide a photo of this connector so as to give a better understanding of its mechanics? see this cringe worthy effort at guidance; https://youtu.be/A96CUSm_Xhs?t=1050
-
-
-
Pour le connecteur situé de l’autre côté de la carte mère, saisissez-le par le dessous et retirez-le délicatement de la carte.
This cable was also taped for me, so remove the tape first
-
-
-
L'écran LCD est maintenant complètement déconnecté du boîtier et peut être réparé / remplacé!
-
-
-
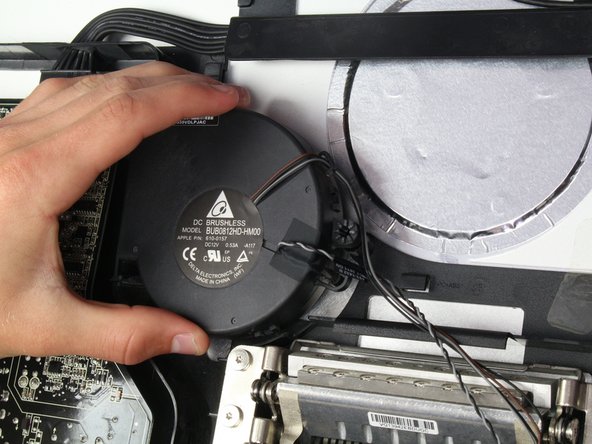
Vous devriez maintenant avoir accès au reste de l'écran. De là, localisez le ventilateur.
-
-
-
Le ventilateur est connecté à la carte logique principale par deux connecteurs. Assurez-vous que lorsque vous les déconnectez, saisissez le fil au point le plus proche de la carte et tirez-le doucement pour éviter d'endommager les connecteurs.
-
Retirez le morceau de ruban adhésif qui maintient les fils au boîtier.
Remember which way the wire is connected. (top connector should have black wire at the top and bottom connector should have brown wire at the bottom). Both wires should have the “shiny” side facing you when inserting.
-


Pour remonter votre appareil, suivez ces instructions dans l’ordre inverse.
Pour remonter votre appareil, suivez ces instructions dans l’ordre inverse.
Annulation : je n'ai pas terminé ce tutoriel.
27 autres ont terminé cette réparation.
Merci à ces traducteurs :
100%
[deleted] nous aide à réparer le monde ! Vous voulez contribuer ?
Commencez à traduire ›
Équipe

Cal Poly, Team 5-11, Maness Spring 2015 Membre de l'équipe Cal Poly, Team 5-11, Maness Spring 2015
CPSU-MANESS-S15S5G11
4 membres
19 tutoriels rédigés
10 commentaires
I have been having trouble with fan noise -- a noisy, rapid thumping sound, especially on startup but getting worse over a few weeks and lately persisting all day. Following this excellent guide, I removed the fan and examined it. I could see nothing wrong except perhaps a fine layer of dust on the blades, no worse than could be expected. I did not manage to disassemble the fan itself, as its two-part housing is very firmly clipped together, but applied a vacuum cleaner hose to both the entry and exit sides to clean it up as much as possible. I put it back and reassembled the whole display, and am pleased to report that the noise has completely disappeared. This may be good news to anyone dismayed by the apparent non-availability of replacement fans.
This guide made the power supply replacement quick and easy.
I had the rumbling fan cleaned by a pro. but the rattling didn't go. I just finished replacing the fan on my 27'' Thunderbolt Display using these instructions, and so far so good after 3 hours. It usually started the rattling after 30mn!
I purchased the fan on eBay. There were a couple available then.
I got the fan for $18 and spent 30mn on the job. At the Apple certified spot in town, they were going to charge me $250! I bought this Apple Display second hand for $250! and now it is back to its old self, working like a charm :)
Thank you very much for this web page which walked me through the process.
By the way, for a succion cup I used the two small ones that are attached to my soap holder, from the bathroom tiled wall; worked just fine and I didn't have to spend $20 to buy one.
cheers
Many thanks to Mr. Laverty and the other contributors. I followed this guide to install a new power supply in my darkened 27” Thunderbolt Display to bring it back from the dead. While the instructions were specifically for replacing the fan, I found that after following them to remove the LCD panel, it was easy to replace the power supply as well. For anyone else who may suspect a failed power supply (loud buzzing and then black), I ordered mine directly from China, supposedly a brand new one. It looks identical to the original in every way and does have a 2018 sticker affixed to it. It took a month to arrive but did the trick. I paid $70.50 for it from wwon_one off eBay (https://www.ebay.com/itm/273134311780). Thanks again for the extremely helpful guide!
Many thanks to Mr. Laverty and the other contributors. I followed this guide to install a new power supply in my darkened 27” Thunderbolt Display to bring it back from the dead. While the instructions were specifically for replacing the fan, I found that after following them to remove the LCD panel, it was easy to replace the power supply as well. For anyone else who may suspect a failed power supply (loud buzzing and then black), I ordered mine directly from China, supposedly a brand new one. It looks identical to the original in every way and does have a 2018 sticker affixed to it. It took a month to arrive but did the trick. I paid $70.50 for it from wwon_one off eBay. Thanks again for the extremely helpful guide!
I killed my Thunderbolt monitor while trying to follow this guide.
There is an aspect of my Thunderbolt monitor that is either different from the one shown above, or just not discussed in the write-up. One of the four cables connecting the front LCD and the back PCBs is a ribbon connector that’s held onto the PCB with a latch. The cable is very short, so the only way to connect it is to hold the LCD and glass *just* above the back panel. What’s more, the latch and ribbon are *extremely* delicate, and the latch *barely* holds the connector onto the PCB.
Long story short - once I disconnected that cable, I could not reattach it and get the latch to stay in place. I kept getting it just right, closing up the monitor, and plugging it in… only to find that it wouldn’t power on. By the fourth or fifth attempt, the latch was bent out of shape (seriously, it’s delicate) and the connector looked a little damaged.
I never got it to turn on again, and I hauled it to an Apple Store for recycling last weekend.
Ein kräftiges “Hallo” aus dem Jahre 2021! :-) Habe soeben meine treues, 7-jähriges Display operiert und den für 59 € erstandenen, neuen Lüfter eingesetzt, nachdem der alte die bekannten Lagergeräusche erzeugte. ––– Herzlichen Dank für die geniale Anleitung!! Es hat alles perfekt funktioniert. ––– Das Schwierigste war, die Fussel zu vermeiden. Dazu habe ich mehrere Anläufe und ne ordentliche Portion Geduld benötigt. Der Moment, in dem man den Strom wieder anschließt, ist besonders adrenalinfördernd – aber ich würde es jederzeit wieder tun! Er lebt! ;-) Auf weitere 7 Jahre Thunderbolt-Display! Liebe Grüße Sonja
Worked great.
Something that was not quite clear to me - the new fan had only one cable.
One of the two cables of the old fan was only attached to the fan with tape and connected to the board, because it was probably a temperature sensor. This could be easily detached from the old fan and attached to the new fan with the same tape.
The display is now totally quiet again - like new! Thanks for the great instructions.
Fairly straightforward repair. I recommend wearing a headlamp in order to see the smallish connectors more clearly. Also, be sure to use a puffer to thoroughly eject dust from the monitor.
Just did mine. If youve taken apart an iMac same deal. No suction cups, no replacement fan. Had a couple imac fan thought maybe i coud rebuild… nope. imac fan is a shaft in 2 bearing. Display is a brass sleeve. I cleaned the fan out some mild goo gone, greased the shaft, reassembled… Weird thing is the fan only wobbled shortly after midnight. No constant, revolving wobble. So far jst the compressor fan on my fridge… How often? so often you wont even notice it.. Elwood Blues…
Seem dirt, worn sleeve little dust and heat… Dash of time is the obvious cause… Didnt have actual grease in hand thought i did… used a tiny bit of solder flux… total cost… 45minutes.. If she doesnt find you handsome she’ll at least find you handy… Cheers
Instead of $14 foam block, I used a full roll of paper towel and two pillows. While it worked, if I ever did this again, I would buy the block of foam. Since you’re removing a power cable, you need to be able thread it through and I think the foam block would make that easier.
Josh Miller - Réponse
You can also use a single handle, double cup floor lifting suction cup. Just place it in the centre of the screen near the camera and lift slowly.
Steve A - Réponse
I just used a toilet plunger to remove the screen and it worked like a charm!
Philip Jacob - Réponse
That’s what I call resourceful—made my day. I hope your repair was successful.
Tobias Isakeit -
Great idea, thanks a lot!
Yvan Sandoz -
The glass lifted off the magnets quite easily after just using my fingernails. No suction cups or toilet accessories needed.
Adrian Gropper - Réponse
I had the same problem and after removal of the fan and a bit of work with the vacuum, the fan is quiet. Thanks to ifixit for the great instructions that made this easy.
John Perser - Réponse
To keep the screen up, other soft objects might work, but it's important that the hole in the back isn't covered because you will need to thread the new Thunderbolt/MagSafe cable through it and it would be a hassle to do it after everything's been set up.
Thomas - Réponse
Anybody got any links to glass screen replacement supplier for the A1407 Thunderbolt Display? Im finding it impossible to find a replacement without it being crazy money.
Michael McMillan - Réponse
Instead of a wedge, I used 4 rolls of toiletpaper, one under each corner.
jnbruin - Réponse