Aller au contenu principal

Repairing Cup Holder for 2008 328i BMW

Ce dont vous avez besoin

  1. Repairing Cup Holder for 2008 328i BMW, Repairing Cup Holder for 2008 328i BMW: étape 1, image 1 de 3 Repairing Cup Holder for 2008 328i BMW, Repairing Cup Holder for 2008 328i BMW: étape 1, image 2 de 3 Repairing Cup Holder for 2008 328i BMW, Repairing Cup Holder for 2008 328i BMW: étape 1, image 3 de 3
    • Apply putty knife to edge of cover until it pops open

    • Remove screws off of broken cup holder

    • Take cup holder out

  2. Repairing Cup Holder for 2008 328i BMW: étape 2, image 1 de 3 Repairing Cup Holder for 2008 328i BMW: étape 2, image 2 de 3 Repairing Cup Holder for 2008 328i BMW: étape 2, image 3 de 3
    • Remove plastic cover on cup holder by pulling apart where the lips meet

    • Locate spring in device

  3. Repairing Cup Holder for 2008 328i BMW: étape 3, image 1 de 2 Repairing Cup Holder for 2008 328i BMW: étape 3, image 2 de 2
    • Fully take apart the cup holder to get to the inside of the cup holder

    • Locate where spring is placed

  4. Repairing Cup Holder for 2008 328i BMW: étape 4, image 1 de 3 Repairing Cup Holder for 2008 328i BMW: étape 4, image 2 de 3 Repairing Cup Holder for 2008 328i BMW: étape 4, image 3 de 3
    • Locate where the spring connects

    • If hole is not broken then just apply spring into hole

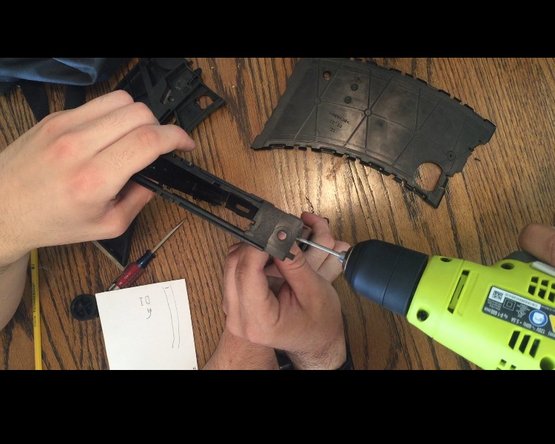
    • If the hole broke, like in this case here, then drill a hole the size of the spring around the same spot of the other hole

    • Caution: Be careful drilling the hole, the plastic is slippery when in contact with drill bit

  5. Repairing Cup Holder for 2008 328i BMW: étape 5, image 1 de 3 Repairing Cup Holder for 2008 328i BMW: étape 5, image 2 de 3 Repairing Cup Holder for 2008 328i BMW: étape 5, image 3 de 3
    • Test to make sure spring is properly working

    • Reassemble the cup holder

  6. Repairing Cup Holder for 2008 328i BMW: étape 6, image 1 de 3 Repairing Cup Holder for 2008 328i BMW: étape 6, image 2 de 3 Repairing Cup Holder for 2008 328i BMW: étape 6, image 3 de 3
    • Put cup holder back in place

    • Screw in screws

  7. Repairing Cup Holder for 2008 328i BMW: étape 7, image 1 de 1
    • Check to make sure cup holder works

    • Start to put on cover by lining up holes

  8. Repairing Cup Holder for 2008 328i BMW: étape 8, image 1 de 3 Repairing Cup Holder for 2008 328i BMW: étape 8, image 2 de 3 Repairing Cup Holder for 2008 328i BMW: étape 8, image 3 de 3
    • Press firmly on cover all around until it is fully on

  9. Repairing Cup Holder for 2008 328i BMW: étape 9, image 1 de 2 Repairing Cup Holder for 2008 328i BMW: étape 9, image 2 de 2
    • Enjoy your fixed cup holder!

Conclusion

Follow these steps step by step to get your broken cup holder fixed.

18 autres ont terminé cette réparation.

Michael Tapia

Membre depuis le 09/29/15

499 Réputation

1 tutoriel rédigé

Équipe

Cal Poly, Team 15-5, Green Fall 2015 Membre de l'équipe Cal Poly, Team 15-5, Green Fall 2015

CPSU-GREEN-F15S15G5

4 membres

14 tutoriels rédigés

6 commentaires

Easy fix that saved over $60 if I had to purchase a new part and much much more if the the dealer were to have fixed this. Thank you

Keith La Plain - Réponse

clever idea when plastic holding the spring hook is broken. nice hack of a fix.

Nicholas McKoy - Réponse

Is there any way to purchase just the spring? In my case the plastic is fine, it’s the shaped metal tip of the spring that sheared off somehow!? I also need the tentioner.

Ryan Cornell - Réponse

This happened to me as well. I broke off the end of the coil/spring while bending to make a “hook” shape.

I looked for purchasing just the spring, but could not find it. Next up was the entire cupholder apparatus, either used ($~26), URO ($~39), or OEM/genuine BMW ($60-75+). This isn’t cheap and is not actually necessary to buy anything ,though.

Much easier is what I did instead, which was taking advantage of the coil material’s rigid/”easily-snap-off-able” property to make a new (wider) hook. I pulled the snapped end of the coil out a little, then put in a thin screwdriver to kind of hold the coil out extended. Next I used flat nose pliers to hold the end flat, while using long nose pliers to break off a new gap on both sides, effectively making a new “t” end. Then of course I VERY GENTLY bent it around to make a “hook”. I gently clipped the new spring hook into the preexisting plastic hole. It works for new after reinstalling. We’ll see how it holds up!

Benjamin Castellon -

Dealer wanted $180. Flat spring has T on end and locks into corresponding T in plastic. My plastic was broken out on one side. I merely took a bit in my dremel, and made the old T deeper in order to catch the metal end.

Larry Pockras - Réponse

Ajouter un commentaire

Nombre de vues :

Dernières 24 heures : 0

7 derniers jours : 8

30 derniers jours : 41

Total : 26,688