Aller au contenu principal

Replacement of the motherboard of Xiaomi Redmi Note 7 Pro Motherboard Replacement

  1. Replacement of the motherboard of Xiaomi Redmi Note 7 Pro Motherboard Replacement, The motherboard: étape 1, image 1 de 1
    • Before you begin, switch off your phone.

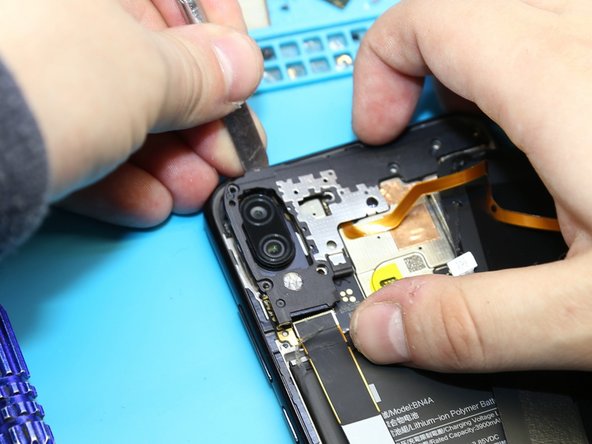
    • Heat your phone to about 195 degrees Fahrenheit (90 C).

  2. Replacement of the motherboard of Xiaomi Redmi Note 7 Pro Motherboard Replacement: étape 2, image 1 de 1
    • Lift the back cover to create a gap between the glass and the frame.

    • Insert an opening pick into the gap.

  3. Replacement of the motherboard of Xiaomi Redmi Note 7 Pro Motherboard Replacement: étape 3, image 1 de 1
    • Start sliding the opening pick from the lower left corner along the side of the device to cut the adhesive

    • Leave the opening pick in the side to prevent the adhesive from resealing.

  4. Replacement of the motherboard of Xiaomi Redmi Note 7 Pro Motherboard Replacement: étape 4, image 1 de 1
    • Lift the cover open like a book, but be careful to make sure you do not damage the flex cable while it’s still connected.

  5. Replacement of the motherboard of Xiaomi Redmi Note 7 Pro Motherboard Replacement: étape 5, image 1 de 2 Replacement of the motherboard of Xiaomi Redmi Note 7 Pro Motherboard Replacement: étape 5, image 2 de 2
    • Using a screwdriver (1.5 mm ), unscrew 4 screw and remove the bracket holding the connector.

  6. Replacement of the motherboard of Xiaomi Redmi Note 7 Pro Motherboard Replacement: étape 6, image 1 de 1
    • Disconnect the connector to avoid a possible short circuit during disassembly.

    • Disconnect connectors and remove the inter-board cable.

  7. Replacement of the motherboard of Xiaomi Redmi Note 7 Pro Motherboard Replacement: étape 7, image 1 de 3 Replacement of the motherboard of Xiaomi Redmi Note 7 Pro Motherboard Replacement: étape 7, image 2 de 3 Replacement of the motherboard of Xiaomi Redmi Note 7 Pro Motherboard Replacement: étape 7, image 3 de 3
    • Using a screwdriver (1.5 mm), unscrew the 7 screws.

    • Remove the cover.

  8. Replacement of the motherboard of Xiaomi Redmi Note 7 Pro Motherboard Replacement: étape 8, image 1 de 1
    • Pry up on the connector and remove the fingerprint sensor cable.

  9. Replacement of the motherboard of Xiaomi Redmi Note 7 Pro Motherboard Replacement: étape 9, image 1 de 1
    • Disconnect the connector on PCB, and remove the front facing (selfie) camera.

  10. Replacement of the motherboard of Xiaomi Redmi Note 7 Pro Motherboard Replacement: étape 10, image 1 de 1
    • Disconnect the connectors on the PCB.

  11. Replacement of the motherboard of Xiaomi Redmi Note 7 Pro Motherboard Replacement: étape 11, image 1 de 1
    • Pull off and remove the PCB.

Conclusion

To reassemble your device, follow these instructions in reverse order.

17 autres ont terminé cette réparation.

Merci à ces traducteurs :

es en

100%

Ces traducteurs nous aident réparer le monde ! Vous voulez contribuer ?
Commencez à traduire ›

Remphone.ru

Membre depuis le 10/02/19

630 Réputation

1 tutoriel rédigé

Un commentaire

Give Me Your Phone Number..

The Comedy King - Réponse

Ajouter un commentaire

Nombre de vues :

Dernières 24 heures : 6

7 derniers jours : 59

30 derniers jours : 236

Total : 10,925