Aller au contenu principal

Replacing LG X Power 2 (LG-M320N) Screen Assembly

Ce dont vous avez besoin

  1. Replacing LG X Power 2 (LG-M320N) Screen Assembly, Opening and removing the rear cover: étape 1, image 1 de 2 Replacing LG X Power 2 (LG-M320N) Screen Assembly, Opening and removing the rear cover: étape 1, image 2 de 2
    • Remove the back cover by prying it off with a fine tool (I used a screwdriver).

    • Just below the camera, there is another tab that holds the lid. Remove with care.

  2. Replacing LG X Power 2 (LG-M320N) Screen Assembly, Opening and removing the intermediate lid: étape 2, image 1 de 3 Replacing LG X Power 2 (LG-M320N) Screen Assembly, Opening and removing the intermediate lid: étape 2, image 2 de 3 Replacing LG X Power 2 (LG-M320N) Screen Assembly, Opening and removing the intermediate lid: étape 2, image 3 de 3
    • Remove the sim/mic tray and the 13 screw that hold the intermediate cover to the screen frame.

    • With a thin tool, pull apart the screen cover, inserting it with care.

    • Once slightly pulled apart, you can continue separating it, using a nail or the spudger.

  3. Replacing LG X Power 2 (LG-M320N) Screen Assembly, DIsconnecting the battery: étape 3, image 1 de 1
    • Disconnect the battery flex and remove it.

    • The battery is attached. In my case, it didn't give much resistance and I could take it out with any problems. Even so, I recommend using a heat source (microwave preheated gel or a hair dryer).

  4. Replacing LG X Power 2 (LG-M320N) Screen Assembly, Disconnecting the screen and camera from the motherboard: étape 4, image 1 de 3 Replacing LG X Power 2 (LG-M320N) Screen Assembly, Disconnecting the screen and camera from the motherboard: étape 4, image 2 de 3 Replacing LG X Power 2 (LG-M320N) Screen Assembly, Disconnecting the screen and camera from the motherboard: étape 4, image 3 de 3
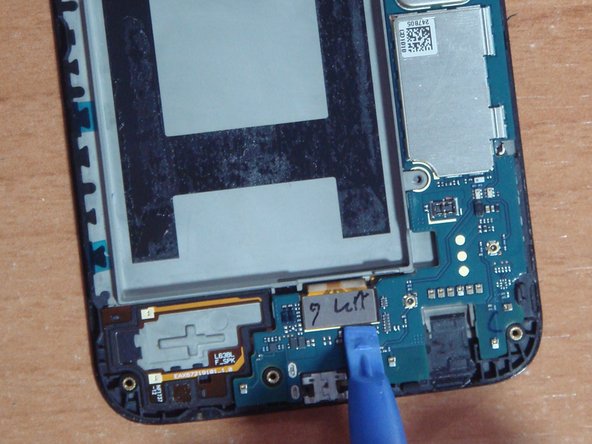
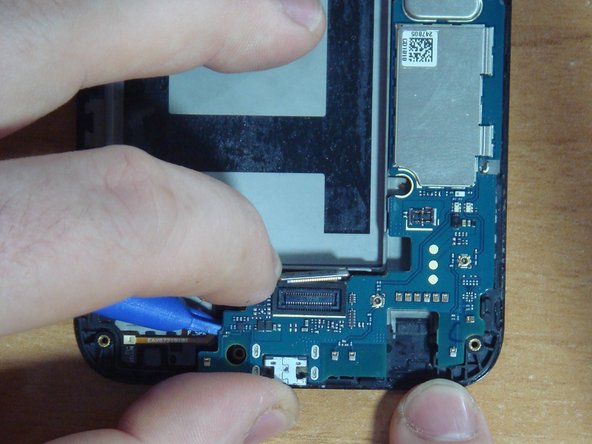
    • Disconnect the flex cable for the bottom screen.

    • Optionally, you can extract the cameras. I took them out for greater ease.

  5. Replacing LG X Power 2 (LG-M320N) Screen Assembly, Removing the motherboard: étape 5, image 1 de 2 Replacing LG X Power 2 (LG-M320N) Screen Assembly, Removing the motherboard: étape 5, image 2 de 2
    • Now that the motherboard has been released from the easily removable components, pick it up lightly by the side of the USB connector

    • Once you've picked it up, take it by hand and pull it slightly upwards to the left.

  6. Replacing LG X Power 2 (LG-M320N) Screen Assembly, Transferring original frame components: étape 6, image 1 de 2 Replacing LG X Power 2 (LG-M320N) Screen Assembly, Transferring original frame components: étape 6, image 2 de 2
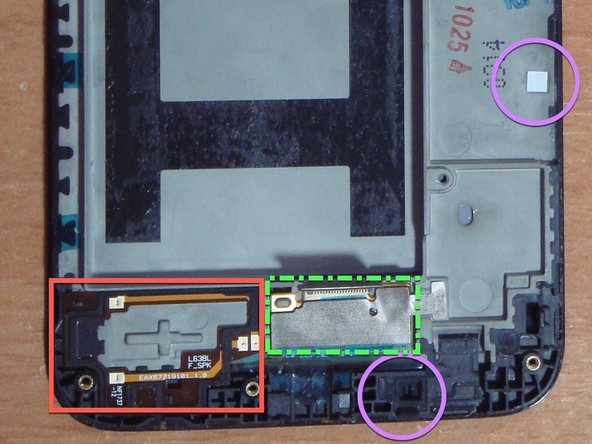
    • Move the remaining pieces from the old frame to the new frame.

    • - 2 flex cables (on button + speaker connector). Marked with red squares

    • - 2 rubber bands (main mic + noise-cancelling mic). Marked with lilac circles

    • - Vibrator. Marked with a red square

    • front flashlight. Marked with a lilac circle

    • Handset. Marked with a red square

    • For ease: metal mesh above the screen flex (green square) and humidity indicator sticker (lilac circle). I've passed them.

    • Some of these components are glued. Be careful.

  7. Replacing LG X Power 2 (LG-M320N) Screen Assembly, Final assembly: étape 7, image 1 de 1
    • Once you have placed all the components into the new frame, proceed with the previous steps in reverse to reassemble the cell phone

    • Filler image

Conclusion

To reassemble your device, follow these instructions in reverse order.

Merci à ces traducteurs :

es en

100%

Ces traducteurs nous aident réparer le monde ! Vous voulez contribuer ?
Commencez à traduire ›

Miguel Cretu

Membre depuis le 10/05/17

373 Réputation

2 tutoriels rédigés

0 commentaires

Ajouter un commentaire

Nombre de vues :

Dernières 24 heures : 2

7 derniers jours : 7

30 derniers jours : 10

Total : 761