Aller au contenu principal

Replacing an autoharp string (Type B)

Ce dont vous avez besoin

  1. Replacing an autoharp string (Type B), autoharp string: étape 1, image 1 de 2 Replacing an autoharp string (Type B), autoharp string: étape 1, image 2 de 2
    • This is an Oscar Schmidt Educator Series Autoharp. There are two types of strings for autoharps. This model uses type B strings which have a ball end. My low octave E string is missing.

    • Low octave E, wound string with ball end.

  2. Replacing an autoharp string (Type B): étape 2, image 1 de 2 Replacing an autoharp string (Type B): étape 2, image 2 de 2
    • If the string is missing or broken check to see if any remnants remain. Use the pliers to remove any from the tuning peg. Use the pliers or your fingers to remove any from the bottom. (My string is completely missing - both ends are clear.)

    • Tuning peg

    • Be sure to pick up any pieces that may have fallen on the floor. They are sharp!

  3. Replacing an autoharp string (Type B): étape 3, image 1 de 3 Replacing an autoharp string (Type B): étape 3, image 2 de 3 Replacing an autoharp string (Type B): étape 3, image 3 de 3
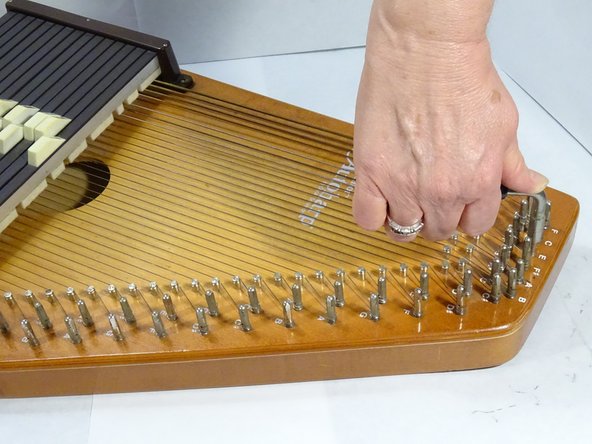
    • If the string is missing, as mine is, loosen the tuning peg before installing the new string. With the tuning hammer, turn the tuning peg counter clockwise (left) 3-1/2 turns. Loosening the tuning peg will prevent stripping the peg when you tighten the new string and you will not be able to keep the string in tune.

    • When replacing a string that is still on the instrument, hold the string as you loosen it. This will prevent if from snapping and possible causing injury.

  4. Replacing an autoharp string (Type B): étape 4, image 1 de 1
    • With tuning hammer, adjust the tuning peg to a height of 15/16”. If the peg is too low, it will strip when installing the new string. Adjust by turning counter clockwise (left) to raise the peg or clockwise (right) to lower the peg.

    • ''Tuning pegs may be different heights if individual strings have previously been changed. When changing a full set of strings, set all of the pegs to the same height.

  5. Replacing an autoharp string (Type B): étape 5, image 1 de 3 Replacing an autoharp string (Type B): étape 5, image 2 de 3 Replacing an autoharp string (Type B): étape 5, image 3 de 3
    • Now we are ready to install the new string. Attach the ball end of the new string at the base of the autoharp by slipping it into the appropriate groove. Use the cardboard wedge to hold the string snugly in place while you continue.

    • Ball end of string

  6. Replacing an autoharp string (Type B): étape 6, image 1 de 2 Replacing an autoharp string (Type B): étape 6, image 2 de 2
    • Make a loop with the string and slide it between the strings and chord bar. Draw the string across the bridge pin and past the tuning peg but do not thread through the hole yet.

  7. Replacing an autoharp string (Type B): étape 7, image 1 de 3 Replacing an autoharp string (Type B): étape 7, image 2 de 3 Replacing an autoharp string (Type B): étape 7, image 3 de 3
    • Hold the string taut, run it past the bridge pin and the tuning pin. Measure the length past the tuning peg. If it is more than 2" to 2-1/4" mark at 2-1/4". Cut excess off with the wire cutter. Do not let go of the string.

    • Bridge pin - note the groove where the string sits.

    • If the wire falls to the floor, pick it up. You do not want to step on it!

  8. Replacing an autoharp string (Type B): étape 8, image 1 de 2 Replacing an autoharp string (Type B): étape 8, image 2 de 2
    • Using the needle nose pliers, bend the end of the string into a hook about 1/4" across.

    • It looks like a shepherd's hook.

  9. Replacing an autoharp string (Type B): étape 9, image 1 de 2 Replacing an autoharp string (Type B): étape 9, image 2 de 2
    • Slip the end of the hook through the hole in the tuning peg. The string will go around the top of the peg on the long side. Once the hook is in the hole, hold the string firmly against the peg with your index finger.

    • You may have to turn the tuning peg a bit to align the hole

  10. Replacing an autoharp string (Type B): étape 10, image 1 de 3 Replacing an autoharp string (Type B): étape 10, image 2 de 3 Replacing an autoharp string (Type B): étape 10, image 3 de 3
    • Use the tuning hammer to turn the tuning peg clockwise (right). Continue to hold your finger against the string as you turn the peg. Make sure the string winds below the hole and the rounds touch but do not cross. As the string becomes taut, check to see that it is aligned across the bridge pin.

    • Crossing the rounds on the peg can cause the string to break

  11. Replacing an autoharp string (Type B): étape 11, image 1 de 1
    • The string should be taut. Now you are ready to tune the autoharp. Use the electronic tuner and adjust tension to the correct pitch. Adjust pitch by turning the tuning hammer in small increments. Turn counter clockwise (left) to lower the pitch and clockwise (right) to raise pitch.

Conclusion

You are ready to make beautiful music on your autoharp!

3 autres ont terminé cette réparation.

Vickie Bedard

Membre depuis le 01/24/16

191 Réputation

1 tutoriel rédigé

Un commentaire

Is there a chart of individual autoharp string sizes so that I could find a similar size guitar string to replace a broken autoharp string?

Heather Fjare - Réponse

Ajouter un commentaire

Nombre de vues :

Dernières 24 heures : 0

7 derniers jours : 7

30 derniers jours : 27

Total : 4,884