Introduction
Utilisez ce tutoriel pour retirer et remplacer la batterie collée de votre Macbook 12 pouces avec écran Retina.
Nous recommandons le kit de remplacement de batterie iFixit; le dissolvant liquide pour adhésif dans votre kit va dissoudre l’adhésif fixant la batterie, et vous pourrez la détacher facilement.
Le dissolvant pour adhésif est inflammable. Effectuez cette procédure dans un lieu bien ventilé. Ne fumez pas et ne travaillez pas près d’une flamme pendant la procédure.
Pour votre sécurité, videz la batterie de votre MacBook avant de commencer cette procédure. Une batterie au ions-lithium peut déclencher un feu dangereux et incontrôlable si elle est crevée accidentellement.
Les contacts de la batterie du MacBook sont situés sous la carte mère, et ce tutoriel recommande de retirer complètement la carte mère pour effectuer le remplacement de la batterie. Alors qu’il est encore possible d’enlever les vis de la carte mère et de simplement pencher légèrement celle-ci pour enlever la batterie, il est très difficile d’installer une nouvelle batterie correctement si la carte mère est encore en place.
Note : le dissolvant utilisé pour dissoudre l’adhésif de la batterie peut endommager et/ou décolorer certains plastiques. Soyez prudent quand vous manipulez le produit.
Pour éviter d’endommager la carte mère, lorsque la réparation de votre macbook sera terminée, mais avant de l’allumer, branchez-le à une source de courant à faible voltage avec un chargeur 5 Watts d’iPhone et un cable USB-C à USB -A. Ces accessoires ne sont pas inclus avec votre MacBook alors assurez-vous de les avoir entre les mains avant de commencer.
Ce dont vous avez besoin
-
-
Retirez les huit vis suivantes fixant le boîtier inférieur :
-
Deux vis Pentalobe P5 de 1,8 mm
-
Quatre vis Pentalobe P5 de 2,9 mm
-
Deux vis Pentalobe P5 de 6,1 mm
-
-
-
Soulevez le boîtier supérieur et l'écran d'un bloc depuis le bord avant et soulevez-les à un angle d'environ 45˚.
-
-
-
Utilisez l'extrémité plate d'une spatule (spudger) pour appuyer et maintenir le petit bouton doré "déconnexion de la batterie".
-
Si le voyant LED de marche est allumé, maintenez le bouton enfoncé jusqu'à ce que le voyant s'éteigne, puis relâchez. Cela peut prendre jusqu'à 10 secondes.
-
Si le voyant LED ne s'allume pas, relâchez le bouton après 5 à 10 secondes. Appuyez à nouveau et maintenez-le enfoncé pendant 5 à 10 secondes, puis relâchez. Enfin, maintenez-le enfoncé une troisième fois pendant 5 à 10 secondes, puis relâchez.
Wow okay could someone explain why this is necessary? What happens if you skip this step and simply undo the screw to disconnect the power?
Removing the screw does not disconnect the power—power comes from the battery terminals contacting the underside of the logic board, and they’re tricky to separate reliably at this stage of disassembly. This step is the safest and easiest way to kill power; don’t skip it.
Hi what will happen if i skip this step, coz i did tried to power down the battery by pressing small gold button, but no avail. the LED light still there even after more than 5 times press (5-10secs or more) each press.
Did you learn the answer to your question? I'm having the same issue -- I keep pressing the gold button but the battery light stays on.
R McP -
Mi laptop doesn’t turn it on doing that ):
-
-
-
En le soulevant par le bord avant, ouvrez le boîtier inférieur à un angle d'environ 45°.
Before the IPD flex cable can be removed the battery disconnect button has be held down for up to 10 seconds. If the LED near the battery connector is switched on it shows that there is power going through the logic board from the battery, once the button is pressed and this light goes off the machine is safe to be worked on.
-
-
-
Utilisez une pincette pour décoller le ruban adhésif recouvrant le connecteur ZIF de la nappe du trackpad.
Only peel back the first half of the tape covering the trackpad cable ZIF connector—do not completely remove.
Gently - lift tape while wiggling cable side to side. Be sure tape is released, but do not remove completely
-
-
-
À l'aide d'une spatule, retournez délicatement le clapet de retenue du connecteur ZIF de la nappe du trackpad.
This is very tricky indeed - at least on my computer. I failed at this point - having skipped to it as sugested above so as not to stress the ribbons on the other side. The ZIF was not as I expected. They had opened when I pulled up the stick cover and I found I was working on the socket itself. The top edge came adrift after almost no pressure being put on it. The ribon did not come free with gentle pulling though. At that point I put the back on again… waited until the battery recharged a bit and found I had not nroken it after all. I doubt I shall try again. It is much harder to replace than the 15 inch - much…
I’ve just found that I have broken it after all. No keyboard. Bluetooth still works so I can use the machine.
All in all, an expensive mistake. BTW - I did NOT get the kit from IFIXIT - not sold here.
I found “Recognizing & Disconnecting Cable Connectors”
Reconnaître et débrancher les connecteurs
useful, esp. for someone who has not used ZIF connectors and retaining flaps before. There are several retaining flaps that need to be opened. The first time is tricky as you need a sense of how much force to apply. I used the flat end of the provided spudger. Apply progressively firmer upward pressure until the retaining flap pops open. The first time is tricky, but straightforward thereafter.
Mouse back and forth between the two right-side thumbnail photos and you will get a little animation feel showing how these ZIF connectors operate—it's very helpful. Apply light but consistent pressure to pop them up. Helps to go side to side if they're a little stubborn.
-
-
-
Déconnectez la nappe du trackpad en le tirant délicatement à travers sa fente dans le châssis.
it would be nice to have a specific picture of the cable and contacts and how it is oriented in the ZIF connector. This isn't clear in any of these photos or text.
My trackpad cable snapped so had to replace it and none of the replacement cables have the tape which is on the smaller end to the trackpad. The other end is fairly easy to figure out but the trackpad end isn't as the cable makes a 180 degree turn inside the case (poor design).
-
-
-
Retournez soigneusement le MacBook, de sorte que le boîtier inférieur repose à plat.
-
Soulevez l'ensemble boîtier supérieur/écran à un angle d'environ 90° et calez-le contre quelque chose de solide pour ne pas avoir à le tenir.
-
Posez un morceau de ruban adhésif près du pavé tactile, pour fixer le boîtier supérieur et éviter tout mouvement accidentel.
You can open the laptop screen all the way open with it flat in the table (screen facing up) and the keyboard should stay up.
-
-
-
Retirez la seule vis Torx T5 de 2,9 mm fixant le connecteur de la batterie à la carte mère.
the moment you opening macbook case and before any tinkering with connections, you MUST press little yellow button on logicboard, located on the right from battery connector - this will disable all power to the board. You can check by looking at the small led on left side of the battery connector - if there is very faint light, it means that power is still there. After pressing button light should go off. Removing screw is not necessary at all, and like I said - you MUST disable power before any touching to connections etc.
Where it says
“2015 models have a silver grounding clip with two foam pads directly under this screw“
I have a 2015 MacBook & the grounding clip is not there!
I’m using this guide to investigate why there are lines on screen or darker screen at certain angles of opening it. Also a background ghosting effect on screen too.
No obvious damage or loose connectors so wondered if the lack of grounding clip can cause these symptoms?
Anybody out there know?
Either buy the clip and check, or replace the screen (or LB), but the macbook would more likely not start if there is a missing grounded connection, depending on what is being grounded.
Sean -
-
-
-
En précaution supplémentaire, vous pouvez déconnecter physiquement la batterie en insérant un médiator d'isolation de la batterie entre la carte mère et le connecteur de la batterie.
I HAD TO DO THIS TWICE. After replacing the battery while following this guide to a 'T', the battery was not being recognized by the logic board. Strangely, with the power unplugged it would still light up the screen and tell me the battery was at a critical level, but it would not boot. Resetting the SMC had no effect. I thought I killed my computer or got a bad battery, so as a last ditch effort I re-opened the case, pressed the battery disconnect button, removed the screw and inserted the battery separation tool again to Physically Disconnect the battery from the mainboard. After about 5 minutes I then removed the tool and reassembled everything, plugged in via 5v iphone charger and USBA-C cable again and LO, the battery is now reporting correctly, charging correctly and allowing me to boot on its power .
-
-
-
Retirez les deux vis qui maintiennent le support de la nappe du port USB-C :
-
Une vis tri-point Y000 de 1,1 mm
-
Une vis torx T5 de 3,5 mm
I should have read the comments before using the provided 1.1 mm Tri-point Y00 bit. I almost stripped the screw but was able to use a small flat head bit to open the screw.
Ifixit: you may want to update this part in the instructions. Not everyone reads the comment section, esp. when it comes to specification of bits which is basic and must be accurate. This is one of the more critical ones in the procedure that can easily go south. The rest of the instructions are excellent.
early 2015 model here. I’ve used a Y1.5 with cautiously applied down force.
My 2015 had a 2.5mm Y screw not a Y000.
Adding to the helpful comments above, on replacing the 1.1mm tripoint screw, I found the the magnetism of the nearby speaker coil overcame that of the driver and would draw the screw away or the combo of forces would fling it out of the work area! After fiddling with it for too long, I used some of the battery adhesive removed earlier to attached the screw to the driver. Wax would probably work better if I’d had some.
I used the PH00 head to unscrew what they call the “1.1 mm Tri-point Y00 screw”, NOT the Y00 head, and it unscrewed perfectly fine.
Agreed, my screw was a PH00.
I have an early 2015 MacBook and it was a PH00 head I needed to use.
-
-
-
Avec le bout plat d'une spatule, déconnectez le support de la nappe du port USB-C en le soulevant de la carte mère.
Emphasis on aligning the bracket correctly. What the pictures do not show is that underneath the flat part of the metal bracket (the area between the two screw holes) is a connector that needs to be accurately aligned. Aligning the two screw holes does not imply that the connector is seated correctly.
After I re-assembled my 2015 MacBook power would not come on. I thought I had damaged the logic board despite being careful and following instructions. Diagnosing the problem took a while. Retracing the steps and focusing on power supply I was able to determine that the metal flap which hides the connector underneath had not made proper contact.
What I did was to use a finger to get a tactile feel for the connector underneath the metal bracket aligning properly and then press down vertically when it seemed to be aligned. It’s a subtle tactile feel. After re-doing this step, I got power back. Be careful not to damage the connector as noted in the instructions.
Good tip. It’s so easy to damage these fragile connectors by forcing the plug in and reattaching the mounting plate screws
-
-
-
Déconnectez la nappe de la carte audio jack en le tirant tout droit hors de son connecteur ZIF.
The audio jack cable is a bit of a pain to reinsert. I found if I turned the screen and the bottom on its side, like an open book, I had much better orientation and it was much easier to insert.
Excellent guide and all works like a sharm, but was one issue. After full assemble there wasn't sound. Then I open Macbook again and disconnect and connect audio cable. You must insert cable so, that white stripe will not visible. And sound reveal!
This helped me, thanks!
-
-
-
-
Avec des pincettes, décollez le ruban adhésif noir qui couvre le connecteur de la nappe de l'écran.
-
-
-
Si c'est le cas, maintenez le volet avec une spatule pendant que vous décollez le ruban adhésif avec les pincettes.
-
-
-
Déconnectez la nappe en la tirant gentiment hors de son connecteur.
A step was skipped. You have to flip up the metal locking tab on the socket before the cable can be removed. See the photo.
And be careful when re-inserting the connector. One end of the two indentations got a little bent (I did not notice) which resulted in a black screen when powering up. I used a heat gun (low setting) to separate the cable from the labtop housing. When re-assembling, first insert the connector (after closing the metal flap as instructed), verify that it’s properly seated, then re-attach the rest of the cable to the laptop housing. In the first try, I first re-attached the cable to the housing, then tried to insert the cable connected into the metal socket. Because of a lack of slack, the cable connector at one end got bent slightly. After identifying the problem, I had to straighten it/unbend out using my fingers. Hence it is easier to insert the connector first, then attach the rest of the cable to the laptop housing.
Black screen upon reboot:
Inserting the display ribbon cable into it’s contact without closing the metal flap before reassembly will result in a black screen.
I live in a colder climate (and it's winter now) - a hair dryer was absolutely necessary to get this cable loose.
The flap must remain closed when the cable is reinserted during reassembly. Carefully line up the cable with the gold contacts facing down, and gently slide it into the connector.
OK, when I read those directions, I did it wrong. I followed the instructions and kept the flap closed when the cable was reinserted during reassembly. Of course I got a blank screen. It should read the flap must be closed AFTER the cable is reinserted during reassembly.
-
-
-
Avec une pincette, décollez le ruban adhésif qui couvre les deux connecteurs ZIF : un sur la nappe du haut-parleur droit, et l'autre sur la nappe audio jack.
Removing the logicboard must be safer way, but battery replacement can be accomplished if you skip here to step 32, and omit 36.
I'm not sure removing the logic board is safer, you have many more opportunities to break something. I left it connected but removed the screws so I could maneuver the battery underneath. Faster and safer imo.
I would strongly advise anyone tempted to follow this advice and skip to 36 to NOT DO THAT. The hardest part of this whole project is removing the old batteries and adhesive. You’re going to want to use the adhesive remover liberally. Getting that on your board, or accidentally gashing at it when you’re trying to wedge out the old battery, is going to ruin it. Trust me, you would hate to go through all this just to find out you fried your board because of this (admittedly tempting) comment. There are seemingly a lot of steps from here to 36, but they’re all pretty easy and fast. KEEP GOING! KEEP FOLLOWING THE INSTRUCTIONS. YOU WILL MAKE IT!
RDG -
-
-
-
Insérez une pointe de votre pincette courbée sous le cou métallique du connecteur de la première antenne et faites levier dessus pour le déconnecter.
The supplied tweezer is no good. You need one with grooves as shown in the picture. When re-inserting the antenna connectors, make sure that they are seated properly before pushing down. If you have magnifying equipment, use that to get visual confirmation. I used tactile feedback from my fingers to discern proper alignment. Try not to force it.
I used the tweezers provided by iFixit. I struggled with both connectors and finally managed to disconnect both, but when I came back to reconnect them, I realized that both connectors on the logic board were loose. Long story short, it turns out that my little exciting adventure changing the battery cost me $530 to send it for repair at Apple Care. I am quite good at troubleshooting Mac and used to work for Apple for many years. This one step is more dangerous than it seems, because you can end up like me, without wifi on your mac. Honestly, for those who think they can do it, think twice. You can thank me later…
For me this step was the only point where I had a bit of trouble. The supplied tweezers were not the best for disconnecting the antenna connectors as Ki Park points out already. In my case the outer ring of one of the connectors on the logic board bended slightly. It bended back in place during assembly and the wifi works as normal again after the repair. It is very tricky though, really be careful in this step and use other tools as necessary.
BY FAR THE MOST DANGEROUS PART OF THE JOB!. I broked one connector and spent an hour with high powered magnifiers to try a repair. Wasted an hour on this. Id suggest leaving the logic board in place if possible
F. I broke one
I actually put one of the tweezer tines under the connector and used it as a lever gently to pop the antenna connector off the housing. Worked well, but I had to be super careful not to break anything.
These connectors are incredibly finicky to reinstall. Precise alignment is critical. You can sort of get a sense of when the connectors are properly aligned by trying to slide them side to side with your finger, but mostly it's a case of trial and error. Don't apply excessive force because you risk damaging the edges of the connectors. When properly aligned they don't exactly click, but you do feel them go in.
DO NOT REMOVE THESE. As others have stated these are fragile and finicky to remove and reinstall. Instead, leave them intact and lift up the logic board at a 70 to 80% angle. Use a piece of tape secured to the bottom edge of the computer and the top edge of the logic board to hold it up and out of the way. If you are diligent, you can remove the batteries without touching or messing with the logic board. Use caution, don't get too overzealous, take your time.
tough one - you guys scared me... SOLUTION: HOLD A SECOND TWEEZERS WITH STRAIGHTEDGE ON THE INSIDE EDGE WHILE GENTLY USING PROVIDED POINTY TWEEZER ON THE OPPOSITE SIDE TO PRY UP THE CONNECTOR. FLAT TWEEZER PROVIDES JUST A HINT OF BACK PRESSURE, KEEPS THINGS STRAIGHT WHILE YOU INSERT THE POINTED TIP AND PRY UP GENTLY. INSERT AND LEVER IT UP - I.E. AFTER INSERTION, TWIST THE POINTED END SO PRESSURE IS STRAIGHT UP, FROM UNDER THE MIDDLE OF THE CONNECTOR - DON'T INSERT AND PUSH AWAY FROM YOU. MINE POPPED RIGHT UP THIS WAY (after exploring all other options). IMPORTANT - THE POINTED TIP (PRY SIDE) COMES FROM OUTSIDE OF CASE , OPPOSITE SHOWN IN PICTURE (AS MENTIONED BY PRIOR COMMENTER.). I ACTUALLY NEED RELATIVELY LITTLE PRESSURE USING THIS METHOD TO GET THE CONNECTORS TO POP. INSERT POINTY TIP UNDER THE NARROW SPOT JUST AHEAD OF THE WIRE, BUT BEFORE THE SOCKET
-
-
-
Faites levier sur le connecteur de la seconde antenne pour le déconnecter.
Broke a connector. Now what?
BEWARE - there are no instructions on how to reassemble this. It goes to step 52 - battery installed and that is it. Easy to pull out, almost impossible to put back in afterwards. So STUDY this to get an idea of how to reattach.
-
-
-
Avec une spatule, déconnectez le connecteur de la nappe du haut-parleur gauche en le soulevant de la carte mère.
Reassembling NOTE. The left speaker cable needs to be below the logic board when screwing in the right screw. Otherwise you will have to backtrack.
-
-
-
Déconnectez la nappe du pavé tactile de la carte mère, en la tirant délicatement hors de son connecteur.
-
Pendant le remontage, vérifiez que les clapets de vos connecteurs ZIF sont levés avant d'y réinsérer les nappes.
Once the logic board has been replaced, when following these instructions in the reverse order it should be pointed out that the all the flaps are flipped down. A distracted person might try to force in the flat connector before realising that he has to flip up the flap of the new logic board.
Ok, went decent but on reconnecting the trackpad cable which I had to replace, it isn't clear which side goes up and which side goes down. From the photos, it appears the copper coated side is down at least on the logic board. Is this the same on the trackpad connector?
I can't quite find a clear photo of the copper surface position on either end of the ZIF trackpad insertion.
HELP!
-
-
-
Retournez la partie frontale de la carte mère.
-
Soulevez et détachez le morceau de ruban anti-interférences électromagnétiques (EMI) qui fixe la carte mère au boîtier inférieur.
“Reattach the tape securely during reassembly.”
In my case the tape did not stick properly to the lower case anymore and also came a bit loose from the logic board. Nonetheless my macbook works fine after the repair, so I'm not sure how important the EMI tape is. If I experience problems in the future I might open the macbook up again and check the tape and perhaps reattach it better with some new glue. There is probably special glue needed, so I'll look into that when it becomes an issue.
-
-
-
Retirez la carte mère.
If you are replacing the logic board once the machine has been rebuild the 2015 model has to have a 5W power adapter plugged into the machine first before the full 29W power supply otherwise there is a risk of damaging the logic board. Once the power is supplied the battery disconnect LED will switch on and once this has occurred you can remove the 5W and supply the machine with the full 29W power adapter.
While it’s true that the internal documentation specifies this for a 2015, after frying 2 motherboards with a normal charger, I spoke with the engineers and they told me that this also applies to 2016 and 2017 macbook main logic boards. I say- It can’t hurt to try to wake them up with a 5 watt charger first! Please take 5 minutes to save your motherboard.
Noah -
-
-
-
Soulevez la partie arrière du boîtier inférieur et surélevez-la en utilisant un support comme un livre ou un bloc de mousse par exemple.
-
-
-
Protégez vos yeux lorsque vous utilisez et appliquez le dissolvant pour adhésif. (Des lunettes de protection sont incluses dans votre kit.)
-
Ne portez pas de lentilles de contact sans protection des yeux.
-
Des gants de protection sont aussi inclus dans votre kit. Mettez-les dès maintenant si vous souhaitez vous protéger.
-
-
-
Enlevez le capuchon en caoutchouc du flacon de dissolvant pour adhésif.
-
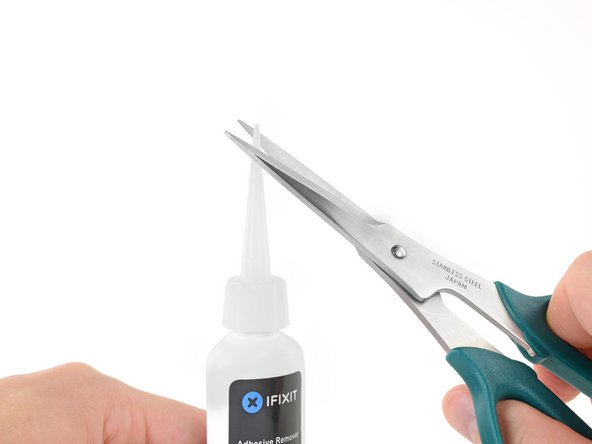
Utilisez des ciseaux pour couper le bout de la tige d'application.
My kit has black cap with added curved clear piece attachment
My kit has a screw-on black plastic cap, with an applicator with a pre-cut hole inside.
I am not sure why one should use this substance, since it turns out that isopropyl alcohol dissolves the glue, as the directions note below. -
-
-
Appliquez quelques gouttes de dissolvant pour adhésif le long du bord supérieur de la cellule avant droite.
-
Attendez 2 à 3 minutes que le dissolvant pénètre sous la cellule de batterie, avant de passer à l'étape suivante.
Das ist nicht nötig. Ich habe mit einer schmalen Spachtel die Akkus sehr gut und vorsichtig vom Klebstoff getrennt.
Hat wunderbar geklappt.
Gruß aus München, Tom
The applicator on the new bottles of the adhesive remover are much bigger, which makes it harder to get the product under the battery.
-
-
-
Après 2 à 3 minutes, glissez un coin d'une carte en plastique sous la batterie.
-
Faites glisser la carte plus loin sous la batterie pour la séparer de l'adhésif qui la fixe au boîtier.
-
-
-
Retirez la batterie en l'éloignant de la zone du haut-parleur et de la carte mère.
-
Décollez les gros morceaux d'adhésif à l'aide d'une pincette ou de vos doigts gantés.
-
Grattez les restes d'adhésif avec un outil en plastique et nettoyez les zones sous-jacentes avec du dissolvant pour adhésif ou de l'alcool isopropylique. Essuyez dans une seule direction, sans mouvement de va-et-vient, jusqu'à ce que tous les résidus d'adhésif aient disparu.
Change the battery: 25 minutes
Remove the adhesive: 2:35 hours
I used citrus oil. It’s vegan. Mr Jobs would approve ;) Made it very easy - less than an hour. After removing battery with the method shown in this iFixit, apply oil to remaining adhesive (black stuff included). Wait five minutes. Scrape black stuff away with plastic card etc. Wipe glue residue from edges towards middle (of each cell) with cloth. I used an old face washer. The nap picks up the clumps of dissolved glue residue nicely. Finish with clean cloth and alcohol. Looks like new!
I applied some isopropyl alcohol to the adhesives then broke up one corner and lifted it up, then slowly pull it the same method to remove an iPhone’s battery’s adhesive. The old adhesives came off with ease and cleanly — less mess to wipe off afterwards.
Once the big, black adhesive strips are removed, cleaning up the remaining detritus can be time consuming. I found the best way to proceed was to continuously apply small quantities of the adhesive remover while wiping away the detritus immediately.
Didn't see these comments b4 removing the adhesive so spent 2 hours scraping it off. Next time I might use some Goo Gone or alcohol.
-
-
-
Testez soigneusement l'ajustement et l'alignement de votre nouvelle batterie avant de l'installer.
-
Votre batterie de remplacement peut être recouverte d'un film plastique épais pour aider à maintenir les différentes cellules en position lors de l'installation. N'enlevez pas ce film avant que la batterie ne soit installée.
-
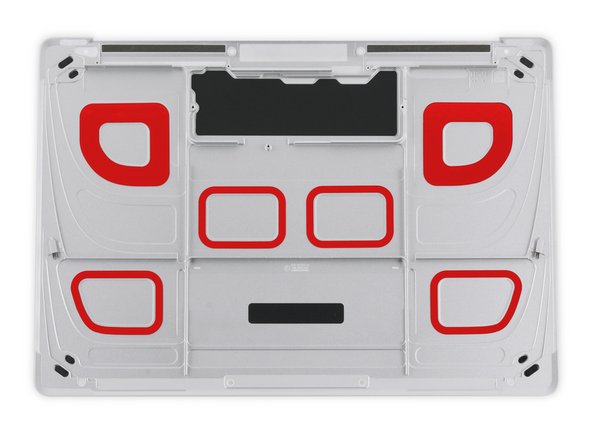
Si votre batterie est livrée avec une couche d'adhésif préinstallée en dessous, retirez le film plastique du bas. Si votre batterie est livrée sans adhésif, appliquez du ruban adhésif double-face fin, comme du Tesa 61395, sur le boîtier inférieur, dans les zones marquées en rouge.
-
Positionnez soigneusement la batterie et mettez-la en place. Appuyez et maintenez chaque cellule fermement pendant 5 à 10 secondes pour qu'elle adhère bien au boîtier. Ensuite, enlevez le film supérieur ainsi que tout rembourrage en mousse.
hola a todos, yo le he cambiado la batería a todos mis Macbook pero el cambio de esta batería fue verdaderamente aterrador, les recomiendo que si está en su posibilidad económica pagar a un agente autorizado o una macstore hagalo, el cambio de mi batería lo realice yo y fue satisfactorio, pero me faltaron muchas herramientas. el Macbook no encendido a la primera destapar revisar volver a cerrar. la batería tiene una pega extremadamente dura y me costo mucho sacarla Suerte
hello to all, I have changed the battery to all my Macbook but the change of this battery was truly terrifying, I recommend that if it is in your financial possibility to pay an authorized agent or a macstore do it, the change of my battery makes it me and it was satisfactory, but I lacked many tools. the Macbook not turned on the first uncover review close again. the battery has an extremely hard tack and it cost me a lot to take it out, luck
To remove the battery, I applied acetone on the edges of the battery. Kept it tilted fir a few minutes and started prying with a credit card. Reapply acetone to the edge of the card, pry again, wait a few minutes and pry again. I thought it would be harder than it was. Removing the battery and all adhesive probably cost 30 minutes work.
I found after reassembly I had no response from the display, although I could hear the boot up sequence and USB-C cable insertion audio. After reset of the SMC I at least began seeing the backlight on boot. Subsequently forcing entry to diagnostics mode caused the display itself (i.e. graphics) to also come to life. The diagnostics found no issues but did seem to trigger the display to start working... hopefully helpful to someone.
I managed to fit the battery with the help of this guide, but I have turned it on, and it does not recognise the pad or the keypad and yet it recognises the keypad button to turn it on and off.
The start screen shows, but I cannot put my password in because the keyboard doesn't work and yet it went into a mode telling me to use a Bluetooth mouse which I did that connected and the mouse cursor works but then tells me to attach a Bluetooth keyboard. So the keyboard and the mouse pad on my retina does not function. Has anybody got any suggestions? Are there any of the connectors inside that I took off that out the obvious ones to check the connection?
-


Pour des performances optimales, calibrez votre nouvelle batterie après avoir terminé ce tutoriel.
Pour remonter votre appareil, suivez ces instructions en sens inverse.
Pour éviter d’endommager la carte mère, avant de d’allumer votre MacBook,' branchez-le à une source d'alimentation basse tension avec un chargeur 5 Watts d’iPhone et un câble USB-C vers USB -A.
Si vous remarquez un comportement inhabituel ou des problèmes après avoir installé la nouvelle batterie, il faudra peut-être réinitialiser le SMC de votre MacBook.
Apportez vos déchets électroniques à un recycleur certifié R2 ou e-Stewards.
La réparation ne s’est pas déroulée comme prévu ? Consultez notre communauté de réponses pour obtenir de l’aide au diagnostic.
Annulation : je n'ai pas terminé ce tutoriel.
113 autres ont terminé cette réparation.
Merci à ces traducteurs :
100%


Ces traducteurs nous aident réparer le monde ! Vous voulez contribuer ?
Commencez à traduire ›


81 commentaires
Beautiful. ‘Followed the instructions to a T. No issues at all. Thanks!
Everything worked, except the keyboard. No backlight, no power. Using remote keyboard for now. Any ideas? Trackpad works fine.
@nabrams1 Check both cables that connect to the trackpad—make sure all four connectors are clean and fully seated, and that the cables aren’t damaged in any way. The first cable connects the keyboard to the trackpad, and should not have been disconnected, but check it anyway. The second cable connects both keyboard + trackpad to the logic board. Good luck!
I did try all of those and checked the cables and ZIF connectors under a microscope. I am thinking a bad trackpad now since it works fine, but the keyboard does not respond. The only way I have figured out o use the machine is to disconnect and reconnect the battery, which is not easy. Otherwise, I cannot power it on myself since the power button is part of the keyboard. Apple won’t touch this now since I replaced the battery myself, so it is kind of a brick. I can’t run AHT since the keyboard doesn’t respond (command-D). Any ideas?
Bad trackpad seems possible. If the keyboard was working before the repair, there may be damage to the trackpad or the logic board itself. It’s hard to say without swapping out parts to test, unless you have a microscope + multimeter + board schematic, and we’re rapidly getting out of DIY territory there. I’d probably take another look at the cables and sockets just to make extra sure it’s not something simple. Hope this helps!
Huzzah! I ordered a tracked replacement else suffer bricking my MacBook. All is better and I am typing from the machine right now! I will add a comment to the trackpad replacement, but my machine had T4, not T3 screws. I stripped a couple on the removal. In the end, this was more expensive than Apple replacing the battery, but there is a sense of triumph! I was also bitter since Apple had already replaced the keyboard and screen due to recalls. I wanted to DIY this one. Thank you Jeff!
Awesome!! Thanks for the update :D
Had same dead keyboard, keyboard light, track pad and click problem after battery change. Was able to recover through voodoo magic. Crappy design to with keyboard tracking battery detach/attach sequence.
Howard -
All in all a pretty easy replacement… if it weren’t for the arduous removal of the adhesive!
My device doesn’t have a tri-point screw as mentioned in Step 14, but aside from that, nice writeup!
Same here, follow instructions, READ throughly and you’ll be fine. Watch for those little connectors, WiFi especially (fragile !). No tri-point screw in 14 either, just a phillips type. As for the adhesive removal I used 70% tech alcohol + 30% acetone mixed together + little spatula that came with battery (bought at Aliexpress). After assembly I connected phone 5V charger as suggested. All worked out fine. Just time consuming :)
My 2015 macbook does have the tri-point screw Y00 and i only had the crew driver Y0 and Y1 which are to big :-) so made the quick route.
Step 14 T5 only and then steps 31 and 34 so I could tilt the pcb enough to remove and install the new battery.
I used the usb C to usb A cable with a iPhone charger after connecting the computer starte up, and everything is fine now 4592mAh and cycle 1 :-)
Hope that this battery last longer than the 272 cycles of the original battery. Thanks for the detailed description what makes at easier for me to judge if I will manage.
Gert Jan
I used the guide and it worked very well. I did not have the adhesive remover and simply used heat and a scraper to manually remove the batterie. I was very careful during that manual removal it worked very well. Because of that, I skipped steps 14-33 and I think I was better off. I simply lifted the logic board up and remove the battery while all the cables were in place. I feel this was better because there was less risk of breaking a connector or cable. I cut a lot of work out of the project and it went very well. I had it completed in about 45 minutes.
Great guide - thanks a lot! Like another user I skipped steps 14 to 33. It was no problem to remove the battery without removing the logic board and all the other stuff. You only have to be careful to hold the body of the Macbook tight so that it does not move when you work on the battery.
Heating the glue was not sufficient, I had to go and buy the detergent.
After performing the steps, and the low power startup procedure, on initial startup I had chime, the battery charging image (48%) and then the screen went gray - and the mouse pointer was on the screen and it would respond to the trackpad. Then the screen went squirelly (kinda like it lost sync). I restarted the laptop and then the screen went blank. I’ve gone back in a couple of times to reseat the display cable, to no avail. And I’ve lost the keyboard lights. So I’m going to take a breather and try to perform steps 1 to 22 over again. Any advice?
I went back in and reseated the trackpad ribbon cable and reclosed the ZIF connector, which restored the keyboard. I used an external monitor to confirm that the laptop is booting up. I also reseated the display cable, but that did not work. I have a new cable coming in a few days, and I’ll replace the current cable, hopefully to fix the issue…
Hi, I did everything as said on the guide, but my computer is totally dead. Nothing happens when I charge it, and I can’t turn it on. I thought there was a problem with the battery I bought, but now I got a new one, and it still can’t turn on. I have checked every connection 4 times, so is there anyone who has an idea to what I can do? I don’t have a usb-c to usb-a cable so I just used the normal charger. Could that be it? Thanks in advance!
And the small led light on the logic board is lit.
Hi,
A short way is also possible, take about 15-20min to change the battery for me.
DON’T do steps 8-9-10, disconnect the ZIF connector on the motherboard side only.
SKIP steps 15>>30, only lift the motherboard by placing a pencil eraser under it, and finally SKIP step 35.
For detaching the battery, a credit card also work, no need detergent
Work great for me.
I used your approach after I opened the computer and quickly realized that I didn’t want to disassemble so many components. I also read some comments from people who made mistakes during putting everything together again.
The hardest part was removing the battery while the computer was opened with a 45-60 degree angle while making sure the the ‘prop-up stick’ didn’t fall out resulting in the top half of the computer falling down. Man, that battery is glued in there so well, was hard to remove it. (even using everything that came in the ifixit repair kit.
I was so happy when after plugging in the computer and pressing the button I heard the startup sound.
Job done!
Corjan -
Excellent instructions. My first time opening a macbook. I did see the route to the short way some mentioned as I was going through the steps, but it would not have worked for my repair. I had to get in there, battle the adhesive (still using remover), and pick the bits off which would have been near impossible if it wasn’t fully opened without risking those connectors. Last battery lasted 970 cycles comfortably; I don’t know if heavy use, travel, dirt, heat, etc. really cemented my battery adhesive. Having it fully apart allowed me to be meticulous about getting it clean and perfectly seated as well. If you do purchase the kit and have the 2015 macbook be prepared to have a PH00 on hand if the Y00 screwdriver tip doesn’t fit (step 14) or the ability to run to the store real quick. Thumbs up to the writer of the guide! Thanks! Saved me a good amount of money with excellent DIY instructions.
Thank you very much, excellent instructions. My issue is that, after completion, the Macbook (early 2015) neither starts / wakes up automatically from the lid opening action, nor does the keyboard or trackpad cause any input whatsoever. I have double-checked all 4 connections of the ZIF connectors/cables as mentioned by you in the earlier answer to a comment. Could there be another bigger issue? The display displays everything correctly as it was before the battery replacement…
Excellent instructions on the battery replacement for a battery that had failed and reporting service battery after 530 cycles, a big thanks to the author. After completing them the MACBOOK worked OK and then I started to get intermittent problems with the power button and the system bringing the shutdown dialogue without pressing the power button. On closer examination and second removal of the trackpad IPD flex ribbon cable (which also routes keyboard signals to the logic board) the cable came apart at the fold half way along the cable. This cable is very fragile and as mentioned in step 7 you need to be very careful on handling them. In my case I think the cable was fatigued or mechanically damaged where the fold was during manufacture . A replacement cable has been installed and the laptop now works ok.
I have also posted this comment on the trackpad repair fixit.
I was able to replace my battery with the help of this website and my computer is working like a champ! Thank you so much!
Even though I had the screwdrivers necessary for this project, I purchased the entire battery replacement kit which made everything a breeze. Make sure to also have a box of ziplock bags and a sharpie so that you can keep all of the screws organized. And some painters tape to keep the opened laptop held in-place to a 90-degree surface while you’re working on the ribbon removal. For the 90-degree surface, I used another opened MacBook… but a wall would work also. It definitely helped to read the comments, particularly when it came to the “tri-point screw” removal. For me it was simply a Phillips screw. The one frustrating part of this process was removing the Phillips screw that held the USB C connector in place. It was necessary to take a piece of high-grit sandpaper to the screw that was provided in the kit, because the tip was far too pointy for the small screw. After that, everything went smoothly.
Hardest point for me was not having the exact tri-point screwdriver
(it’s one thing I fault Apple on, as it was unnecessary to have two types of screw on one cable).
I used standard Lighter Fluid (easily available in the UK) to remove the batteries, which was far less trouble than I thought it would be. ( I’ve used it before to remove sticky label residue, so, figured it would work).
Really useful guide, thanks for the tip on the 5w (5V - 1A) iPhone charger. Everything appears to be working!
Great instructions, I had two issues step 14 which was the removal of the 3.5 mm screw but eventually managed to remove it. Second, (user error) the Zif connector must have had some dirt or something because once everything was re-assembled the keyboard and trackpad did not work. I cleaned the connector, double-checked all the other cables and the issue was resolved. Other than these two items, make sure to follow step by step.
Connected to 5w charger and I don’t get the chime and the battery icon how long do I need to leave it .cheers
All Sorted lose connection
Excellent instructions, and easy to follow with great pictures that make everything crystal clear. I purchased the replacement kit and had absolutely everything I needed to complete the repair in less than 2 hours. Works as advertised. I had to reset PRAM to get the battery to start charging.
Would it be easier to just get a new bottom case w/ battery pre-installed?
I tried all the steps and replaced the battery. However, I used the computer charger to plug in the computer. The computer gave the chime sound but nothing came on. No apple logo. I can hear the wire connection but when I press the power button nothing happens.
Do you know why my new battery is not charging and how to fix it?
I have installed a new battery, then first connected with a 5 watt iPhone charger. Subsequently, charged it with my MacBook charger to 100%. The charger was working normally. For calibration I drained the battery by normal usage until the Mac fell asleep. Five hours later I connected the charger, nothing happens. When I push the power button, the low battery symbol is shown with the symbol I should charge.
My second new battery is having exact the same problem. After battery drainage, when the 5 watt iPhone charger is connected, the battery led on the motherboard is on. As soon as I remove the 5 watt iPhone charger, the led turns off. When I connect my regular MacBook charger, the led does not turn on.
Frankmac -
It’s normal for the machine not to boot up right away after a deep drain on the battery. Plug the charger in and leave it for 30-60 minutes, then try turning it on again. The battery charge symbol on the screen is not normally an indication that anything is wrong with the battery; it just means there isn’t enough charge in reserve for the system to safely boot up quite yet. Just give it a little time.
Thank you for your reply Jeff. The 5 W iPhone charger and regular MacBook charger have been plugged in for several hours. When I try to boot it afterwards, nothing happens. In the beginning the battery charge symbol was there, later it was not (probably because the battery was fully drained). Is there another explanation why the battery is not charging? I have ordered a second new battery.
Frankmac -
I followed the instructions and everything works but the audio. I’m pretty excited that it’s working and I’ll go back in and tighten some things later this week. The headphone jack didn’t work either.
Hallo, wie beschrieben ist der Akku eingebaut, wird erkannt, aber leider wird der Mac nicht Strom versorgt. Der Mac schaltet sich ohne externe Stromversorgung ab. Was habe ich falsch gemacht?
Versuchen Sie, die SMC zurückzusetzen
I did every step and I replaced the battery but now my MacBook doesn’t start, she only chimes, the chime cuts when almost finishing and then nothing, I don’t get a charging screen. The led inside tells me there’s power but I don’t know what to do now.
Same thing here, any clue on what's going on?
Thanks
I disconnected the battery two times and nothing changes!
If you are technically oriented, this is a good guide to replace a 2015 MacBook battery. I did this work myself after reading the how-to. Delegating to an Apple repair person seemed fraught with too many places to mess up. Apple doesn’t have a good track record of owning up to mistakes.
Make sure to read the comments. There are a couple of issues in the how-to description that can lead to a bad outcome. Overall, it’s a good how-to guide.
For me, steps 15 and 22 were critical. Read the comments. If after replacement power doesn’t come on, it could be step 15 during re-assembly. Not easy to diagnose because damaging the logic board (despite following instructions and precautions) is always a possibility. If power comes on but the screen remains black, check step 22.
Most of the steps involve seating connectors into sockets for which there is no simple correctness check. Following the instructions carefully will help prevent damaging the laptop. And you can retrace the steps to debug problems.
Great instructions and photos. I would emphasize the delicate ribbon cables don’t like to be twisted. I was almost completely finished reassembling, when I over twisted the trackpad ribbon cable and it broke into three pieces. A quick order and I had the replacement in a couple days. The final battery replacement worked perfectly. Thanks for the great guides!
Make sure you get a PH000 screwdriver and you dont need any extra tape, comes pre applied!
Followed guide step by step and it worked perfectly. For those with the 2015 model and the 5v charger don’t panic if you don’t get a tone or battery icon after fifteen minutes. Mine took nearly 45 to boot up. Be patient before you think of tearing it apart and having another go. Great guide!
Changing my Macbook battery by myself was probably the one of most stressful things I’ve ever attempted, but the instructions were very clear, and the part kit was great. One problem on step 14 (It’s not a tri point but a philips head), however I thankfully had one small enough in my garage. Also struggled a little with the adhesive on the cable in step 21. I think the idea is to separate the cable from the adhesive, or separate the cable and adhesive tape from the case? Also, when calibrating the battery, it’s turn on with the low voltage, then switch to the normal voltage to charge. I was worried it wasn’t charging, then realized I needed to change the voltage back to normal, after powering it on.
Thank you for this great resource and service. Hopefully many more people will be inspired to repair their devices, and not continue to trash the planet.
thanks bro!!!
anyone else having an issue where they need to keep opening the laptop and resetting the battery? i only just installed it the other day it was working fine for a couple days and then it’s started playing up. after reboots it won’t start up properly either i have to give it it’s time (a good hour or two) and then it might decide to switch ON or the best way it so open it up press the little button to “turn off the battery” and then just put it back together and powers up straight away. super strange
es necesario cargarlo con que tipo de cargador de iPhone , podría mandar una foto porque el cuadrado es usb a lightining , otras marcas tienen cable de usb a entrada usb C .
Chime, chime, chime and nothing else… no low battery light nothing and it’s about a half chime. I have tried a few time in the last few days unplugging and plugging it back in. The chime stops after a while then starts up again. I painstakingly followed the removal and replacement directions and now the computer will not fire up with the iPhone charger as directed. With my old, completely dead battery it would at least start up before if I kept the computer plugged in. It is a 2015 model.
Has anyone received any answers beside there may have been a problem with the install? “If the MacBook fails to power on after 15 minutes, there may be an issue with your repair.”
Is there another procedure to follow?
Help me please… thanks
Same for me, any clue?
I followed this guide and it worked perfectly, except for one thing - I had no audio. I took the whole thing back apart, checked all the connections, put it back together…still no luck.
I reset the PRAM and the SMC, with still no luck. I figured I must have damaged one of the cables, so I ordered replacement parts, and prepared to return it to the client. But before I did that, I wanted to make sure I exercised the battery, as the card that I received with the battery from iFixit advised. So I charged it to 100%, turned off all the battery management and played YouTube videos all night to run it all the way down.
The next morning, it was dead as a doorknob. So I charged it for about 5 minutes, pressed the power button and all the sudden it was working!
How long should the iPhone charger be hooked up before switching to the MacBook charger?
This step might be what you’re looking for!
Ottima guida, dettaglio e qualità delle immagini perfetto. Grazie
I just successfully completed this battery replacement on a 2015 MacBook that I picked up on eBay for a song (the original battery had 1,068 charge cycles on it and it wouldn’t hold a charge anymore). The instructions are easy to follow, and the hardest part for me was getting the new battery aligned just right to fit the terraced parts of the case before the adhesive made it impossible to shift. To anyone else who attempts this repair, don’t overlook the instruction to plug in the MacBook to a 5-watt charger before powering up the first time. I was thankful to be told of this quirk in these machines. Many thanks to the author for this writeup!
I did this repair with the ifixit kit and it went almost perfectly. The macbook is as new again with a 5369 mAh battery.
10 min. Preparation and setting up my workplace. This was well worth the time and it helped a lot during the rest of the work to have everything close at hand.
15 min. Taking apart the macbook, then a little break. All the right bits were included. Only the tweezer was not very useful since it is a bit slippery.
30 min. Removing the old battery, with plenty of time for each part of the battery to soak in the solvent. Removal was pretty easy with the provided cards and did not need much force. I stuck some plastic packaging underneath each loose battery to prevent it from re-adhering since the kit only had two plastic cards included.
20 min. Cleaning the lower case of all the old sticky stuff. This was a lot more work then I expected, but worked out fine. The provided solvent and cleaning cloth was very helpful. I cut the cleaning cloth in three pieces beforehand to have a clean piece as spare.
[continuation of previous post]
5 min. Putting in the new battery. Very easy to do with the pre-attached tape and transparent plastic cover sheet.
15 min. Re-assembling the macbook. Some of the tape at connectors would not re-attach, but this did not cause any problems so far.
5 min. Safe-charging with the 5W iPhone charger. I almost directly got the familiar chime sound and the macbook started without any problems.
After charging the battery fully with the normal Macbook charger I'm now using it again to type this review. Now just calibrating the new battery by using the Macbook and then it can hopefully be used for many years to come.
Total repair time (excluding breaks): 100 minutes.
Thank you iFixit for providing this guide and the very useful and complete repairkit!
Just a heads up, after almost 2 months suddenly the battery is not found anymore by the system. See Why does my MacBook 12" A1534 say: Battery not installed? for details on my progress getting it to work again.
I followed each step exactly - no broken clips or cables. Went directly to a 5W iPhone charger, but the laptop is dead - no life or charge at all. I cannot put the old battery back in since the new one is glued in place. Not sure what went wrong or what to try next
To follow up, i plugged the laptop into it’s regular charger. It booted right up and everything is functional. However the battery indicator shows an ‘x’ through it. Battery status shows 1% charge and ‘Needs Service’. I can use the laptop but only with the power cord. Could the new battery be faulty? is there something I can check?
CJB -
The battery was bad and iFixit sent me a replacement. This time everything worked as expected and my MacBook is as good as new! Great customer service.
CJB -
Completed the repair. Everything worked nicely! Great guide with all the necessary detail!
Superb - thanks for the large amount of adhesive remover - needed it :-). All worked well - skipped 14-33 just proped up the MB
Amazing guide - worked PERFECTLY, but boy did it require exquisite care and patience. I think this probably took me 6 hours, but I went about it very slowly.
Great guide. Followed it carefully and everything worked well.
Thanks for a great guide! A better close-up of the touchpad ZIF connector in its inserted state, tape pulled back as far as it goes for a clear view, would have been helpful. I wasn't sure if I had it fully inserted - the contacts stuck out a little bit, and I was applying more pressure than maybe I should have before realizing this is the correct insertion depth.
Realizing I needed to follow it backwards for reassembly was a little frustrating. I get that everything we need is already in there, but would have preferred straight-forward reassembly instructions to save time and be more confident that I'm putting everything together correctly, since there's a lot that can go wrong.
As for my repair, it went well! There was no sound at first. Not sure why- I opened it back up, and the audio ribbons all seemed properly connected. Disconnecting/reconnecting did the trick.
Breathing new life into the Macbook with a fresh battery & upgrade to Ventura using OCLP, it feels new again after 8 years!
I completed this guide without incident, but plugging in to the 5V/1A charger didn't give me a chime. (I left it plugged in to that overnight just in case.) When I reassembled, screwing in the screw in step 12 turned on the faint white LED, which I understood to mean that the new battery was making good contact. The ribbon cable from the USB-C port also seemed to click back in place with no issues. I plan to disassemble and check both of these again (along with the grounding clip), does anyone else have any more suggestions for things to check when I open it back up? I'm handy with a multimeter if that helps.
Guide was very well written - great work! I skipped most of the disassembly steps and simply removed the 2 motherboard screws to lift out the old and set in the new battery. Working the old battery out was more difficult by leaving the motherboard and related components in the machine but I did not want to mess with detaching and reattaching wires, especially ones that are pushing 8 years old. It took maybe 30 minutes to remove the battery and then another 15-20 minutes to remove all the old adhesive. Not too bad.
The new battery is working well so far.
perfect Instructions. I had no issues - took me 3,5 hours though...
Hi,
I tried and followed this page to change the battery yesterday.
My fault is, I did not turn off the switch on motherboard one, and did not install anything between motherboard to old and new battery during the work.
The other work, I believe perfectly did.
Then I finished assemble, and started to use computer, but it does not work.
After I did SMC reset, and pushed button on the motherboard 10sec x 3 times.
Still doesn't work.
Does anyone have same experience?
If so, how you fixed?
Or if know any expert to suggest any solutions?
I need anyone's advice.
Cheers,
Did his recently on a 2015 Macbook. Didn't need anything special except a spudger to pry up each cell. Sometimes, depending on the glue that was used to glue down the cell, I have used a thin piece of wax paper under each cell as I pry them up to keep them from adhering again to the frame.
There is one major GOTCHA. Be careful to remove the three bridging cables - especially the middle trackpad cable as they are easily damaged. I damaged the middle cable accidentally so had to replace it - $16 or so.
All in all, wasn't as bad as my 2016 Macbook Pro battery replacement.
One thing that also helps is warming up the frame of the Macbook. Doesn't have to be really hot just around 100 deg F so that things separate easier. I'd go this before I would put some solvent on it.
As for the battery connector, I used a piece of cellophane tape on it to keep it from reconnecting accidentally while you're working on the machine. Once finished, remove the tape and screw down the battery connector.
Should be very easy , but: the bottle of adhesive remover Come without any pump , is just an wide open bottle
Very important : this kit doesn’t include all the necessary parts , like the tape that you need for new battery.
Other thing is sort of organizer for the small screws - is very difficult to keep them separate and in order .
Other very important think is the “Take care not to damage the ribbon cables that still attach the lower case to the MacBook.” Should be mark very distinct and this part have to be disconnected first ! Is very very fragile . Mine broke instant
Macbook wouldn't start from the battery after following these instructions to a T. It's a newly ordered battery and it is not showing in System Report. The little led light does light up on the connector board. Tried using a 5w charger first... then a 27w. Then a 60w. It turns on but nothing battery.
I've always wondered about the price of battery replacement at Apple for the Macbook 12". Now I know how fiddly and time-consuming it is to replace the battery. Unfortunately, Apple no longer offers this service and I had to do it myself. Anyone who has ever replaced the home button on an iPhone 4 will also be able to replace the battery on a Macbook 12".
There was a problem with Step 7, although I was careful, the flex cable broke. I was able to order a new flex cable on eBay. If you look at the sales figures, the problem seems to occur very frequently. ;-)
Now everything is working again!
If, like me, you didn’t have a P5 Pentalope screwdriver but did have one that fits an iPhone.
You can sand down the tip until it’s the right size.
Stuart - Réponse
Thank you Stuart! I would never have thought of this and it worked perfectly.
R McP -
Hello,
where do I plug the USB-C to USB-A cable on MacBook MacBook Pro (Retina, 15-inch, Mid 2015)
I can’t any port suitable for USB-c !??
sissi - Réponse
My MacBook had P4 pentalobe screws, notP5
Greg Lavardera - Réponse
Big thanks to Jeff for such thorough and detailed instructions. This is definitely a more advanced repair so if you're not comfortable with making such repairs, like having experience working on iPhones, computers, etc., you might think twice before attempting. It's very helpful to read all the instructions thoroughly before starting. Plan on 3 to 4 hours—the battery removal along with its adhesive is a real $@$*-show, but totally doable if you followed Jeff's recommendations.
I'll post a few tips in the comments on each step that I think is worth noting but I will mention here one of the trickier steps. ZIF connectors on the flat cables can be a little tricky, especially if you have never done these. Before attempting to do the first one (step 8) review the others in steps 16, 20, and 25. You'll get a better sense of how these little retaining flaps flip up and what they actually look like when you study each photo in each step—they are very tiny and fragile.
Steven Gibson - Réponse
Just finished replacing the battery. I followed the directions that came with the battery instead of this guide. In short, Steps 15 to 35 are not necessary. You don't have to completely disassemble the laptop to replace the battery.
Andrew Mohan - Réponse
Thanks. I skipped it too and it worked.. It was a painstaking to remove the two side batteries as the cables were connected. But a little patience gets the job done. I did however remove the audio jack connector but from the audio board. Removed the display connector and the usb-c bracket to get the bottom case free.
Paras Tolani -
READ EVERY STEP, AND EVERY COMMENT FOR THAT STEP BEFORE ATTEMPTING! Go slow. Think first. Be organized. No probs.
David Nagle - Réponse