Il est possible que cette traduction ne reflète pas les dernières mises à jour du tutoriel source. Aidez à mettre à jour la traduction ou bien consultez le tutoriel source.
Ce dont vous avez besoin
Vidéo d'introduction
-
-
Retirez les huit vis suivantes fixant le boîtier inférieur :
-
Deux vis Pentalobe P5 de 1,8 mm
-
Quatre vis Pentalobe P5 de 2,9 mm
-
Deux vis Pentalobe P5 de 6,1 mm
-
-
-
Soulevez le boîtier supérieur et l'écran d'un bloc depuis le bord avant et soulevez-les à un angle d'environ 45˚.
-
-
-
Utilisez l'extrémité plate d'une spatule (spudger) pour appuyer et maintenir le petit bouton doré "déconnexion de la batterie".
-
Si le voyant LED de marche est allumé, maintenez le bouton enfoncé jusqu'à ce que le voyant s'éteigne, puis relâchez. Cela peut prendre jusqu'à 10 secondes.
-
Si le voyant LED ne s'allume pas, relâchez le bouton après 5 à 10 secondes. Appuyez à nouveau et maintenez-le enfoncé pendant 5 à 10 secondes, puis relâchez. Enfin, maintenez-le enfoncé une troisième fois pendant 5 à 10 secondes, puis relâchez.
Wow okay could someone explain why this is necessary? What happens if you skip this step and simply undo the screw to disconnect the power?
Removing the screw does not disconnect the power—power comes from the battery terminals contacting the underside of the logic board, and they’re tricky to separate reliably at this stage of disassembly. This step is the safest and easiest way to kill power; don’t skip it.
Hi what will happen if i skip this step, coz i did tried to power down the battery by pressing small gold button, but no avail. the LED light still there even after more than 5 times press (5-10secs or more) each press.
Did you learn the answer to your question? I'm having the same issue -- I keep pressing the gold button but the battery light stays on.
R McP -
Mi laptop doesn’t turn it on doing that ):
-
-
-
En le soulevant par le bord avant, ouvrez le boîtier inférieur à un angle d'environ 45°.
Before the IPD flex cable can be removed the battery disconnect button has be held down for up to 10 seconds. If the LED near the battery connector is switched on it shows that there is power going through the logic board from the battery, once the button is pressed and this light goes off the machine is safe to be worked on.
-
-
-
Utilisez une pincette pour décoller le ruban adhésif recouvrant le connecteur ZIF de la nappe du trackpad.
Only peel back the first half of the tape covering the trackpad cable ZIF connector—do not completely remove.
Gently - lift tape while wiggling cable side to side. Be sure tape is released, but do not remove completely
-
-
-
À l'aide d'une spatule, retournez délicatement le clapet de retenue du connecteur ZIF de la nappe du trackpad.
This is very tricky indeed - at least on my computer. I failed at this point - having skipped to it as sugested above so as not to stress the ribbons on the other side. The ZIF was not as I expected. They had opened when I pulled up the stick cover and I found I was working on the socket itself. The top edge came adrift after almost no pressure being put on it. The ribon did not come free with gentle pulling though. At that point I put the back on again… waited until the battery recharged a bit and found I had not nroken it after all. I doubt I shall try again. It is much harder to replace than the 15 inch - much…
I’ve just found that I have broken it after all. No keyboard. Bluetooth still works so I can use the machine.
All in all, an expensive mistake. BTW - I did NOT get the kit from IFIXIT - not sold here.
I found “Recognizing & Disconnecting Cable Connectors”
Reconnaître et débrancher les connecteurs
useful, esp. for someone who has not used ZIF connectors and retaining flaps before. There are several retaining flaps that need to be opened. The first time is tricky as you need a sense of how much force to apply. I used the flat end of the provided spudger. Apply progressively firmer upward pressure until the retaining flap pops open. The first time is tricky, but straightforward thereafter.
Mouse back and forth between the two right-side thumbnail photos and you will get a little animation feel showing how these ZIF connectors operate—it's very helpful. Apply light but consistent pressure to pop them up. Helps to go side to side if they're a little stubborn.
-
-
-
Déconnectez la nappe du trackpad en le tirant délicatement à travers sa fente dans le châssis.
it would be nice to have a specific picture of the cable and contacts and how it is oriented in the ZIF connector. This isn't clear in any of these photos or text.
My trackpad cable snapped so had to replace it and none of the replacement cables have the tape which is on the smaller end to the trackpad. The other end is fairly easy to figure out but the trackpad end isn't as the cable makes a 180 degree turn inside the case (poor design).
-
-
-
Retournez soigneusement le MacBook, de sorte que le boîtier inférieur repose à plat.
-
Soulevez l'ensemble boîtier supérieur/écran à un angle d'environ 90° et calez-le contre quelque chose de solide pour ne pas avoir à le tenir.
-
Posez un morceau de ruban adhésif près du pavé tactile, pour fixer le boîtier supérieur et éviter tout mouvement accidentel.
You can open the laptop screen all the way open with it flat in the table (screen facing up) and the keyboard should stay up.
-
-
-
Retirez la seule vis Torx T5 de 2,9 mm fixant le connecteur de la batterie à la carte mère.
the moment you opening macbook case and before any tinkering with connections, you MUST press little yellow button on logicboard, located on the right from battery connector - this will disable all power to the board. You can check by looking at the small led on left side of the battery connector - if there is very faint light, it means that power is still there. After pressing button light should go off. Removing screw is not necessary at all, and like I said - you MUST disable power before any touching to connections etc.
Where it says
“2015 models have a silver grounding clip with two foam pads directly under this screw“
I have a 2015 MacBook & the grounding clip is not there!
I’m using this guide to investigate why there are lines on screen or darker screen at certain angles of opening it. Also a background ghosting effect on screen too.
No obvious damage or loose connectors so wondered if the lack of grounding clip can cause these symptoms?
Anybody out there know?
Either buy the clip and check, or replace the screen (or LB), but the macbook would more likely not start if there is a missing grounded connection, depending on what is being grounded.
Sean -
-
-
-
-
En précaution supplémentaire, vous pouvez déconnecter physiquement la batterie en insérant un médiator d'isolation de la batterie entre la carte mère et le connecteur de la batterie.
I HAD TO DO THIS TWICE. After replacing the battery while following this guide to a 'T', the battery was not being recognized by the logic board. Strangely, with the power unplugged it would still light up the screen and tell me the battery was at a critical level, but it would not boot. Resetting the SMC had no effect. I thought I killed my computer or got a bad battery, so as a last ditch effort I re-opened the case, pressed the battery disconnect button, removed the screw and inserted the battery separation tool again to Physically Disconnect the battery from the mainboard. After about 5 minutes I then removed the tool and reassembled everything, plugged in via 5v iphone charger and USBA-C cable again and LO, the battery is now reporting correctly, charging correctly and allowing me to boot on its power .
-
-
-
Retirez les deux vis qui maintiennent le support de la nappe du port USB-C :
-
Une vis tri-point Y000 de 1,1 mm
-
Une vis torx T5 de 3,5 mm
I should have read the comments before using the provided 1.1 mm Tri-point Y00 bit. I almost stripped the screw but was able to use a small flat head bit to open the screw.
Ifixit: you may want to update this part in the instructions. Not everyone reads the comment section, esp. when it comes to specification of bits which is basic and must be accurate. This is one of the more critical ones in the procedure that can easily go south. The rest of the instructions are excellent.
early 2015 model here. I’ve used a Y1.5 with cautiously applied down force.
My 2015 had a 2.5mm Y screw not a Y000.
Adding to the helpful comments above, on replacing the 1.1mm tripoint screw, I found the the magnetism of the nearby speaker coil overcame that of the driver and would draw the screw away or the combo of forces would fling it out of the work area! After fiddling with it for too long, I used some of the battery adhesive removed earlier to attached the screw to the driver. Wax would probably work better if I’d had some.
I used the PH00 head to unscrew what they call the “1.1 mm Tri-point Y00 screw”, NOT the Y00 head, and it unscrewed perfectly fine.
Agreed, my screw was a PH00.
I have an early 2015 MacBook and it was a PH00 head I needed to use.
-
-
-
Avec le bout plat d'une spatule, déconnectez le support de la nappe du port USB-C en le soulevant de la carte mère.
Emphasis on aligning the bracket correctly. What the pictures do not show is that underneath the flat part of the metal bracket (the area between the two screw holes) is a connector that needs to be accurately aligned. Aligning the two screw holes does not imply that the connector is seated correctly.
After I re-assembled my 2015 MacBook power would not come on. I thought I had damaged the logic board despite being careful and following instructions. Diagnosing the problem took a while. Retracing the steps and focusing on power supply I was able to determine that the metal flap which hides the connector underneath had not made proper contact.
What I did was to use a finger to get a tactile feel for the connector underneath the metal bracket aligning properly and then press down vertically when it seemed to be aligned. It’s a subtle tactile feel. After re-doing this step, I got power back. Be careful not to damage the connector as noted in the instructions.
Good tip. It’s so easy to damage these fragile connectors by forcing the plug in and reattaching the mounting plate screws
-
-
-
Déconnectez la nappe de la carte audio jack en le tirant tout droit hors de son connecteur ZIF.
The audio jack cable is a bit of a pain to reinsert. I found if I turned the screen and the bottom on its side, like an open book, I had much better orientation and it was much easier to insert.
Excellent guide and all works like a sharm, but was one issue. After full assemble there wasn't sound. Then I open Macbook again and disconnect and connect audio cable. You must insert cable so, that white stripe will not visible. And sound reveal!
This helped me, thanks!
-
-
-
Avec des pincettes, décollez le ruban adhésif noir qui couvre le connecteur de la nappe de l'écran.
-
-
-
Si c'est le cas, maintenez le volet avec une spatule pendant que vous décollez le ruban adhésif avec les pincettes.
-
-
-
Déconnectez la nappe en la tirant gentiment hors de son connecteur.
A step was skipped. You have to flip up the metal locking tab on the socket before the cable can be removed. See the photo.
And be careful when re-inserting the connector. One end of the two indentations got a little bent (I did not notice) which resulted in a black screen when powering up. I used a heat gun (low setting) to separate the cable from the labtop housing. When re-assembling, first insert the connector (after closing the metal flap as instructed), verify that it’s properly seated, then re-attach the rest of the cable to the laptop housing. In the first try, I first re-attached the cable to the housing, then tried to insert the cable connected into the metal socket. Because of a lack of slack, the cable connector at one end got bent slightly. After identifying the problem, I had to straighten it/unbend out using my fingers. Hence it is easier to insert the connector first, then attach the rest of the cable to the laptop housing.
Black screen upon reboot:
Inserting the display ribbon cable into it’s contact without closing the metal flap before reassembly will result in a black screen.
I live in a colder climate (and it's winter now) - a hair dryer was absolutely necessary to get this cable loose.
The flap must remain closed when the cable is reinserted during reassembly. Carefully line up the cable with the gold contacts facing down, and gently slide it into the connector.
OK, when I read those directions, I did it wrong. I followed the instructions and kept the flap closed when the cable was reinserted during reassembly. Of course I got a blank screen. It should read the flap must be closed AFTER the cable is reinserted during reassembly.
-
-
Cette étape n’est pas traduite. Aidez à la traduire
-
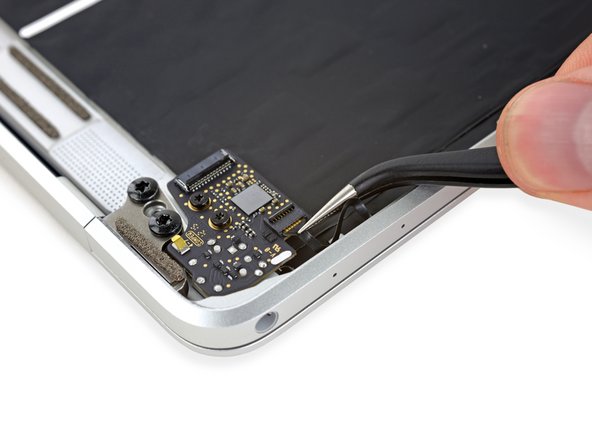
Use a spudger to flip open the ZIF connector retaining flap for the dual microphone assembly ribbon cable.
Does unplugging the "dual microphone assembly ribbon cable" affect anything other than the microphones? The headphone jack is separate, for example, right?
Right. We haven't tested it, but unplugging that cable shouldn't affect anything other than the microphones. You can see the microphone assembly in this guide.
-
-
Cette étape n’est pas traduite. Aidez à la traduire
-
Use tweezers to pull the microphone assembly ribbon cable free of its connector.
I broke the microphone assembly ribbon cable, from step twenty five. Is there anyway to fix this, soldering kit, or can I order a new cable online?
-
-
Cette étape n’est pas traduite. Aidez à la traduire
-
Remove the two 3.2 mm T5 Torx screws securing the audio jack board to the case.
-
-
Cette étape n’est pas traduite. Aidez à la traduire
-
Remove the audio jack board.
-
-
Cette étape n’est pas traduite. Aidez à la traduire
-
Remove the single 4.3 mm Phillips #00 screw securing the USB-C port ribbon cable.
-
-
Cette étape n’est pas traduite. Aidez à la traduire
-
Unfold the USB-C port ribbon cable until it lays flat, allowing access to the bracket beneath.
my a1534 had slightly different connector 821-00828-A an it had two torx screws attaching it
-
-
Cette étape n’est pas traduite. Aidez à la traduire
-
Lift and remove the metal bracket securing the USB-C port ribbon cable connector.
-
-
Cette étape n’est pas traduite. Aidez à la traduire
-
Use a spudger to disconnect the USB-C port ribbon cable by prying the connector straight up.
-
Pry from the side nearest the back edge of the MacBook.
-
Remove the ribbon cable.
-
-
Cette étape n’est pas traduite. Aidez à la traduire
-
Fully open the display.
-
Set the MacBook down on its right edge with the display facing away from you, as shown.
-
-
Cette étape n’est pas traduite. Aidez à la traduire
-
Remove the four 4.8 mm T8 Torx screws securing the display hinges.
On an early 2015 model, I found the T9 Torx bit to be too tight a fit in the hinge screw heads. Almost to the point where one screw head got slightly damaged as the bit slipped when turning as it hadn’t gone in far enough. This is the T9 bit that came with the iFixIt 64 bit driver kit.
So I used the T8 bit instead and managed to loosen the other screws much more easily. It’s a slightly looser fit but it goes in further and didn’t slip even though the screws on this particular machine were very very tightly screwed in.
@cool_breeze I think you’re right and this is probably a mistake in the guide. Apple commonly uses T8 screws, T9 not so much. But it can be hard to tell for sure depending on which toolkit you happen to be using. I’ll update the text to say T8! Thanks for the heads-up.
-
-
Cette étape n’est pas traduite. Aidez à la traduire
-
Holding the display assembly with one hand and the upper case with the other, push them together slightly to move the hinges out of their recesses in the the upper case.
-
Push the upper case forward while pulling back gently on the display.
-
Once the two display hinges have cleared the upper case, remove the display and set it aside.
How long does it take usually before you should hear the chime? Any way to test that the USB-C has been properly plugged backed in before reassembling everything?
-


Annulation : je n'ai pas terminé ce tutoriel.
47 autres ont terminé cette réparation.
Merci à ces traducteurs :
8%

Ces traducteurs nous aident réparer le monde ! Vous voulez contribuer ?
Commencez à traduire ›

20 commentaires
thank you: very good and clear guiding through
Is there a guide to replace the LCD without replacing the entire shell with housing? Replacements for the LCD only are alt cheaper than buying the entire thing.
MrNewbhero - You probably can replace it without a full clamshell, however, be advised that the front glass acts as a part of the LCD and the layers underneath are just backlight pieces and so on. It's a very difficult job for a DIY
This repair is so nervewreaking. I suggest everyone to take your time and really make sure you're not rushing it, or you may break the connectors, as there's tape on everything almost breaking the connector when you remove the flex cable.
My screen bezel is tearing apart in pieces and got no damage, drop or else, since day 1 I use a UrbanArmor cover, how can I change it, I bought a replacement in eBay.
Is this valid for the 2016 model? Does the 2016 model use the same display assembly replacement?
Regards
The procedure is very similar on the 2016 model, with a few minor differences (screw types, etc). Some differences are documented here, but following this guide should get you 99% of the way there. I'm not sure whether the display itself is compatible/interchangeable between model years.
Ive just done a screen replacement after my son spilled tea over it. The MacBook was still functioning, sound, booting up etc but the screen was dead. Ive just replaced the screen, all works fine, but now the trackpad and keyboard are not working/no power and the trackpad is getting very hot. Does the trackpad send power to the keyboard in this design as it seems like the only link to via a cable.
I changed the screen but now it won’t start anymore. Any ideas ?
There’s an alternate way to replace the display assembly shown in a YouTube video from a UK company. It's seemingly a lot less steps, easier, and much quicker. I followed it successfully, so I’m not sure why there is such a big difference between their procedure and this one…
I think you were lucky. In that video they do not disconnect the battery, they pry apart ZIF connectors with a screwdriver, they reconnect the TCON cable incorrectly, they skip the 5W charging procedure—all good ways to brick your device. Glad it worked out for you, but I would not recommend anyone follow that example.
I did the repair and all works except the when i click the trackpad little harder the screen goes off and i press it again goes on. Is this the battery connector or any suggestions?
Hi, I did the tutorial and everything worked out except for one thing. My Macbook isn’t detecting when I close it and open it. I would like some help, does anyone know how to solve it?
I broke the microphone assembly ribbon cable, from step twenty five. Is there anyway to fix this, soldering kit, or can I order a new cable online?
Excellent guide, as always with I fix it. I always come to your site even for repairs I’m used to just for the screws refs/colors etc which are so convenient.
But now I’m not starting a repair without you since as years go by you keep adding really precious notes and info (I.e in this guide, to power the 2015 models with a phone charger first), which along with all the hi-res pictures makes you the apple products repair authority by far! THANK YOU!
excellent explained! thanks. i. hav the problem that my webcam doesn’t work anymore. I don’t understand why. i’ve tried the Sudo killall in terminal the pram the nvram resets. but he doesn’t find my webcam. does someone know what the problem/damage is? thanks!
Everything worked except that when I finished, I discovered that I had no sound and internal speakers does not appear as an option in the sound pane in System Preferences. So I assume I must have accidentally disconnected something but I am not see anything. Any clue what I missed and how to fix this?
Hi my screen had a column of about 3 cm wide that sometime come more dark than the rest of the display, near the center of the MacBook.
I saw that this column with some micro movement of the display sometime goes off. So I had assumed that the problem could be the flex cable that connect the display assembly to the logic board, it's possible or the problem is the lcd itself?
If, like me, you didn’t have a P5 Pentalope screwdriver but did have one that fits an iPhone.
You can sand down the tip until it’s the right size.
Stuart - Réponse
Thank you Stuart! I would never have thought of this and it worked perfectly.
R McP -
Hello,
where do I plug the USB-C to USB-A cable on MacBook MacBook Pro (Retina, 15-inch, Mid 2015)
I can’t any port suitable for USB-c !??
sissi - Réponse
My MacBook had P4 pentalobe screws, notP5
Greg Lavardera - Réponse
Big thanks to Jeff for such thorough and detailed instructions. This is definitely a more advanced repair so if you're not comfortable with making such repairs, like having experience working on iPhones, computers, etc., you might think twice before attempting. It's very helpful to read all the instructions thoroughly before starting. Plan on 3 to 4 hours—the battery removal along with its adhesive is a real $@$*-show, but totally doable if you followed Jeff's recommendations.
I'll post a few tips in the comments on each step that I think is worth noting but I will mention here one of the trickier steps. ZIF connectors on the flat cables can be a little tricky, especially if you have never done these. Before attempting to do the first one (step 8) review the others in steps 16, 20, and 25. You'll get a better sense of how these little retaining flaps flip up and what they actually look like when you study each photo in each step—they are very tiny and fragile.
Steven Gibson - Réponse
Just finished replacing the battery. I followed the directions that came with the battery instead of this guide. In short, Steps 15 to 35 are not necessary. You don't have to completely disassemble the laptop to replace the battery.
Andrew Mohan - Réponse
Thanks. I skipped it too and it worked.. It was a painstaking to remove the two side batteries as the cables were connected. But a little patience gets the job done. I did however remove the audio jack connector but from the audio board. Removed the display connector and the usb-c bracket to get the bottom case free.
Paras Tolani -
READ EVERY STEP, AND EVERY COMMENT FOR THAT STEP BEFORE ATTEMPTING! Go slow. Think first. Be organized. No probs.
David Nagle - Réponse