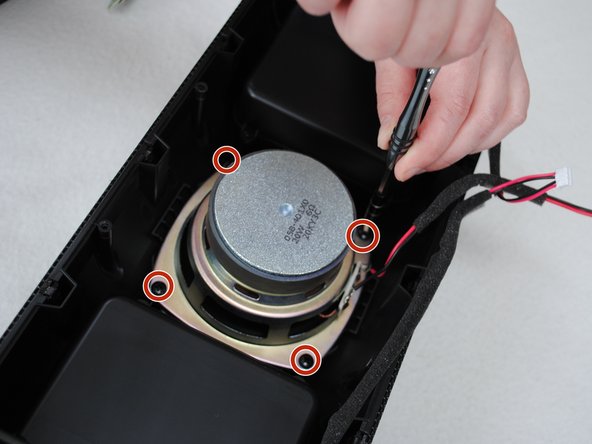
Aller au contenu principal

Rocketfish RF-WSP313 Speaker Replacement

Ce dont vous avez besoin

  1. Rocketfish RF-WSP313 Speaker Replacement, Speaker: étape 1, image 1 de 1
    • Using the metal spudger, remove the outer cap from the top of the device.

  2. Rocketfish RF-WSP313 Speaker Replacement: étape 2, image 1 de 1
    • Using a Phillips # 1 screwdriver, remove the four 1.1 cm flathead screws attaching the metal ring to the top of the device.

  3. Rocketfish RF-WSP313 Speaker Replacement: étape 3, image 1 de 1
    • Remove the ring and set aside.

  4. Rocketfish RF-WSP313 Speaker Replacement: étape 4, image 1 de 1
    • Using the metal spudger, remove the cap from the bottom of the device.

  5. Rocketfish RF-WSP313 Speaker Replacement: étape 5, image 1 de 1
    • Using a Phillips # 1 screwdriver, remove the four 1.1 sm screws attaching the metal ring to the bottom of the device.

  6. Rocketfish RF-WSP313 Speaker Replacement: étape 6, image 1 de 1
    • Remove the ring and set aside.

  7. Rocketfish RF-WSP313 Speaker Replacement: étape 7, image 1 de 1
    • Using a Phillips # 1 screwdriver, remove the four 1 cm screws from the outside panel. You will do this for each panel; it does not matter which side you start with.

  8. Rocketfish RF-WSP313 Speaker Replacement: étape 8, image 1 de 1
    • Using the metal spudger, pry off the side panel. Repeat this step on the other side panel.

  9. Rocketfish RF-WSP313 Speaker Replacement: étape 9, image 1 de 1
    • Using a Phillips #1 screwdriver, remove the four 1.1 cm flathead screws from the side of the device. Repeat this step on the other side of the device.

  10. Rocketfish RF-WSP313 Speaker Replacement: étape 10, image 1 de 2 Rocketfish RF-WSP313 Speaker Replacement: étape 10, image 2 de 2
    • Using the metal spudger, open the device.

  11. Rocketfish RF-WSP313 Speaker Replacement: étape 11, image 1 de 2 Rocketfish RF-WSP313 Speaker Replacement: étape 11, image 2 de 2
    Outil utilisé dans cette étape :
    Tweezers
    $4.99
    J'achète
    • Using your fingers (or a pair of tweezers), disconnect the speaker cord from its socket.

  12. Rocketfish RF-WSP313 Speaker Replacement: étape 12, image 1 de 1
    • Using a Phillips #1 screwdriver, remove the four 1.2 cm pan head screws surrounding the speaker.

  13. Rocketfish RF-WSP313 Speaker Replacement: étape 13, image 1 de 1
    • Remove the speaker from the device.

Conclusion

To reassemble your device, follow these instructions in reverse order.

Kara Falknor

Membre depuis le 01/25/17

101 Réputation

1 tutoriel rédigé

Équipe

Washington State, Team 1-50, Staggers Spring 2017 Membre de l'équipe Washington State, Team 1-50, Staggers Spring 2017

WSU-STAGGERS-S17S1G50

2 membres

1 tutoriel rédigé

0 commentaires

Ajouter un commentaire

Nombre de vues :

Dernières 24 heures : 2

7 derniers jours : 12

30 derniers jours : 19

Total : 570