Ce dont vous avez besoin
-
-
Use the metal spudger to pry the face screen open. Pull away from the device to remove.
-
-
-
Use the spudger to remove the speaker host plate. Insert the metal tip in the seam between the host plate and the shell.
-
Center the spudger on the top of the device, this is furthest from the wiring, in wiggling the spudger under the plate, the plate should move up and out of the shell, you can finish lifting the plate away with your fingers.
-
-
-
-
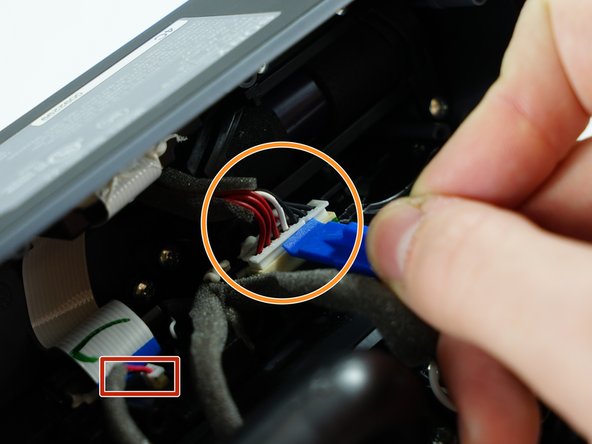
Unplug the power cable connector shown using the plastic opening tool. Wiggle the tool under the lip of the plug, the smaller area and odd angle means lifting up with the plastic tool in the setup shown.
-
Unplug the power connector shown using the plastic opening tool lift from the front of the plug shown and move the opening tool to either side to get it all the way out of the socket.
-
-
-
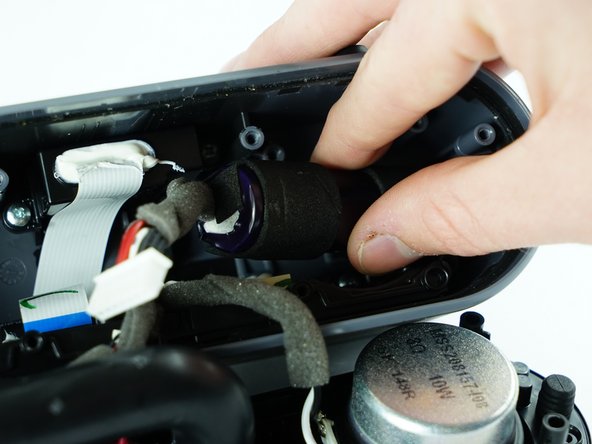
Remove the battery cover plate carefully then proceed to remove the battery.
grazie. faccio notare che nel mio sony SRS-X2 posizione e dimensioni nelle viti non corrisponde. consiglio farsi uno schema per non perdere tempo nel montaggio
-
-
-
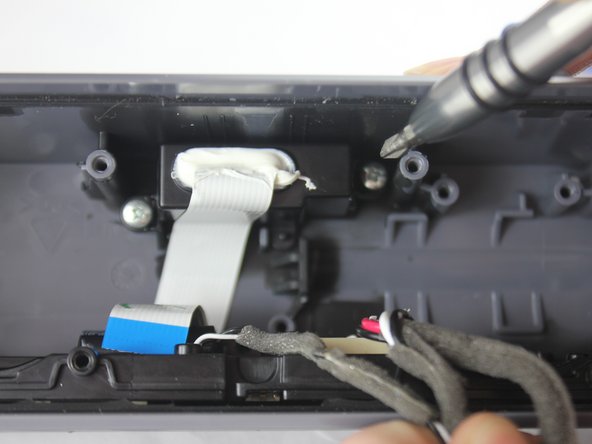
Use PH1 screwdriver to remove two 11mm Phillips #1 screws on the charger port.
-
Gently pull out the charger port with fingers for replacement.
-


To reassemble your device, follow these instructions in reverse order.
To reassemble your device, follow these instructions in reverse order.
Annulation : je n'ai pas terminé ce tutoriel.
5 autres ont terminé cette réparation.
Équipe

USF Tampa, Team 3-3, Sullivan Fall 2016 Membre de l'équipe USF Tampa, Team 3-3, Sullivan Fall 2016
USFT-SULLIVAN-F16S3G3
4 membres
6 tutoriels rédigés
9 commentaires
My SRS-X2 will connect via bluetooth, I can hear for the sound briefly then stops. I know it still connected because the sound from my laptop is off, until I switch off the SRS to restore sound on my laptop.
If anyone experienced the same and have idea how to fix it, please notify me.
Does anybody know where to get a charger port?
This is very helpful in taking the speaker apart but as others have asked, where can I get a replacement part? I searched and searched till I was blue in the face and finally found a sight that sent me to a 1-800 number that supposedly sold Sony replacement parts. They were unable to find the model number, let alone a parts list. I managed to get the sub-assembly apart that has the defective USB charging port on it and now I have to find the correct replacement USB port so it can be replaced. If I’m successful I’ll add a post. It would be wonderful if someone could come up with a Sony part number for the sub-assembly. The serial number on mine is 00044, so I suspect it is an early production of the SRS-X2.
This is a follow up from my last post. Background disclaimer: In 1958 I was trained as an electronic teck for the USCG.. That was in the days of vacuum tubes and stuff you could actually repair. So, after much searching I found a USB port that looked like it might work. After waiting for it to arrive from China I tried to remove the port and managed to destroy what was left of it in the process. The new port I ordered looked might it might fit but in the end the mounting studs were not in the right place so they didn’t work. I made a second try at ordering a USB port from the the US this time but in the end they didn’t fit either. My annalist of the problem: There is a design flaw in these units. The USP port rely’s on nothing more than the physical contact of the port contacts mating with printed circuit board strips to conduct the 5V from the charger to the rest of the unit.
More to the above — I don’t think that the problem in the USP port itself but the loss of connection between the port and the PC board. In desperation I tried the following: I cut the end from the of the charging cable off the unit that came originally with the unit. I had found on the charging sub assembly two solder points marked 6+ and 6-. I checked the polarity of the wires from the charging unit (6+ is marked with a white stripe) and soldered them in place. I checked for voltage in various places and was satisfied that all was well. When I had it all together and plugged in I got no indication that the battery was charging or that the unit would work. So the final result is that while this is a nice unit with remarkably good sound the thing will end up in the junk pile. I think I’ve given it my best shot and there it will have to end. Lot’s of luck. If you find a better solution e-mail me at rector@nbnet.nb.ca