Aller au contenu principal

SONY SRS-X2 Face Plate Replacement

Conditions préalables uniquement
Ce tutoriel est uniquement destiné à être utilisé comme prérequis d'autres tutoriels. Il ne se suffit pas à lui-même.

Ce dont vous avez besoin

  1. SONY SRS-X2 Face Plate Replacement, Face Plate: étape 1, image 1 de 2 SONY SRS-X2 Face Plate Replacement, Face Plate: étape 1, image 2 de 2
    • Use the metal spudger to pry the face screen open. Pull away from the device to remove.

  2. SONY SRS-X2 Face Plate Replacement: étape 2, image 1 de 2 SONY SRS-X2 Face Plate Replacement: étape 2, image 2 de 2
    • Remove seven, 27 mm long Phillips #1 screws.

    • Remove three, 11mm long Phillips #1 screws.

    • Remove four, 10 mm long Phillips#1 screws.

  3. SONY SRS-X2 Face Plate Replacement: étape 3, image 1 de 2 SONY SRS-X2 Face Plate Replacement: étape 3, image 2 de 2
    • Before removing the host plate, face the feet of the speaker to you. The wiring allows for minimal access to the inner components.

    • Use the spudger to remove the speaker host plate. Insert the metal tip in the seam between the host plate and the shell.

    • Be very careful when pulling the speaker host plate (described in the next step) as there are wiring connected to the host plate. This wiring is soldered to the plate and to the shell of the device. The wires are flexible and you can still open the device as shown in the second picture.

    • Center the spudger on the top of the device, this is furthest from the wiring, in wiggling the spudger under the plate, the plate should move up and out of the shell, you can finish lifting the plate away with your fingers.

  4. SONY SRS-X2 Face Plate Replacement: étape 4, image 1 de 2 SONY SRS-X2 Face Plate Replacement: étape 4, image 2 de 2
    • Be gentle when using the opening tool, wiggle the opening tool on each side of the socket to be sure the plastic does not snap.

    • Be careful not to damage the wires, pull from the plastic base to unplug.

    • Unplug the power cable connector shown using the plastic opening tool. Wiggle the tool under the lip of the plug, the smaller area and odd angle means lifting up with the plastic tool in the setup shown.

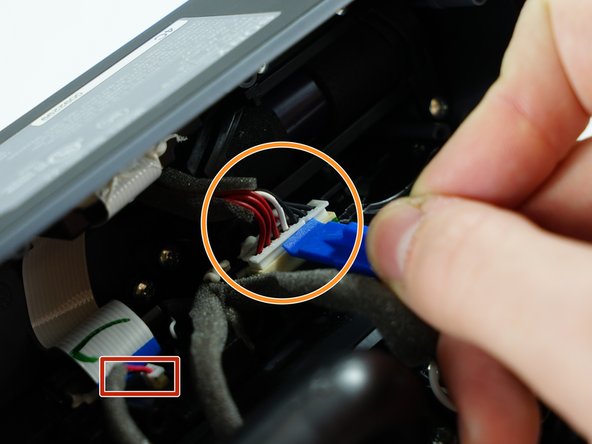
    • Unplug the power connector shown using the plastic opening tool lift from the front of the plug shown and move the opening tool to either side to get it all the way out of the socket.

Conclusion

To reassemble your device, follow these instructions in reverse order.

Megan Berthiaume

Membre depuis le 10/04/16

484 Réputation

3 tutoriels rédigés

Équipe

USF Tampa, Team 3-3, Sullivan Fall 2016 Membre de l'équipe USF Tampa, Team 3-3, Sullivan Fall 2016

USFT-SULLIVAN-F16S3G3

4 membres

6 tutoriels rédigés

0 commentaires

Ajouter un commentaire

Nombre de vues :

Dernières 24 heures : 0

7 derniers jours : 0

30 derniers jours : 0

Total : 36