Introduction
The STB-101 Miele Turbo Mini TurboBrush can get clogged with hair and fibres over time. This will show you how to fully disassembly and clean the unit.
Ce dont vous avez besoin
-
-
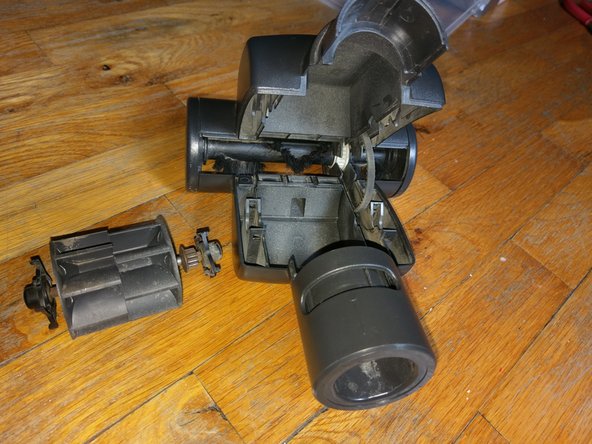
Here is a photo of the entire unit fully disassembled. Most of the hair we need to get at is inside the ends of the brush axle (bottom left of photo).
-
I recommend using a medium-large safety pin to dig out the hair/fibres, a pair of scissors to cut the hair off of the brush, and a flat head screw driver to pry the black plastic end caps off with. You may need a small hammer for reassembly.
-
There are no screws. Most pieces are held together by plastic pressure. Be careful not to break any plastic clips or pieces or you will need to buy a new unit.
-
To prevent having to disassemble this unit often, always take a few minutes to cut any hair/fibre off of the brush after each use.
-
Disassembly and cleaning should take from 30-45 minutes, depending on how much hair is stuck in the unit.
-
-
-
Following the instructions in your manual open the unit up. You line up the arrows, push the little plastic button, and slide the rotating cuff up. This should allow the top half of the unit to hinge upwards as shown in this photo.
-
-
-
Now we remove the part that makes the unit spin. The fins are pulled by the vacuum suction and rotate the belt that moves the brush. To remove the Fin assembly, gently squeeze the little black plastic clips on either side. This does not take much force, do it gently as if you break the clips there is no way to repair them.
-
-
-
This is probably the hardest part of the disassembly, certainly the least intuitive. The end caps hold the whole unit together and are just popped in. Gently pry them off pulling them by hand, rotating as much as you can, and then using a small flat-headed screwdriver to pry them off. This will take a little pressure and work.
-
The caps are held on at the centre (see the middle of caps in the photo). This is where you want to focus the pressure when prying. Be careful of plastic clips but apply assertive pressure to pop them off.
-
-
-
-
The top half of the unit that hinges upward can be removed by gently bending the plastic edges outward. You should be left with the bottom half and brush assembly as shown in the photo.
-
-
-
Just like the top half, the bottom half of the unit can be removed by gently bending the plastic fins on either side outward and sliding it off of the brush assembly. You will be left with what is shown in the photo.
-
-
-
To remove the brush axle from the brush assembly, pull the little white plastic end cap outward slightly (see second photo). Then you can just pull the brush axle out.
-
-
-
The unit is now fully disassembled! Clean all the parts. I recommend using a large safety pin. Dig all of the hair/fibres out of the ends of the brush axle and white axle caps especially. Cut all the hair off of the brush unit using scissors. Once everything is clean, use your vacuum to clean all the remaining dust and leftover hair.
-
-
-
Just follow the steps in reverse.
-
Fit the belt onto the white gear on the brush assembly. With white end cap pulled out, fit the brush axel into the brush assembly, make sure the belt is in the right place and runs freely. Push the white end cap closed.
-
-
-
Attach the bottom half of unit gently over white end caps.
-
Attach the top half of the unit gently over white end caps.
-
Push the black side caps into place. You may have to gently hammer these on so that they "pop" in. Make sure they are in the right place so you don't break off the little plastic tabs inside.
-
-
-
Put the belt around the Fin unit. make sure the belt can run freely.
-
Gently squeeze the plastic clips to allow them to clip the fin unit into place. Note, these clips fit in in a "vertical" orientation (longest from top to bottom) and the middle part of the clip is what holds the unit in place. Be gentle and do not break this.
-
The top hinge should close easily.
-
-
-
Hooray! Your Turbo Mini is now as good as new! Just like this stock photo!
Nice and clear!
Fab, thanks guys ? took a fair bit longer to clean all the hair out but instructions were invaluable ?
Hilfe!!
Habe die Bürste nach Anweisung gereinigt…. Obwohl Riemen etc…. richtig sitzen dreht sich die Bürste nicht mehr, sobald ich das Oberteil aufsetze!?!!
Ohne Oberteil lässt es sich mit dem Finger leicht drehen!!
Was mache ich falsch??
Vielen Dank im Voraus für die Hilfe. ?
Liebe Grüße
Natascha
-


To reassemble your device, follow these instructions in reverse order.
To reassemble your device, follow these instructions in reverse order.
Annulation : je n'ai pas terminé ce tutoriel.
20 autres ont terminé cette réparation.
16 commentaires
Excellent guide, clear and helpful.
I don’t think there’s any need to remove the turbo fan until after the cover is off.
As you say removing the end caps is the hardest bit, and it’s worth saying at the start that they are held on by the studs at the centre, and only the studs, (so people don’t start trying to lever them off at the edge. I don’t think rotating makes any difference.
Note that the two white pieces at each end of the roller are different - the longer one fits in the end with the deeper hole.
But - Thank- you! - as the end pieces are so reluctant to come off that I had previously given up trying to dissemble it.
I’d given up on mine working and just looking at it didn’t exactly inspire me how to disassemble it. (I was looking for screws.) Luckily this popped up (I never would have thought something like this would be on ifixit but here we are…) on a web search.
Well explained and now my mini vacuum head is spinning like a champ again. Thanks much.
My first instinct was to check YouTube, but this was the best set of instructions I found. Worked perfectly. Thank you!
Excellent guide, thank you! My Turbobrush wasn’t working and after following this guide, it is as good as new!
Fantastic, instructions were invaluable and I managed to take it all apart, clean and put it back together again, no problem Thank you ??
Great guide! I was about to buy a new turbo brush unit when I ran across these instructions. They are clear, simple and easy to follow. After cleaning carefully, especially around the steel ends of the brush axle (it took some digging to get all the matted hair and fibrous dirt out), the brush rotates freely and smoothly. It’s like a new unit! And I saved quite a bit of money. Thanks!
Excellent guide. However I am unable to put the end caps on again. I have been trying for days, no luck. Any suggestions?
Helen, I put both caps on one time. You have to press hard, than it will klick in again.
Herzlichen Dank für die tolle Anleitung. Mein Antrieb war verklemmt durch ein elastisches Gummiseil von einem Katzenspielzeug und die Bürste hat sich nicht mehr bewegt. 10 Minuten und alles läuft wieder wie Neu!
Great instructions! Thanks for this very helpful tutorial. One refinement: the best tool for digging out the hair at the ends of the brush axle is not a safety pin, but a sewing stitch ripper. You’ll get a lot more control and strength. This is great for cutting hairs off any power brush, too. Once you run the stitch ripper along the brush, you can pull them out easily.
Brilliant - wouldn’t have had much of a clue how to get past Step No 2 to fix a seized brush without these instructions. As others have also pointed out a flat bladed screw driver is needed to remove the end caps not a Philips one. Incredible to see how much “grot” had got into the works. Didn’t need to use a hammer to refit the end caps - just firm pressure with the brush axis vertical. Thanks for posting this.
Perfect- thank you. Helpful and detailed descriptions and clear pictures.
excellent! keep going