Aller au contenu principal

Samsung ATIV Book 9 Plus Wi-Fi Card Replacement

Ce dont vous avez besoin

  1. Samsung ATIV Book 9 Plus Wi-Fi Card Replacement, Back Cover: étape 1, image 1 de 3 Samsung ATIV Book 9 Plus Wi-Fi Card Replacement, Back Cover: étape 1, image 2 de 3 Samsung ATIV Book 9 Plus Wi-Fi Card Replacement, Back Cover: étape 1, image 3 de 3
    • Turn the laptop upside down so that the underside of the laptop is facing you.

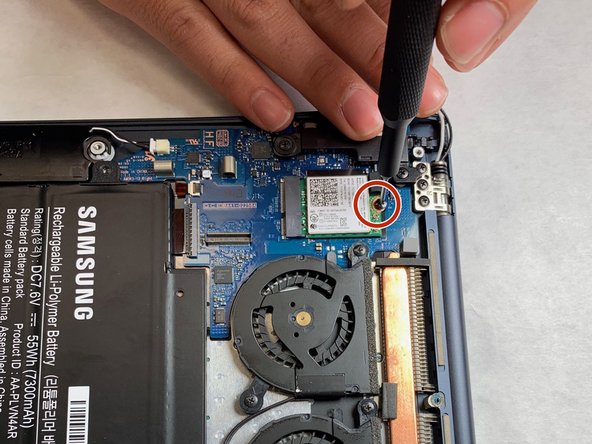
    • Use a Phillips #000 screwdriver to unscrew the 4.3 mm screws located on the edges and corners of the laptop.

  2. Samsung ATIV Book 9 Plus Wi-Fi Card Replacement: étape 2, image 1 de 1
    • Lift the cover to reveal the interior of the laptop.

  3. Samsung ATIV Book 9 Plus Wi-Fi Card Replacement, Wi-Fi Card: étape 3, image 1 de 1
    • Gently pull off both cables attached to Wi-Fi card.

  4. Samsung ATIV Book 9 Plus Wi-Fi Card Replacement: étape 4, image 1 de 1
    • Unscrew the labeled screw using a Phillips #000 screwdriver.

  5. Samsung ATIV Book 9 Plus Wi-Fi Card Replacement: étape 5, image 1 de 1
    • Pull Wi-Fi card out to completely detach it.

Conclusion

To reassemble your device, follow these instructions in reverse order.

Ryan Smith

Membre depuis le 04/01/19

193 Réputation

2 tutoriels rédigés

Équipe

IUPUI, Team S7-G7, Wilson Spring 2019 Membre de l'équipe IUPUI, Team S7-G7, Wilson Spring 2019

IUPUI-WILSON-S19S7G7

3 membres

2 tutoriels rédigés

0 commentaires

Ajouter un commentaire

Nombre de vues :

Dernières 24 heures : 0

7 derniers jours : 6

30 derniers jours : 10

Total : 722