Aller au contenu principal

Samsung Chromebook XE550C22 Cooling Fan Replacement

Ce dont vous avez besoin

  1. Samsung Chromebook XE550C22 Cooling Fan Replacement, Back Panel: étape 1, image 1 de 3 Samsung Chromebook XE550C22 Cooling Fan Replacement, Back Panel: étape 1, image 2 de 3 Samsung Chromebook XE550C22 Cooling Fan Replacement, Back Panel: étape 1, image 3 de 3
    • Turn the power off before beginning this step.

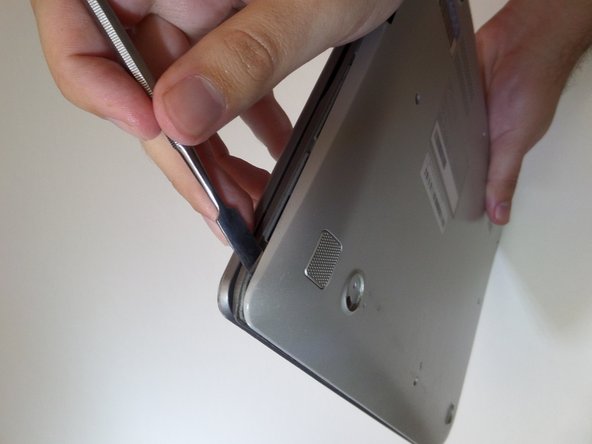
    • Using the spudger, remove the four 1/2 inch skid pads from the back of the laptop.

  2. Samsung Chromebook XE550C22 Cooling Fan Replacement: étape 2, image 1 de 2 Samsung Chromebook XE550C22 Cooling Fan Replacement: étape 2, image 2 de 2
    • Remove the eight 7mm screws using the J0 Screwdriver.

  3. Samsung Chromebook XE550C22 Cooling Fan Replacement: étape 3, image 1 de 3 Samsung Chromebook XE550C22 Cooling Fan Replacement: étape 3, image 2 de 3 Samsung Chromebook XE550C22 Cooling Fan Replacement: étape 3, image 3 de 3
    • Starting at the center front of the laptop, insert the metal spudger between the keyboard panel and the bottom panel, separating the bottom panel from the laptop.

    • Continue prying around the sides to release more brackets.

  4. Samsung Chromebook XE550C22 Cooling Fan Replacement: étape 4, image 1 de 2 Samsung Chromebook XE550C22 Cooling Fan Replacement: étape 4, image 2 de 2
    • After deconnecting all the brackets, pull the back panel away from the laptop.

    • Note: The back panel has some flex to it, don't be afraid to use some force.

  5. Samsung Chromebook XE550C22 Cooling Fan Replacement, Battery: étape 5, image 1 de 2 Samsung Chromebook XE550C22 Cooling Fan Replacement, Battery: étape 5, image 2 de 2
    • Remove the four 3mm screws holding the battery with the J0 screwdriver.

  6. Samsung Chromebook XE550C22 Cooling Fan Replacement: étape 6, image 1 de 2 Samsung Chromebook XE550C22 Cooling Fan Replacement: étape 6, image 2 de 2
    • Lift the battery up at an angle to disconnect the battery from the motherboard, then pull it away from the laptop.

    • Do not lift the battery straight up. This will damage the battery's connectors.

  7. Samsung Chromebook XE550C22 Cooling Fan Replacement, Cooling Fan: étape 7, image 1 de 1
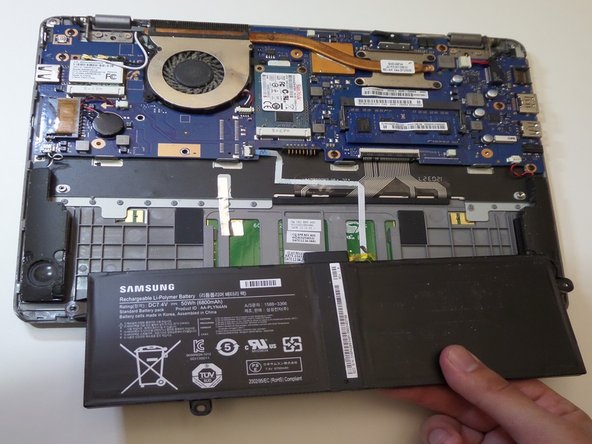
    • Locate the cooling fan and the heat sink on the top center of the Chromebook.

  8. Samsung Chromebook XE550C22 Cooling Fan Replacement: étape 8, image 1 de 3 Samsung Chromebook XE550C22 Cooling Fan Replacement: étape 8, image 2 de 3 Samsung Chromebook XE550C22 Cooling Fan Replacement: étape 8, image 3 de 3
    Outil utilisé dans cette étape :
    Tweezers
    $3.99
    J'achète
    • Rotate the Chromebook 180 degrees so the fan is closest to you, and locate the fan power cable.

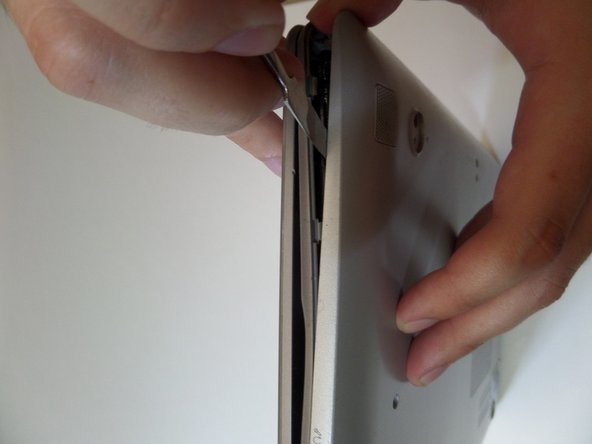
    • Disconnect the fan cable from the motherboard with the angled tweezers.

    • Be gentle and do not pull out the fan cable with excessive force. It will result with a non-working cooling fan and a damaged wire.

  9. Samsung Chromebook XE550C22 Cooling Fan Replacement: étape 9, image 1 de 3 Samsung Chromebook XE550C22 Cooling Fan Replacement: étape 9, image 2 de 3 Samsung Chromebook XE550C22 Cooling Fan Replacement: étape 9, image 3 de 3
    • Remove four identical 6mm screws from the heat sink labelled CPU using the J0 screwdriver.

    • Using your hands, gently lift up and pull away the heat sink.

  10. Samsung Chromebook XE550C22 Cooling Fan Replacement: étape 10, image 1 de 3 Samsung Chromebook XE550C22 Cooling Fan Replacement: étape 10, image 2 de 3 Samsung Chromebook XE550C22 Cooling Fan Replacement: étape 10, image 3 de 3
    • Remove the three identical 6mm screws from around the fan using the J0 screwdriver.

    • Using your hands, gently lift up the fan and pull it away from the laptop.

Conclusion

To reassemble your device, follow these instructions in reverse order.

Une autre personne a terminé cette réparation.

Linh Luu

Membre depuis le 09/11/17

312 Réputation

2 tutoriels rédigés

Équipe

CSU Fullerton, Team S2-G7, Bruce Fall 2017 Membre de l'équipe CSU Fullerton, Team S2-G7, Bruce Fall 2017

CSUF-BRUCE-F17S2G7

3 membres

14 tutoriels rédigés

0 commentaires

Ajouter un commentaire

Nombre de vues :

Dernières 24 heures : 0

7 derniers jours : 0

30 derniers jours : 5

Total : 416