Aller au contenu principal
Pour réparer ensemble - Je crée un compte

Samsung Galaxy Centura Lock and Volume Buttons Replacement

Ce dont vous avez besoin

  1. Samsung Galaxy Centura Lock and Volume Buttons Replacement, Battery: étape 1, image 1 de 2 Samsung Galaxy Centura Lock and Volume Buttons Replacement, Battery: étape 1, image 2 de 2
    • Locate the rectangular groove on the top side of the device.

    • Firmly press the tip of your index finger, or plastic opening tool into the groove, and pull back firmly. The device should pop open as shown.

    Demander à FixBot

    Ajouter un commentaire

  2. Samsung Galaxy Centura Lock and Volume Buttons Replacement: étape 2, image 1 de 3 Samsung Galaxy Centura Lock and Volume Buttons Replacement: étape 2, image 2 de 3 Samsung Galaxy Centura Lock and Volume Buttons Replacement: étape 2, image 3 de 3
    • With the back casing removed, the phone should appear as shown, with a clear view of the battery.

    • Gently pull the battery up with your thumb and index finger. It should come out without resistance.

    Demander à FixBot

    Ajouter un commentaire

  3. Samsung Galaxy Centura Lock and Volume Buttons Replacement, Lock and Volume Buttons: étape 3, image 1 de 1
    • Find the positions of the seven screws on the back of the device. Use the Phillips #00 screwdriver to remove these 5.0mm screws.

    Demander à FixBot

    Ajouter un commentaire

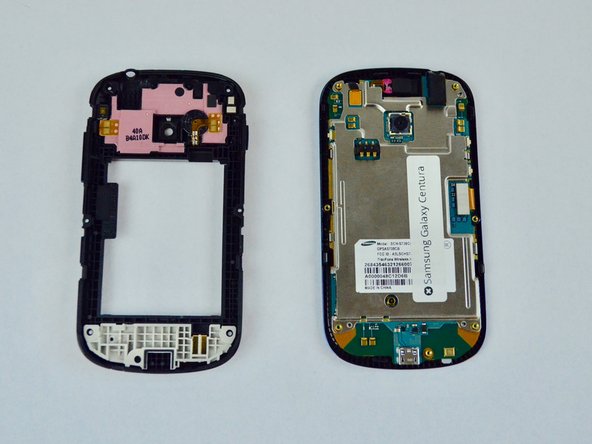
  4. Samsung Galaxy Centura Lock and Volume Buttons Replacement: étape 4, image 1 de 2 Samsung Galaxy Centura Lock and Volume Buttons Replacement: étape 4, image 2 de 2
    • Locate the indentation on the side of the device, and gently insert the plastic opening tool into it. With a firm prying motion, the plastic should begin to come apart.

    Demander à FixBot

    Ajouter un commentaire

  5. Samsung Galaxy Centura Lock and Volume Buttons Replacement: étape 5, image 1 de 1
    Outil utilisé dans cette étape :
    Tweezers
    $4.99
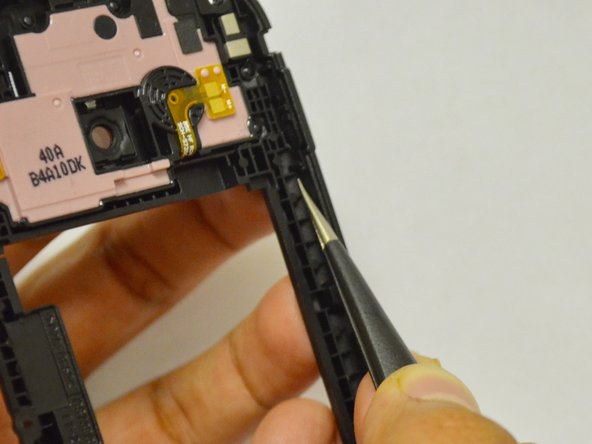
    • Locate the volume buttons on the plastic casing.

    • Gently pull the black tab up and out with the tweezers, then push or pull the button inward and out of the plastic casing. It should come free without resistance.

    Demander à FixBot

    Ajouter un commentaire

  6. Samsung Galaxy Centura Lock and Volume Buttons Replacement: étape 6, image 1 de 2 Samsung Galaxy Centura Lock and Volume Buttons Replacement: étape 6, image 2 de 2
    • Locate the lock button on the opposite side of the plastic casing.

    • Using the tweezers, pull the two horizontal tabs up and out of the plastic pegs that hold them in place.

    • Push the button inward and out of the plastic casing. This may require firm pressure to free it completely.

    Demander à FixBot

    Ajouter un commentaire

Conclusion

To reassemble your device, follow these instructions in reverse order.

Annulation : je n'ai pas terminé ce tutoriel.

Austin Erickson

Membre depuis le 02/28/17

360 Réputation

3 tutoriels rédigés

Équipe

USF Tampa, Team S2-G5, Nance Spring 2017 Membre de l'équipe USF Tampa, Team S2-G5, Nance Spring 2017

USFT-NANCE-S17S2G5

3 membres

11 tutoriels rédigés

0 commentaires de tutoriel

Ajouter un commentaire

Nombre de vues :

Dernières 24 heures : 0

7 derniers jours : 4

30 derniers jours : 28

Total : 553